Enhancements
![]()
Enhancements
Get the redesigned OpenAir user experience across new list views, new record headers, Administration settings, and view multi-currency monetary totals on list views.
Add a tag to your entity properties forms and display it on your list views, project status summaries, reports and dashboard portlets.
Copy the code samples to the clipboard in one click and benefit from improved format and syntax highlighting.
Set a custom field order for the Job code and Contact entities.
Configure OpenAir to use the currency set on the employee demographic form instead of the receipt currency for new expense reports when importing receipts from the American Express data feed.
Create and manage your resource bookings from within the Project center.
Get a clearer overview of your project with relationship lines, default columns and support for the built-in notes field.
The project center screen uses lazy loading, or loading “on demand” to load only the data you see on the screen as you interact with the tool.
With this optional feature enabled, in the incurred vs. forecast revenue recognition rule, the Estimated hours multiplied by user cost forecast is calculated using the loaded cost effective on the day work was delivered or work is planned.
Add the custom field Online Invoice and the ability to read the invoice URL using the OpenAir XML API, SOAP API and User Scripting.
Add support for saving the internal ID of the payment terms as well as the payment terms on the invoice record.
Filter time entries by timesheet status on time entries tabular (detail) reports.
The maximum number of daily time periods in crosstabbed (summary) reports can be changed to fit a whole month, 2–month period or quarter.
Add the Internal IDs of all time entry current approvers to your reports.
The OAuth 2.0 feature now supports Identity Provider initiated Single Sign-on for users authorizing an API integration application to access OpenAir on their behalf.
Request authorization for accessing OpenAir data using one or more OpenAir APIs.
Configure the access and refresh token lifetime, and enable, disable or remove multiple applications at the same time in the API integration applications administration screen.
Use the new OpenAir REST API to exchange Expenses information with OpenAir in your integration applications.
Update the rate card associated with a project record using OpenAir SOAP or XML API.
Add or update the project billing rule associated with a revenue recognition transaction rule using OpenAir SOAP or XML API.
Read the ID of the payment terms associated with an invoice using OpenAir SOAP or XML API.
OpenAir Business Intelligence Connector covers additional list views.
View and manage the list views you published to the OData service. Administrators and users with the View and modify all saved list views role permission can view and manage all published list views on the account from the Administration module.
Select the workflows you want to include in automated integration runs, manual integration runs, or full synchronization runs and safeguard workflows selected for scheduled or real-time integrations against unintended changes.
Double the speed of your integration with an optimized link between OpenAir and NetSuite.
Use the NetSuite 2020.1 communication endpoint for the NetSuite <> OpenAir integration and take advantage of its features.
Update your NetSuite bundles and use the NSOA Connector role for the integration straight out of the box.
Review whether there are any recommended actions to improve the NetSuite Connector configuration and to take full advantage of recommended features.
Speed up your Customers workflow by ensuring only that records are only included in the integration run if one or more integrated field values have changed.
View the status screen in a new browser tab and use column and advanced filters to refine the list of integration runs.
OpenAir Mobile 3.0 rolls out an intuitive new design for Timesheets, optimizes the layout for higher screen resolutions and improves data synchronization with your OpenAir account.
Get the same redesigned OpenAir Mobile user experience on iPhone and Android devices.
OpenAir Exchange Manager 5.1 adds support for OAuth 2.0 authentication and authorization to access Microsoft Azure Active Directory or Microsoft Exchange Online.
Stronger minimum password policy requirements are now enforced for all Sandbox and Production OpenAir account.
OpenAir completed the migration to Oracle Cloud Infrastructure on July 18, 2020.
Support for custom remote ports in the Automatic Backup Service will stop on January 20, 2021. Custom remote ports will not work after this date.
The FTPS protocol in the Automatic Backup Service will no longer be supported after January 20, 2021, and it will stop working on that date.
Effective with the April 2021 OpenAir release, the legacy SAML endpoint will be removed from OpenAir.
upGet the redesigned OpenAir user experience across new list views, new record headers, Administration settings, and view multi-currency monetary totals on list views.
The redesigned user experience list view layout and features is now available for the following list views:
Administration
Global settings > Contacts
Global settings > Customers
Global settings > Job codes
Projects
[Select a project] >Financials > Billing > Rules
[Select a project] >Financials > Billing > Transactions
[Select a project] > Financials > Recognition > Rules
[Select a project] > Financials > Recognition > Transactions
Note: Project financials list views show a “billing” or “recognition” label on the left of the list view toolbar.
Workspaces
Discussions
Documents
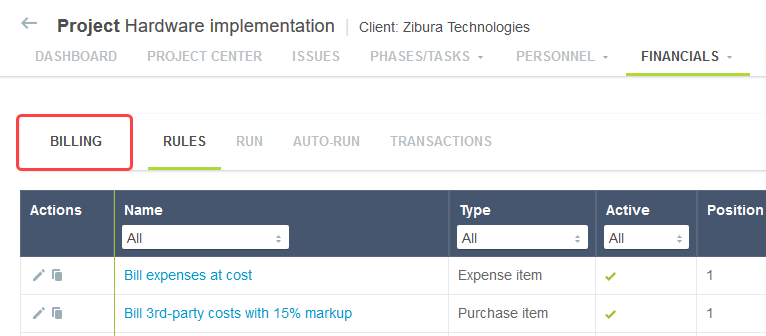
Note: The new redesigned list views are available if Redesigned OpenAir User Experience Phase 3 is enabled for your account. To enable this feature, contact OpenAir Support.
The redesigned user experience record header layout and features is now available for the following entities:
Purchase orders
Purchase requests
Resource profile approvals
Schedule requests
Workspaces
Workspace discussions
Note: The new redesigned record headers are available if Redesigned OpenAir User Experience Phase 3 is enabled for your account. To enable this feature, contact OpenAir Support.
Administration global settings and application settings have a redesigned screen header with tab navigation.
The tab navigation lets you navigate from one screen to another without going back to the main overview screen or the main navigation menu. The main overview screen listing all global settings screens is now replaced with overview screens for each global settings section (Organization, Display, Users, Account, Jobs, Rates, Reports, Customers, Custom Fields).
Click Administration in the Main Navigation menu. The in-module screen navigation submenu appears.
Click the relevant section under Global Settings. The section overview screen appears.
Click the screen required.
Click the relevant section heading in the screen header. A submenu appears.
Click the screen required.
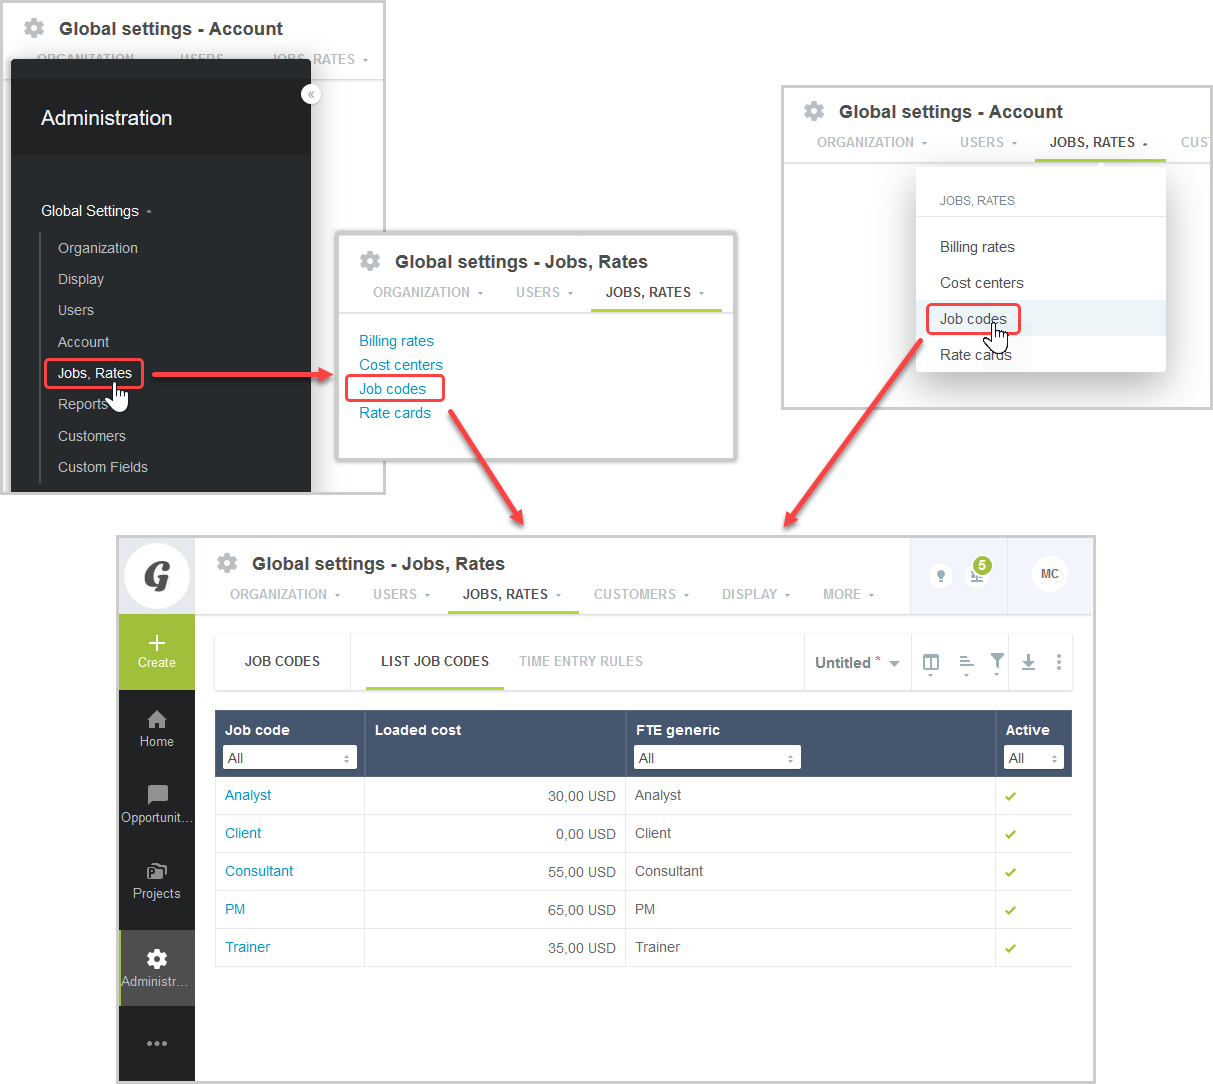
Note: The redesigned global and application settings screen headers are available if Redesigned OpenAir User Experience Phase 3 and Redesigned Administration module are enabled for your account. To enable this feature, contact OpenAir Support.
View monetary subtotals for each currency if the list view column contains monetary values in two or more currencies. Currency subtotals are available both for the page and for the entire list view as popup panels.
To view the currency subtotals for the page you are currently viewing, click the Currency subtotals link in bold type at the bottom of the monetary column.
To view the currency subtotals for the whole data across all list view pages, click the Currency subtotals link in smaller and normal weight type underneath.
The column totals row shows the total monetary value in place of the Currency subtotals link if all monetary values on the current page or across all pages are in the same currency.
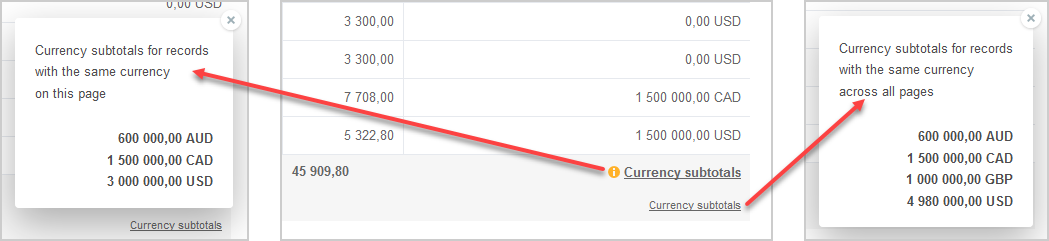
Note: Multicurrency monetary column totals are available if Redesigned OpenAir user experience Phase 2 or Phase 3 and Multi-currency are enabled for your account. To enable this feature, contact OpenAir Support.
This feature introduced in the April 18, 2020 OpenAir Release is now enabled by default if Redesigned OpenAir user experience Phase 3 is enabled for your account. All redesigned list views, including inline-editable list views now support smart rendering.
If the number of rows per page is set to 100 or higher, OpenAir renders your list view data progressively. When the list view loads, enough rows are rendered to fit the available canvas space vertically and over half that space up and down the list. Additional rows are rendered progressively as you scroll vertically. This reduces the demands on your browser and lets your list views load faster. However, you cannot search through all the 100 or 1000 rows in the page using the browser “Find in page” feature (Ctrl +F). You can only search the rendered rows using Ctrl + F.
Note: List view smart rendering is enabled by default if Redesigned OpenAir user experience Phase 3 is enabled for your account. To disable this feature, contact OpenAir Support.
Effective with the April 2021 OpenAir release, the optional features introduced to facilitate the phased release of the redesigned OpenAir user experience will be consolidated into a single optional feature. The optional features Redesigned OpenAir user experience Phase 1 and Redesigned OpenAir user experience Phase 2 will be removed and the full redesigned user experience functionality will be available as part of Redesigned OpenAir user experience (until then Redesigned OpenAir user experience Phase 3).
Important: We recommend that you enable Redesigned OpenAir user experience Phase 3 on your Production account early before the April 2021 OpenAir release if you are currently using the redesigned user experience up to Phase 1 or Phase 2 only.
Please test the feature extensively on a Sandbox account before you enable Redesigned OpenAir user experience, and prepare your users for the change. Contact OpenAir Support if you have any questions or encounter any issues. OpenAir will prioritize the resolution of reported issues blocking the adoption of the full redesigned OpenAir user experience on your production account.
If Redesigned OpenAir user experience Phase 3 is already enabled for your account, there are no actions required.
For more information about the redesigned OpenAir user experience, see OpenAir Redesigned User Experience Guide.
Add a tag to your entity properties forms and display it on your list views, project status summaries, reports and dashboard portlets.
The tag custom field lets you select a single tag. It uses the same mechanism as dropdown custom fields but tag custom field values are displayed as badges with specified text and color.
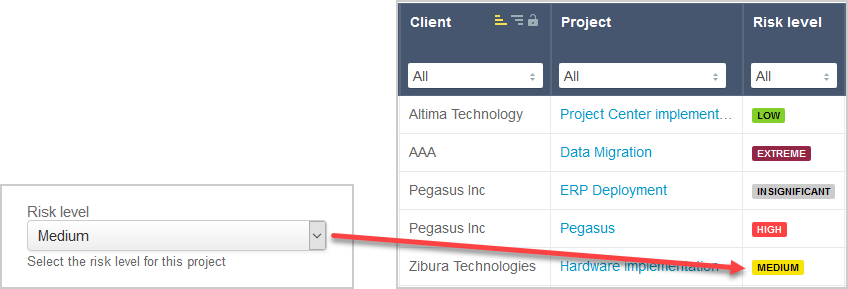
You can use tag custom fields to draw attention to important information on forms, list views, and reports. For example, you can use this custom field type to define a risk tags for any entity.
You can control who can see or update tag values using form permissions and form rules.
You can use the OpenAir Integration Manager, XML API, SOAP API and user scripting to read, set and modify tag custom fields.
Follow the usual procedure for creating or modifying custom fields.
If the optional feature Conditional Dropdown Custom Fields is enabled for your OpenAir account (recommended), the custom field properties form includes a required Tags field.
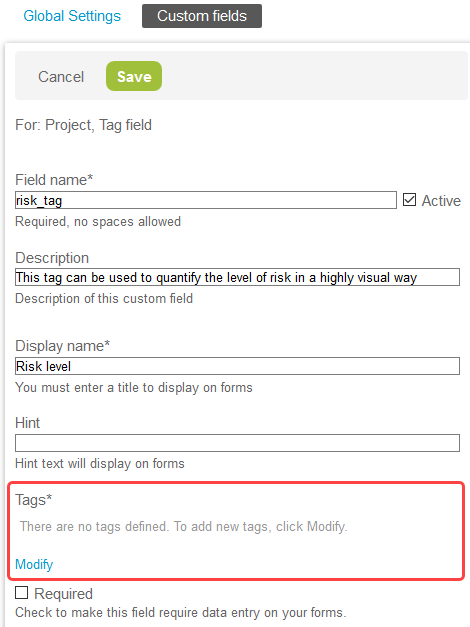
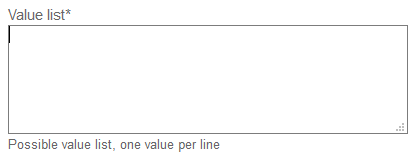
Otherwise, the custom fields properties form includes a required Value list field.
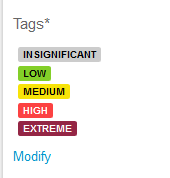
On the custom field properties form, define Tag values.
Note: The following steps assume the optional feature Conditional Dropdown Custom Fields is enabled for your OpenAir account (recommended). If Conditional Dropdown Custom Fields is enabled for your OpenAir account, list tag value definitions in the required order, one value per line, using the following <Text><Hex_Color_code> in the Value list text box— for example, Medium#F7E308.
To enable the Conditional Dropdown Custom Fields feature for your account, contact OpenAir Support.
Click Modify under Tags. A popup appears and shows the custom field display name for existing fields, or “ New Field Values” if you are creating a new custom field.
To add a new tag value, click the Add button ![]() , and type the tag value definition in the text box. Click OK. The tag value is added.
, and type the tag value definition in the text box. Click OK. The tag value is added.
Note: You can define the text and badge color for tag values. The tag value definition includes the display text and the background color for the tag value in the following format: <Text> <Hex_Color_code>
<Text> — The display text . It must be unique for each tag value.
<Text> <Hex_Color_code> — The background color defined as a Hex color code (e.g. #2C7ADB).
The tag value display text is set automatically to white or black, depending on the background color.
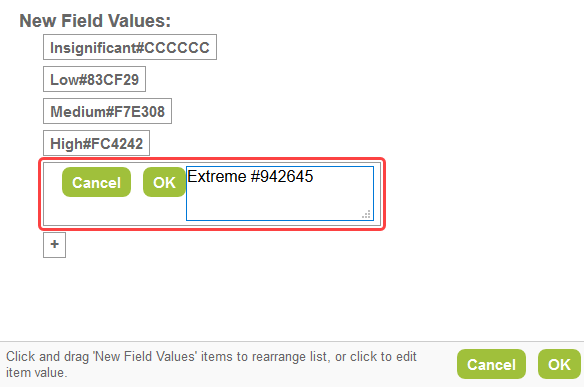
To modify a tag value, click the tag value, and edit the tag value definition in the text box. Press Enter to save your changes or Esc to discard your changes. The tag value shows the new definition.

To delete a tag value, click the tag value, and click the Delete icon ![]() . The tag value is removed.
. The tag value is removed.
Note: You can remove a tag value even if the taq custom field is set to this value on some records. Records continue to show the selected tag value after that tag value is removed.
To change the order of tag values in the dropdown, drag tag values to the position required.

Click OK to save the tag value changes. The custom field properties form shows the tag values you added or modified.
Click Save to save the custom field properties.
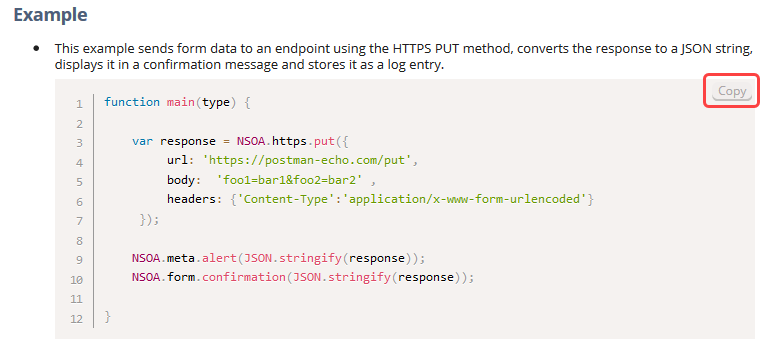
Copy the code samples to the clipboard in one click and benefit from improved format and syntax highlighting.
Code samples in the OpenAir Help Center now include line numbers, better syntax highlighting and a Copy button. Click Copy to copy the whole code sample to your computer clipboard. You can then paste it in your preferred text editor for editing.
Note: To enable the OpenAir Help Center feature for your account, contact OpenAir Support. After OpenAir Help Center is enabled, you must be an administrator or have the View Help Center role permission to access the Help Center.
Set a custom field order for the Job code and Contact entities.
To access the field order settings, do one of the following:
Go to the entity properties form, and click Modify the form permissions from the Tips menu.
Go to Administration > Customization, click the entity name, and click the Field order tab.
Configure OpenAir to use the currency set on the employee demographic form instead of the receipt currency for new expense reports when importing receipts from the American Express data feed.
By default, OpenAir creates new expense reports using the currency on the imported receipt when importing American Express receipts using the manual or automated method.
You can configure OpenAir to use the currency set on the employee’s demographic form instead.
In OpenAir, go to Administration > Application Settings > Expenses Settings > American Express data feed.
Check the Create the Expense report in the employee's currency instead of the receipt currency box.
Click Save.
Note: The American Express integration must be enabled and configured for your account to use this feature. To enable the American Express integration, contact OpenAir Support or OpenAir Professional Services.
upCreate and manage your resource bookings from within the project center.
The project center booking Worksheet is the second installment in the phased release of the Project Center feature introduced in the October 12, 2019 OpenAir Release. The Project Center feature aims to let you manage key project activities from a single screen available for each project record.
This release adds the ability to create and manage resource bookings from within the project center. It doubles your project center outline view as a booking worksheet.
The project center booking worksheet includes the following components:
Project outline — The element introduced in the first installment of the project center feature.
You could already:
Create and modify a project structure with phases, tasks and milestones.
Add built-in and custom fields for the task entity (phases, tasks and milestones) as columns.
You can now also:
Add resource bookings at the task level or at the project level using the Add booking icon ![]() in the Actions column.
in the Actions column.
Add built-in and custom fields for the booking entity as columns.
Booking grid — A booking grid is shown alongside the project outline in the same view. You can use the booking grid to enter the number of hours you want to book a resource for a given task (or at the project level) in a given week.
Toolbar — The project center toolbar now includes the following additional functionality:
Date navigation panel — Use the date navigation to change the period visible in the booking grid.
Save and Discard — Click Save or Discard to save or cancel any changes made in the booking grid.
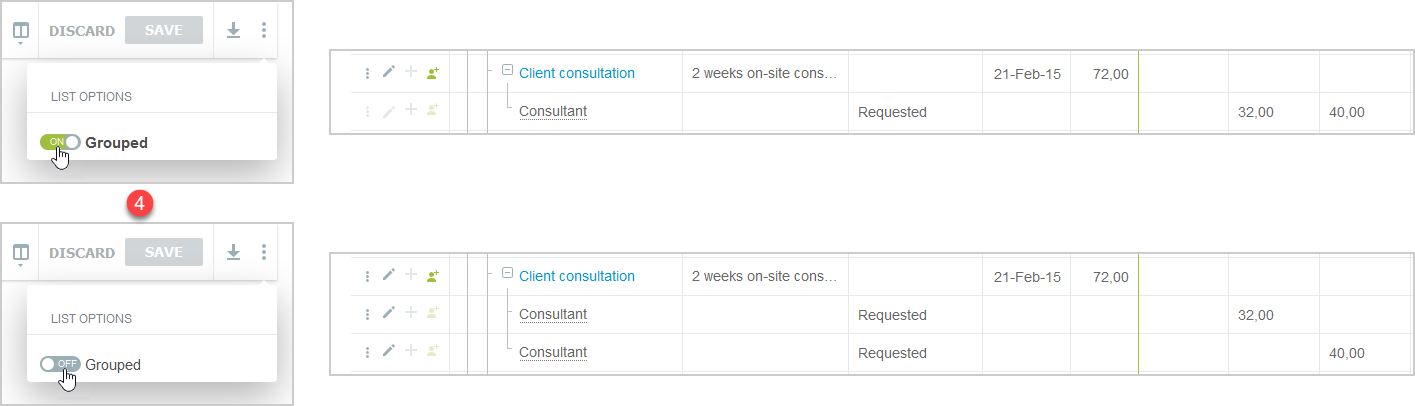
The Grouped toggle in the Other options panel — Use the Grouped toggle to group bookings for the same resource, on the same task (or at the project level), and with the same booking type and job code, on a single row, or to show each booking on a different row.
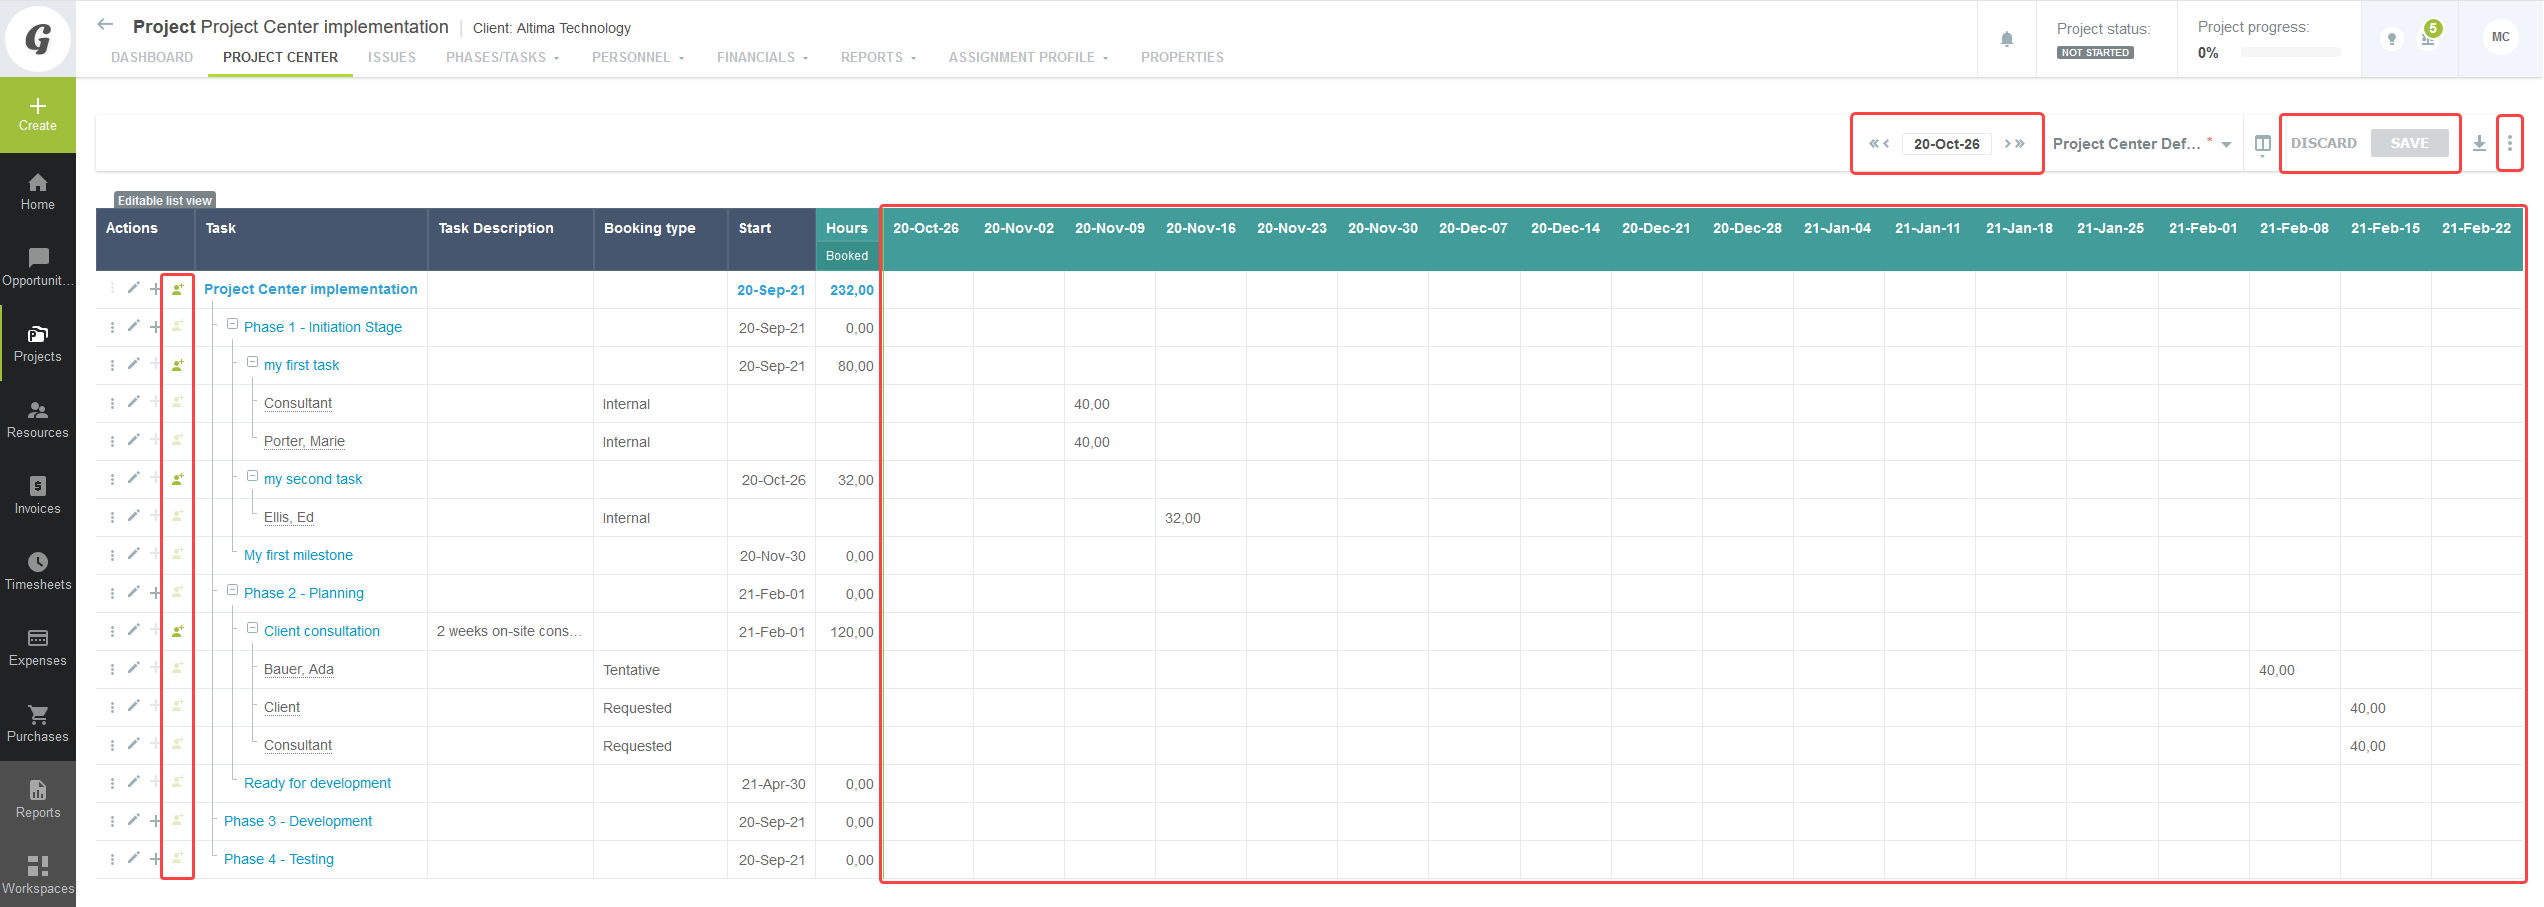
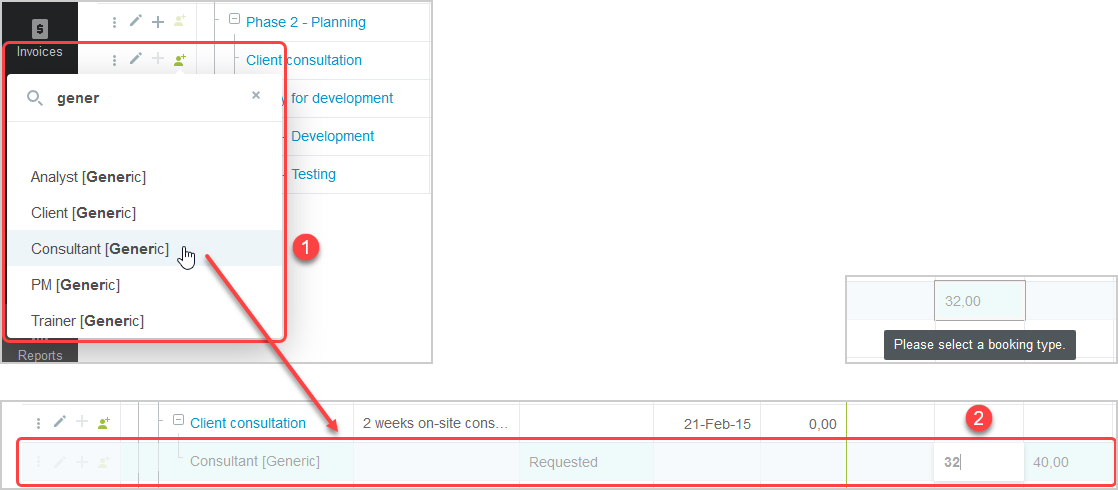
Add a resource booking to your tasks and project without having to open a form:
Click the Add booking icon ![]() in the Actions column next to a task or next to the project root to add a new resource booking. The new booking row will be nested immediately under the task or the project root.
in the Actions column next to a task or next to the project root to add a new resource booking. The new booking row will be nested immediately under the task or the project root.
Type a few characters in the search box to refine the list of resources, if required, and select a resource from the list of options.
Use inline-editing to enter additional information for your booking in the relevant project outline columns.
Note: Inline-editing for bookings in the project outline works the same way as for phases, tasks, and milestones. However, if you add a new booking row, you must enter some hours for that booking before you can save it.
Enter the number of hours you want to book the resource in each given week in the booking grid.
Double click a cell in the booking grid and type the number of hours you want to book the resource for the task in that week. Repeat for each week you want to book the resource for the task.
Tip: Use Tab and Shift + Tab, or the right and left arrow keys to move to the next cell to the right or to the left of the cell you are currently editing.
Click Save to save the resource bookings or click Discard to cancel all changes made in the booking grid.
When you save the bookings, a message appears to confirm the bookings were saved. Booking cells with errors preventing the save operation are outlined with a black border. Point to the outlined booking cell to show a tooltip describing the error.
A separate booking record is created for each booking grid cell containing hours. This enables you to distribute hours flexibly over multiple weeks and to include gaps if required.
Note: In contrast, when creating booking records using the Create button, for example, you can create one booking for any length of time. However, the number of hours will be distributed evenly across all weeks in the booking period.
Important: Editing a cell in the booking grid creates a new booking record. The project center booking worksheet does not allow the number of hours to be edited. However you may be able to edit the hours on the booking properties form, depending on the booking approval status and on your OpenAir account configuration (form rules, form permissions, global and application settings).
You can add multiple booking rows before you add hours in the booking grid. However, you must add hours to all the booking rows before you can save your bookings. Note the Save button in the toolbar is disabled and shows in gray color if there are no hours in a booking row.
Form permissions and form rules are applied. Form scripts associated with the booking form will be triggered when updating a booking record directly from the project center outline view.
Use the date navigation panel to change the period shown in the booking grid. Each column corresponds to a week and the column header shows the first day of the week. The number of columns in the grid depends on the size of your browser window. It is calculated automatically when you first load the screen or when you refresh it.
Click the Previous icon ![]() or Next icon
or Next icon ![]() to move the visible period backward or forward by one week.
to move the visible period backward or forward by one week.
Click the Rewind icon ![]() or Fast Forward icon
or Fast Forward icon ![]() to move the visible period backward or forward by the number of weeks visible in the booking grid.
to move the visible period backward or forward by the number of weeks visible in the booking grid.
Click the date in the center of the date navigation panel to select the starting date of the visible period.

Group bookings or show each booking on a different row.
Click the More icon ![]() in the toolbar and click the Grouped toggle under List options to change the way bookings are displayed.
in the toolbar and click the Grouped toggle under List options to change the way bookings are displayed.
If the Grouped toggle is ON, bookings for the same resource, on the same task (or at the project level), and with the same booking type and job code, are grouped on a single row. If any of the grouped bookings have some unique information other than Project, Task, Client, Employee, Job code, or Booking type, and if the relevant column is included in the project outline, the corresponding cell shows empty.
If the Grouped toggle is OFF, each booking appears in a different row. There will be a different row for each week the resource is booked even if all other information is the same.
Note: You can use inline-editing to edit the information shown in the project outline columns for a grouped booking row.
If you change any information in the grouped booking row, the information will be changed for all bookings in the group.
Form rules and form permissions are validated for each booking record in the group.
Form scripts associated with the booking form are triggered for each booking record in the group. This may have a performance impact on the project center, depending on the number of bookings in the group and on how resource demanding the scripts are.
If one of the bookings in the group is not editable, the grouped booking row is not editable.
Note: To enable the project center booking grid, contact OpenAir Support. This feature also requires Redesigned OpenAir user experience Phase 2, Inline-editing in list views and Project center outline to be enabled for your account.
Important: Please test the project center booking worksheet feature extensively on a Sandbox account or during release preview before you enable it on your Production account.
Note the following difference of behavior:
If you add a booking in the project center booking worksheet, a separate booking record is created for each week you book the resource.
If you create a booking using the entity properties form, you can create a single booking record for any length of time.
Note the following limitations. The project center booking worksheet does not currently support:
Booking approvals — You cannot submit bookings for approval, approve or reject bookings using the project center.
% Complete calculation of project progress.
Calculated start and end dates of tasks, phases and projects.
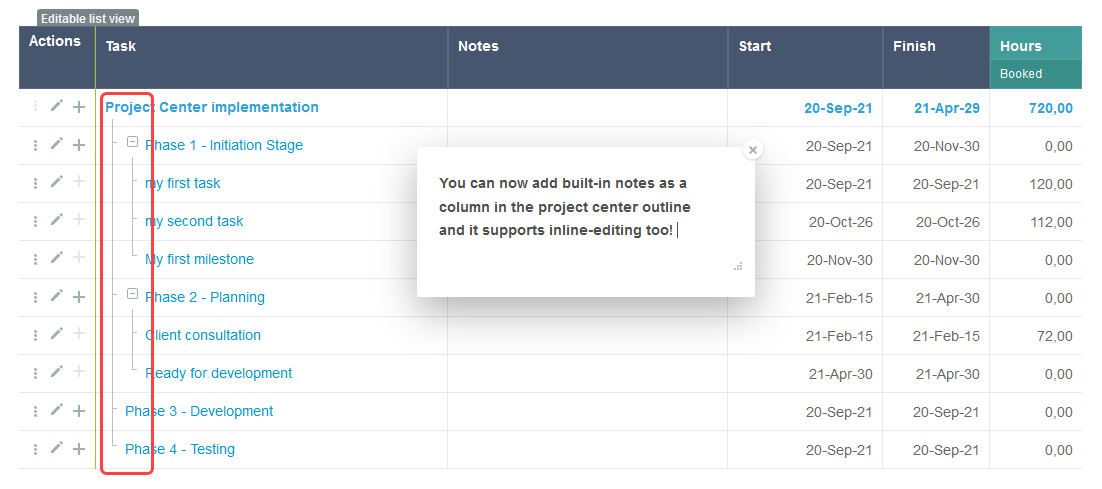
Get a clearer overview of your project with relationship lines, default columns and support for the built-in notes field.
This release adds the following enhancements to the project outline in the project center:
Relationship lines show a clear overview of the project structure and relationships between phases, tasks, bookings and milestones in the project.
By default, the project center outline includes the following columns: Actions, Task, Start, Finish, Hours — Booked. Only the Actions and Task columns are required, all others are optional, including the % complete column (previously required). You can select the columns for the project outline and save the configuration in the same way as for usual list views.
You can now add the built-in notes field for phase, task and milestones as a column. The notes field supports inline-editing in the same way as text area fields.
Note: The project center outline view is an optional feature. To enable this feature, contact OpenAir Support.
You must be an administrator or have the View Project Center role permission to be able to view and use the project center outline view.
The project center screen uses lazy loading, or loading “on demand” to load only the data you see on the screen as you interact with the tool.
The project outline and the booking grid are loaded progressively. OpenAir loads only enough data to fit the available canvas space when you navigate to the project center. It then loads data as you scroll, as you expand or collapse nodes in your project tree, or as you change the period visible in the booking grid. This ensures a smooth experience when viewing or editing large project structures with a high number of bookings and achieves a good compromise between loading time and key project center functionality.
Note: Lazy loading is part of the project center feature. It is available if the Project center outline view or Project Center booking worksheet feature is enabled.
With this optional feature enabled, in the incurred vs. forecast revenue recognition rule, the Estimated hours multiplied by user cost forecast is calculated using the loaded cost effective on the day work was delivered or work is planned.
By default, the Estimated hours multiplied by user cost forecast is calculated using the current employee hourly cost. OpenAir can be configured to calculate the Estimated hours multiplied by user cost using both the current hourly costs and the historical hourly costs set in Administration > Employees > [Select an Employee] > Cost.
Note: To enable this feature, contact OpenAir Support and request the following revenue recognition switch: For incurred vs. forecast recognition rules, use hours from assign by day table for the forecast, instead of planned hours, so that dated loaded cost can be used for the forecast instead of current loaded cost.
upAdd the custom field Online Invoice and the ability to read the invoice URL using the OpenAir XML API, SOAP API and User Scripting.
This optional feature adds the custom field Online Invoice [openair_invoice_short_url] to the Invoice entity. The custom field is used to store the invoice URL that OpenAir generates automatically when an invoice is created. It is read-only and appears on the invoice properties form as a hyperlink.
Administrators can control who can view the Online Invoice link on the invoice properties form using form permissions.
Tip: All users will be able to see the Online Invoice link by default. Make sure you set the relevant form permissions after you enable this feature if access needs to be restricted.
The Online Invoice custom field supports read requests using the OpenAir XML API, SOAP API and User Scripting.
Note: The invoice URL is the short URL included in the body of the invoice email when you navigate to the Send tab for a given invoice record in OpenAir.
To enable this feature, contact OpenAir Support.
Add support for saving the internal ID of the payment terms as well as the payment terms on the invoice record.
Depending on your account configuration, you can select the payment terms on the invoice entity property form using a dropdown list. By default, the payment terms name is stored on the invoice record but not the payment terms ID. This release adds a hidden payment terms ID field for the invoice entity.
An optional feature sets the internal ID of the payment terms selected for the invoice automatically when you create a new invoice or update an existing record. If your account is configured to show internal IDs on list views or on reports and if you are an account administrator or have the relevant role permissions, you can add the Internal id - payment_terms_id column on list views or the Internal id - payment_terms_id attribute to Invoice detail reports. With this feature enabled, the payment_termsid value can be retrieved and modified using OpenAir XML or SOAP API — see Platform.
Note: To enable this feature, contact OpenAir Support.
If the payment terms field currently shows as a text field on the invoice property form, it will show as a dropdown list after you enable this feature. The payment terms internal ID will not be populated for existing invoice records when you enable this feature. To set the payment terms internal ID for existing records, you can either save existing invoices manually or use the XML or SOAP API.
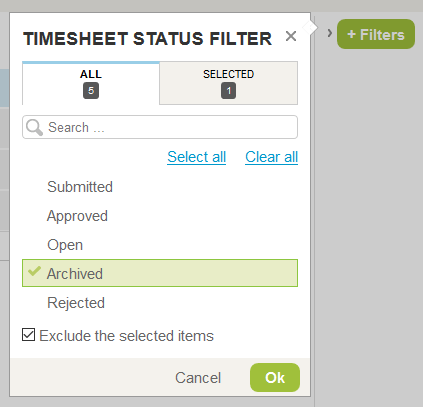
upFilter time entries by timesheet status on time entries tabular (detail) reports.
The new filter lets you include or exclude time entries from timesheets with specific statuses. For example, you can set a status to exclude time entries from archived timesheets.
The maximum number of daily time periods in crosstabbed (summary) reports can be changed to fit a whole month, 2–month period or quarter.

Note: The maximum number of daily time periods in reports depends on the configuration for your OpenAir account and is limited for performance reason. The current limit for your account will be changed automatically to include the additional days to cover a whole month, 2–month period (62 days instead of 60) or quarter (92 days instead of 90). To change the limit for your account, contact OpenAir Support.
Add the Internal IDs of all time entry current approvers to your reports.
You can now add the attribute Time entry — Internal Id(s) — Current Approver(s) to show the internal IDs of all time entry current approvers.
In tabular (detail) reports:
Tabular > Timesheets > Time entries
Tabular > Timesheets > TimeBills
In crosstabbed (summary) reports:
Charge attribute
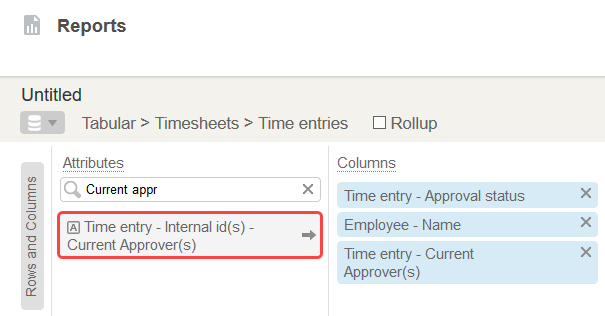
Note: Your account must be configured to show all internal IDs on detail reports and you must be an account administrator or have the View all pending time entries approvers role permission to add or view the attribute Time entry — Internal Id(s) — Current Approver(s) in reports.
upThe OAuth 2.0 feature now supports Identity Provider initiated Single Sign-on for users authorizing an API integration application to access OpenAir on their behalf.
Users must log in using their Identity Provider Single Sign-on form before the application attempts to access OpenAir on their behalf. When the application attempts to access OpenAir, the authorization screen appears automatically. Users do not need to enter their login details again as long as the Single Sign-on session has not expired.
Request authorization for accessing OpenAir data using one or more OpenAir APIs.
The OAuth 2.0 feature now support multiple scope values. Client applications can request authorization to use multiple OpenAir APIs to access OpenAir data. You can use the access token within the scope it was issued for or refresh the access token and request a scope within the scope the original access token was issued for. For example, if the scope of the original token includes both xml and rest, the scope of the access token requested can be rest only.
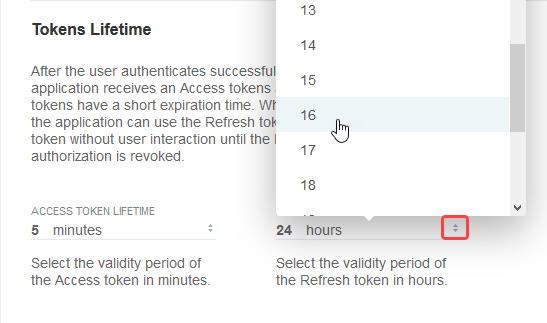
Configure the access and refresh token lifetime, and enable, disable or remove multiple applications at the same time in the API integration applications administration screen.
The API integration applications administration screen (Administration > Global settings > Account > API integration applications) was introduced in the April 2020 OpenAir release to register and manage the integration applications using the OAuth 2.0 authorization code flow to access your OpenAir data. This release adds the following functionality and usability enhancements to the API integration applications administration screen:
Configurable access and refresh token lifetime — You can select the expiration time of access tokens (in 5–minute increments up to 60 minutes) and refresh tokens (in one-hour increments up to 24 hours) for each client application when you register a new application or when you edit an application configuration. The default lifetimes are 15 minutes for access tokens and 24 hours for refresh tokens.
Remove action — Click the delete icon or check the box next to the application and click Remove to remove an application from your list of registered applications. An application must be disabled before it can be removed.
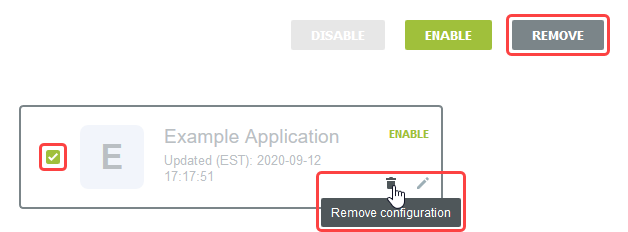
Bulk actions — Check the box next to each application you want to select and click Enable, Disable, or Remove to enable, disable, or remove several applications at the same time. You can only select multiple applications if they are either all enabled, or all disabled. After you select the first application, the application that are not available for selection and the actions that not permitted appear in light gray.
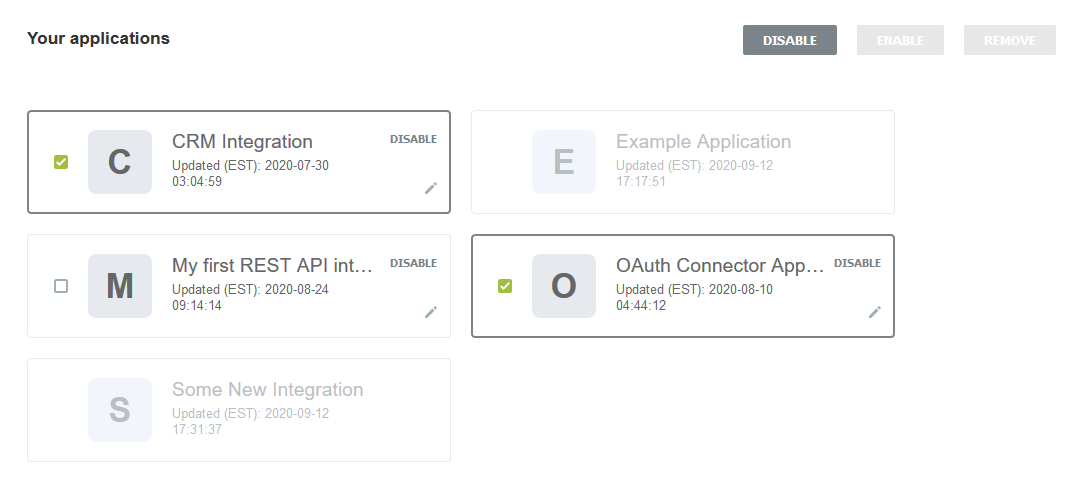
Usability enhancements — You can use the Create button to add new applications from any screen in OpenAir. Applications are sorted by name, and names support diacritics and non-latin characters. The application configuration supports tab navigation.
Note: OpenAir API access must be enabled for your account to connect tools and services to OpenAir using OpenAir APIs. The API Integration Application screen is not available if OpenAir API access is not enabled. To enable OpenAir API access for your account, contact OpenAir Support or your OpenAir Sales Representative.
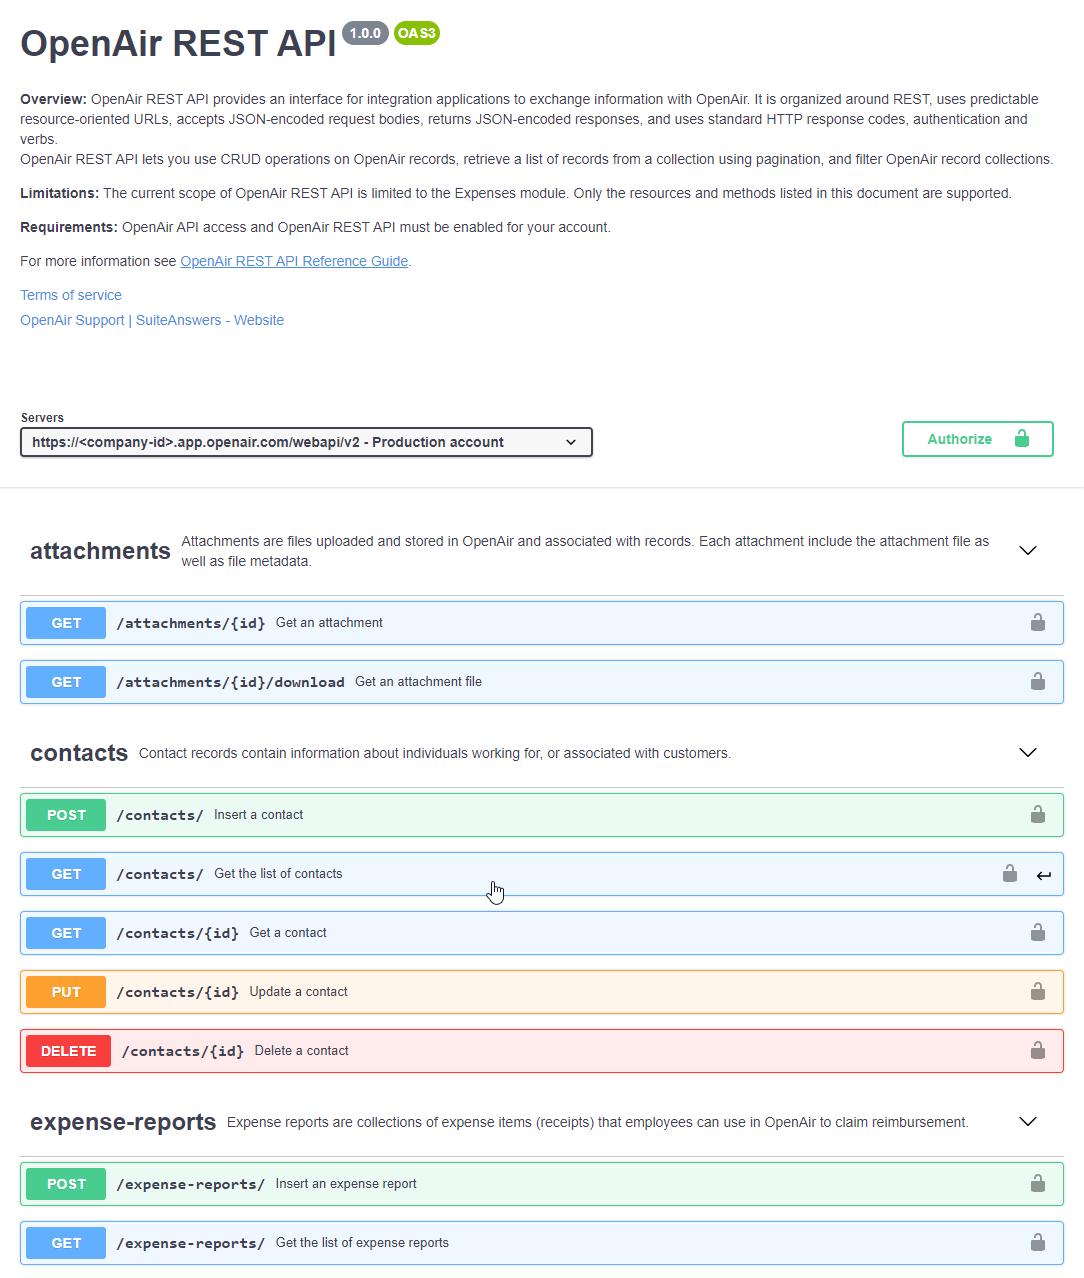
Use the new OpenAir REST API to exchange Expenses information with OpenAir in your integration applications. These release notes summarize the main functionality of OpenAir REST API. For a more detailed description, see OpenAir REST API Reference Guide.
The OpenAir REST API provides an interface for integration applications to exchange information with OpenAir.
OpenAir REST API:
Is organized around REST.
Uses predictable resource-oriented URLs.
Accepts JSON-encoded request bodies.
Returns JSON-encoded responses.
Uses standard HTTP response codes, authentication and verbs.
OpenAir REST API lets you:
Use CRUD (create, read, update, delete) operations on OpenAir records.
Retrieve a list of records from a collections and use pagination.
Filter OpenAir record collections.
OpenAir REST API is a service layer that is built on top of the business layer in OpenAir. This ensures that business rules configured for your OpenAir account are applied when an integration application interacts with your OpenAir data through OpenAir REST API. Business rules include OpenAir account configuration settings and access control mechanisms, as well as any user scripts deployed on your OpenAir account.
OpenAir REST API supports OAuth 2.0 exclusively for authentication and authorization, which is a more robust and reliable way to access data.
Note: To enable OpenAir REST API, contact OpenAir Support.
OpenAir API access must be enabled for your account before you can enable OpenAir REST API. To obtain access to OpenAir API, contact your OpenAir Sales representative.
Important: OpenAir REST API was introduced in the October 10, 2020 OpenAir release. It is an initial version with limited functionality.
Some optional features and application settings are not fully supported.
As with any other OpenAir APIs or platform features, it is crucial that you test integration applications leveraging OpenAir REST API extensively on a sandbox account. Make sure your integration applications run smoothly without error on a non-production account before you implement it on your production account.
The current scope of OpenAir REST API is limited to the Expenses module. The following table summarizes the methods and features available for supported resources.
|
Resources |
Create (POST) |
Read ( GET) |
Update ( PUT) |
Delete ( DELETE) |
Filtering |
Pagination |
|---|---|---|---|---|---|---|
|
Contacts |
|
|
|
|
||
|
Expense reports |
|
|
|
|
|
|
|
Job codes |
|
|
|
|
||
|
Receipts |
|
|
|
|
|
|
|
Receipt attachments |
(single object only) |
OpenAir REST API supports authentication by OAuth 2.0 access token exclusively. You must send the OAuth 2.0 access token as a bearer token in the Authorization header for each request.
Integration applications must be registered in OpenAir to use OpenAir REST API with OAuth 2.0, and users must give the application explicit permission to access OpenAir on their behalf.
You can access OpenAir resources through the REST API by using URLs specific to each resource, and pass parameters in the query string to specify the information you need in the response.

The request URL includes:
Base URL — The base URL includes your account-specific domain, with a unique account identifier usually based on your Company ID, and the REST API service path.
|
Environment |
Base URL |
|---|---|
|
Production |
https://<company-id>.app.openair.com/webapi/v2 |
|
Sandbox |
https://<company-id>.sandbox.app.openair.com/webapi/v2 |
|
Demo |
https://<company-id>.demo.app.openair.com/webapi/v2 |
Note: The base URL is typically sent in the Host header.
The examples in this document include the base URL for a production account in the Host header, and use company-id as the unique account identifier. Substitute company-id with your account identifier, which is typically based on your company ID.
Resource endpoint path
There is a predictable resource endpoint path for each entity supported.
|
Entity |
Path |
|---|---|
|
Receipts |
/receipts/ |
|
Expense reports |
/expense-reports/ |
|
Receipt attachments |
/attachments/ |
|
Job codes |
/job-codes/ |
|
Contacts |
/contacts/ |
The path may also include URL parameters. For example:
{id} — The internal ID of the specific record you want to retrieve, update or delete.
Query string — A query string may be used to specify what information you need in the response, to use pagination or to filter the resource collection.
The request headers include:
Authorization — OAuth 2.0 bearer token.
Content-Type — The POST and PUT methods include the application/json content-type header.
POST and PUT requests must include a JSON-encoded request body with the object to be created, or the key-value pairs for the fields to be updated.
You can filter the collection of resources by using the q query parameter to specify filter conditions when retrieving the list of resources. Each condition consists of a field name, an operator, and a value. You can join several conditions using the AND and OR logical operators, and you can use parenthesis () to mark precedence.
The following table lists the comparison operators available depending on the field data type and format.
|
Data Type and Formats |
Query Operators |
|---|---|
|
[All field types and formats |
EMPTY, EMPTY_NOT |
|
boolean |
IS, IS_NOT |
|
integer($int64) number($double) number($float) |
ANY_OF, ANY_OF_NOT, BETWEEN, BETWEEN_NOT, EQUAL, EQUAL_NOT, GREATER, GREATER_NOT, GREATER_OR_EQUAL, GREATER_OR_EQUAL_NOT, LESS, LESS_NOT, LESS_OR_EQUAL, LESS_OR_EQUAL_NOT, WITHIN, WITHIN_NOT |
|
string |
CONTAIN, CONTAIN_NOT, IS, IS_NOT, START_WITH, START_WITH_NOT, END_WITH, END_WITH_NOT |
|
string($date) |
AFTER, AFTER_NOT, BEFORE, BEFORE_NOT, BETWEEN, BETWEEN_NOT, ON, ON_NOT, ON_OR_AFTER, ON_OR_AFTER_NOT, ON_OR_BEFORE, ON_OR_BEFORE_NOT |
The list of resources can be returned in one or more pages when you send a GET request.
You can specify the length of the page (the maximum number of results per page) by using the limit query parameter. If a limit is not specified, the default page length is 100. The maximum length allowed is 1000.
You can specify the specific page to return by using the offset query parameter. The offset must be a positive number divisible by the page limit.
Some methods accept the following query parameters.
You can use the fields query parameter to return exactly the fields you need in the response (POST, GET, PUT).
You can use return_object query parameter to return the object created or updated instead of returning the internal ID of the object created or updated only.
Note: The GET /contacts/ and GET /job-codes/ methods to retrieve a list of contacts and job codes, respectively, do not currently support the fields parameter.
The following examples demonstrate the request format.
The following request retrieves a filtered and paginated list of expense reports.
                  GET /expense-reports?limit=10&offset=10&q=created BETWEEN ['2020-01-01', '2020-06-30'] AND currency IS 'EUR' HTTP/1.1
Host: https://company-id.app.openair.com/webapi/v2
Authorization: Bearer yAc0fCiQBZcWEoHBipZ3ScZa3TJNajGm4dGV79C1cO0CFMU2B1kKDbtk4YYkmt3a1y2Uut6eGJXFGobCyLwdcgxm
The following request updates the receipt with the internal ID 3825, and specifies to include the object in the response, and the fields to be returned.
                  PUT /receipts/3825?fields=id,attachments&return_object=1 HTTP/1.1
Host: https://company-id.app.openair.com/webapi/v2
Content-Type: application/json
Authorization: Bearer yAc0fCiQBZcWEoHBipZ3ScZa3TJNajGm4dGV79C1cO0CFMU2B1kKDbtk4YYkmt3a1y2Uut6eGJXFGobCyLwdcgxm

{
  "cfCheckboxReceipts": true,
  "date": "2020-06-30",
  "currency": "USD",
  "isTaxIncludedInCost": false,
  "notes": "Receipt updated using OpenAir REST API"
}
The following documentation is available: OpenAir REST API Reference Guide and the system-generated REST API reference documentation in OpenAPI 3.0 JSON format.
Account administrators and employees with the Export data role permission can access the generated API reference documentation JSON if OpenAir REST API is enabled for your account. The generated documentation provides a reference for OpenAir REST API including resource descriptions, endpoints and methods, parameters, request body and response examples and schema. It includes custom fields specific to your OpenAir account that are associated with supported resources.
In OpenAir, go to Administration > Global settings > Account > Integration: Import/Export. You must be an Administrator or have the relevant role permission to access this screen.
Click REST API documentation. The generated REST API documentation JSON object appears in a new browser tab.
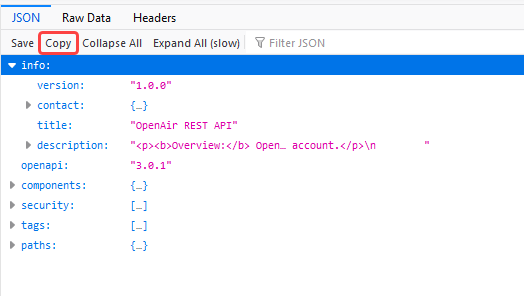
Click Copy.
Open an OpenAPI 3.0 compatible tool. For example, open the freely available online tool Swagger Editor in a new browser tab.
Clear any default content and paste the OpenAir REST API documentation JSON you previously copied to your clipboard. If using Swagger Editor, you copy the JSON in the left pane, The tool can convert the JSON to YAML, generates a static web page and shows the web page in the right pane. You can edit the JSON or YAML and use the resulting static web page as reference to work with OpenAir REST API.
Update the rate card associated with a project record using OpenAir SOAP or XML API.
The field rate_cardid now supports the modify method when you use the SOAP or XML API to update a record in the Project table.
Add or update the project billing rule associated with a revenue recognition transaction rule using OpenAir SOAP or XML API.
The field project_billing_ruleid is available for revenue recognition rule items if the optional feature “Show billing rules on revenue recognition forms” is enabled for your account.
The field project_billing_ruleid now supports the add and modify methods when you use the SOAP or XML API to create or to update a record in the Revenue_recognition_rule table.
Read or Modify the internal ID of the payment terms associated with an invoice using OpenAir SOAP or XML API.
If the optional feature Save Payment Terms Internal ID on Invoice Records is enabled for your account, you can set either the terms or payment_termsid field in the Invoice table using the SOAP or XML API. If you set one in your API request, the other will be set automatically. If both values are modified in the API request, the API will return an error unless both the terms or payment_termsid values match the same payment terms record.
Note: For more information about the Save Payment Terms Internal ID on Invoice Records optional feature, see Invoices. To enable the feature for your account, contact OpenAir Support.
upOpenAir Business Intelligence Connector covers additional list views.
You can read data from all essential OpenAir list views in real-time by publishing these list views to the OpenAir OData service.
The following additional list views are supported:
Administration
Global settings > Job codes
Global settings > Customers
Global settings > Contacts
View and manage the list views you published to the OData service. Administrators and users with the View and modify all saved list views role permission can view and manage all published list views on the account from the Administration module.
When OpenAir Business Intelligence Connector is enabled for your account, the Manage list view settings screen shows the following columns:
Publish status — Shows whether the list view is published as a private resource (available to the saved list view owner only), as a public resource (available to all users), or not at all.
Last published — The date and time when the list view configuration was last saved.
OData resource name — Use the OData resource name to access the published list view in your OpenAir OData feed.
Other list view configuration properties provide additional details about the published list view including Owner which shows the name of the employee who published the list view.
You can delete a list view configuration. If you delete a list view configuration, the published list view data will no longer be available from the OpenAir OData service.
Go to the list view.
Click Manage saved list views from the List View Configurations panel. The “Manage list view settings” popup displays the list of configurations you saved for this list view.
To delete a list view configuration and the associated published list view, click the Delete link in the Actions column.
Note: If you have no saved configurations for this list view, the Manage saved list views option is disabled.

Go to Administration > Global settings > Saved list views.
The Manage list view settings screen appears. It lists all the list views published by all users across your OpenAir account.
To delete a list view configuration and the associated published list view, click the Delete link in the Actions column.

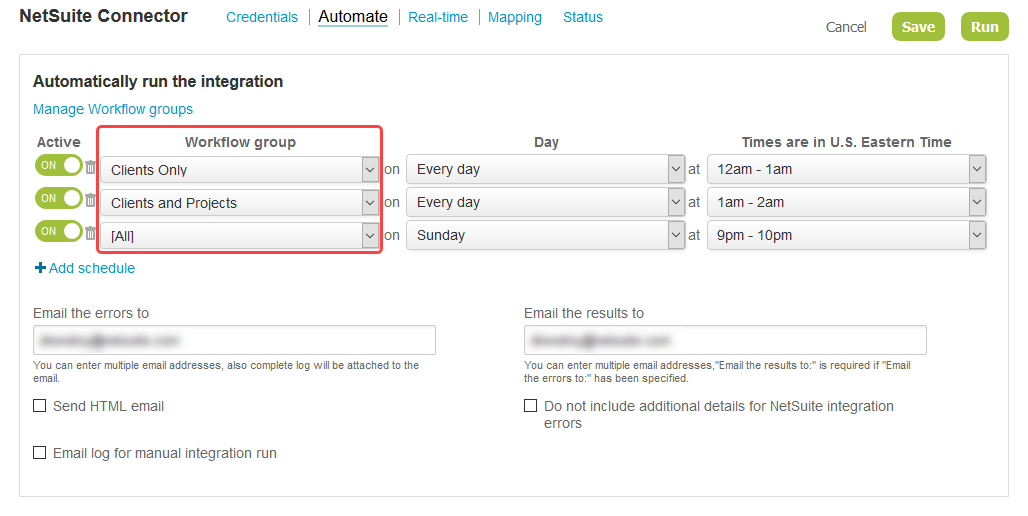
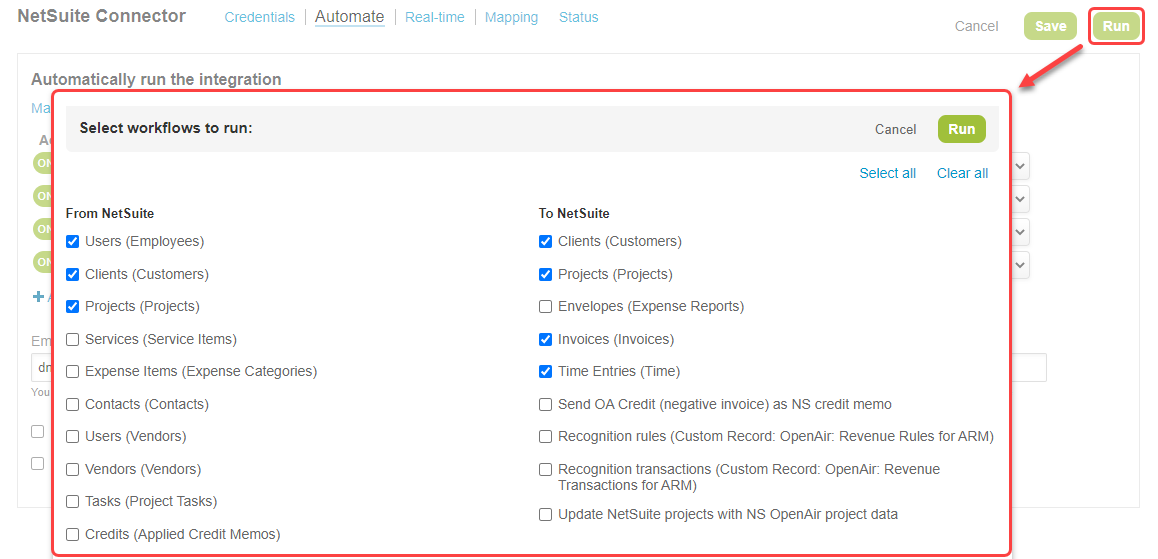
Select the workflows you want to include in automated integration runs, manual integration runs, or full synchronization runs and safeguard workflows selected for scheduled or real-time integrations against unintended changes.
You no longer need to disable workflows to run the integration for a single workflow or a small subset of workflows. OpenAir NetSuite Connector now lets you:
Schedule integration runs by workflow groups
Select the workflows you want to include in each manual run
Run a full synchronization for selected workflows only
This release also introduces a safeguard to protect workflows included in scheduled integration runs or set for real-time integration.
Important: Set and forget integration features are available only if the “New NetSuite Connector UI” optional feature introduced in the October 17, 2015 OpenAir release is enabled for your account. To enable the New NetSuite Connector UI, contact OpenAir Support.
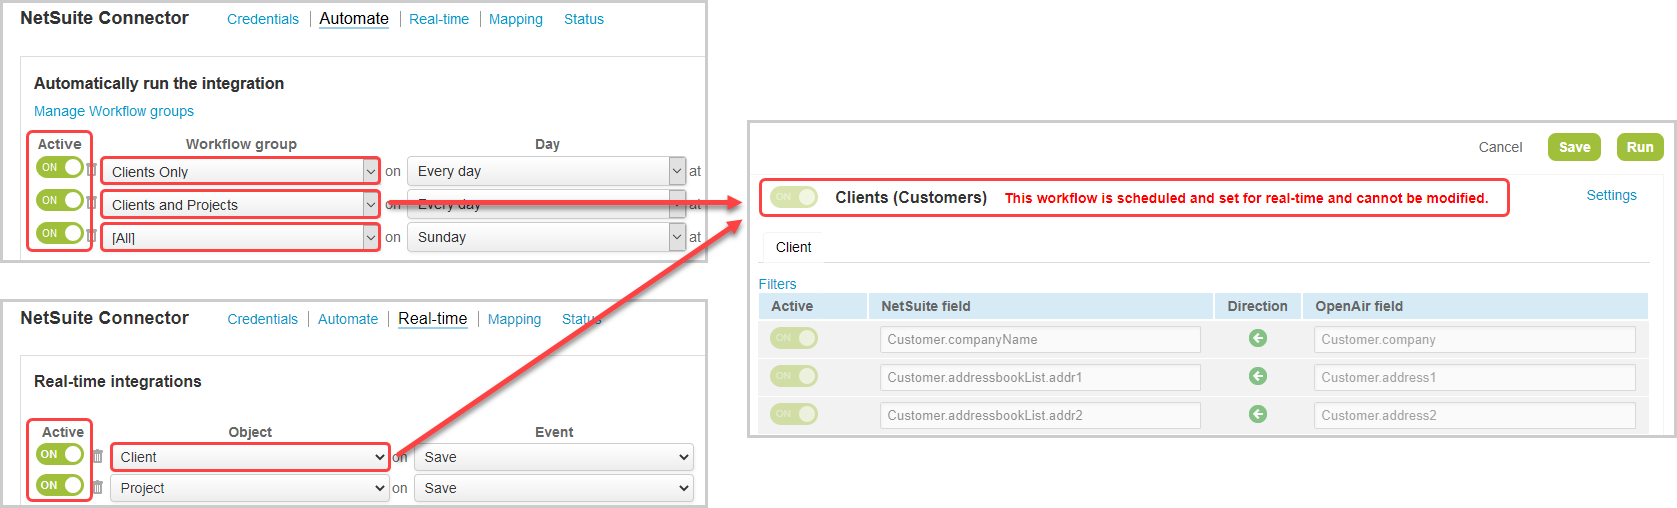
You can now schedule the integration to run automatically for a group of workflows on the day and time specified for the run. Previously, scheduled integration runs always included all workflows that were enabled at the time of the run.
In OpenAir, go to the NetSuite Connector user interface and click the Automate tab. Note the Automate screen now includes the Workflow group column.
Select a Workflow group from the dropdown list to restrict the scheduled integration run to the workflows included in that group. The options include:
Workflow groups defined for your account. Click Manage workflow groups to create, modify or delete workflow groups (see the procedure below).
The meta value [All] — all the workflows enabled on the NetSuite Connector Mapping screen.
Tip: Define and use workflow groups instead of [All] in your integration schedules to gain more control when setting up or maintaining your integration.
On the OpenAir NetSuite Connector Automate screen, click Manage workflow groups. The manage workflow groups dialog appears.
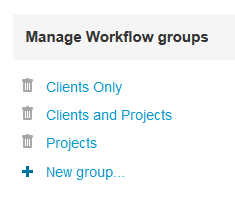
To create or modify a workflow group, do the following:
Click New group ... to create a new workflow group or click a workflow group name to view or edit this group. The workflow group settings dialog appears.
Enter a Name for the workflow group, if creating a new group.
Check the boxes for the workflows you want to include.
Note: You can only select from workflows that you have enabled on the mapping screen.
Tip: Click Select all to check all boxes and clear the box for workflow you want to exclude, or click Clear all to clear all boxes and check the box for each workflow you want to include.
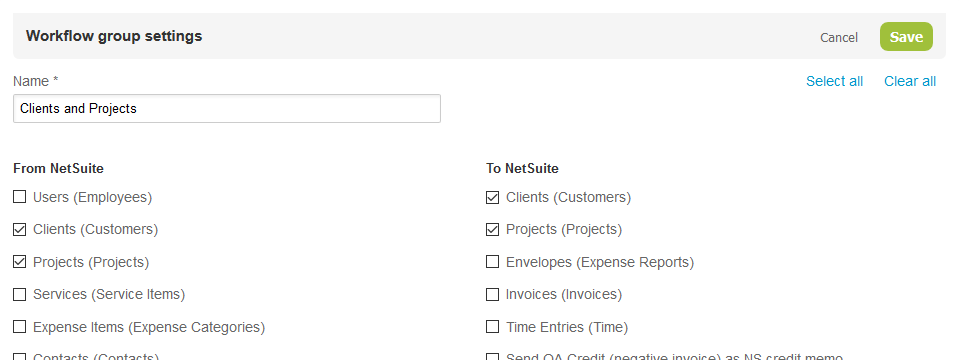
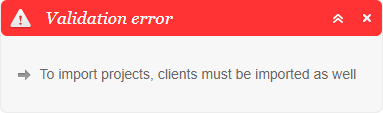
Click Save. OpenAir NetSuite Connector validates any workflow dependencies before saving the workflow group settings. A validation error message appears if a workflow is required but not included in the workflow group. For example, if you create a workflow group to import projects from NetSuite, clients must also be imported.
To delete a workflow group, click the delete icon ![]() next to the workflow group name.
next to the workflow group name.
Click Cancel or outside the dialog to close it and return to the Automate screen. You can now select
OpenAir NetSuite Connector lets you select the workflows you want to include in each manual run. When you click Run on the NetSuite Connector user interface, a dialog appears. Check the boxes for the workflows you want to include and click Run to launch the integration run for the selected workflows.
OpenAir NetSuite Connector validates any workflow dependencies before running the integration. A validation error message appears if a workflow is required but not included in the run. For example, if you configure the manual run to import projects from NetSuite, clients must also be imported.
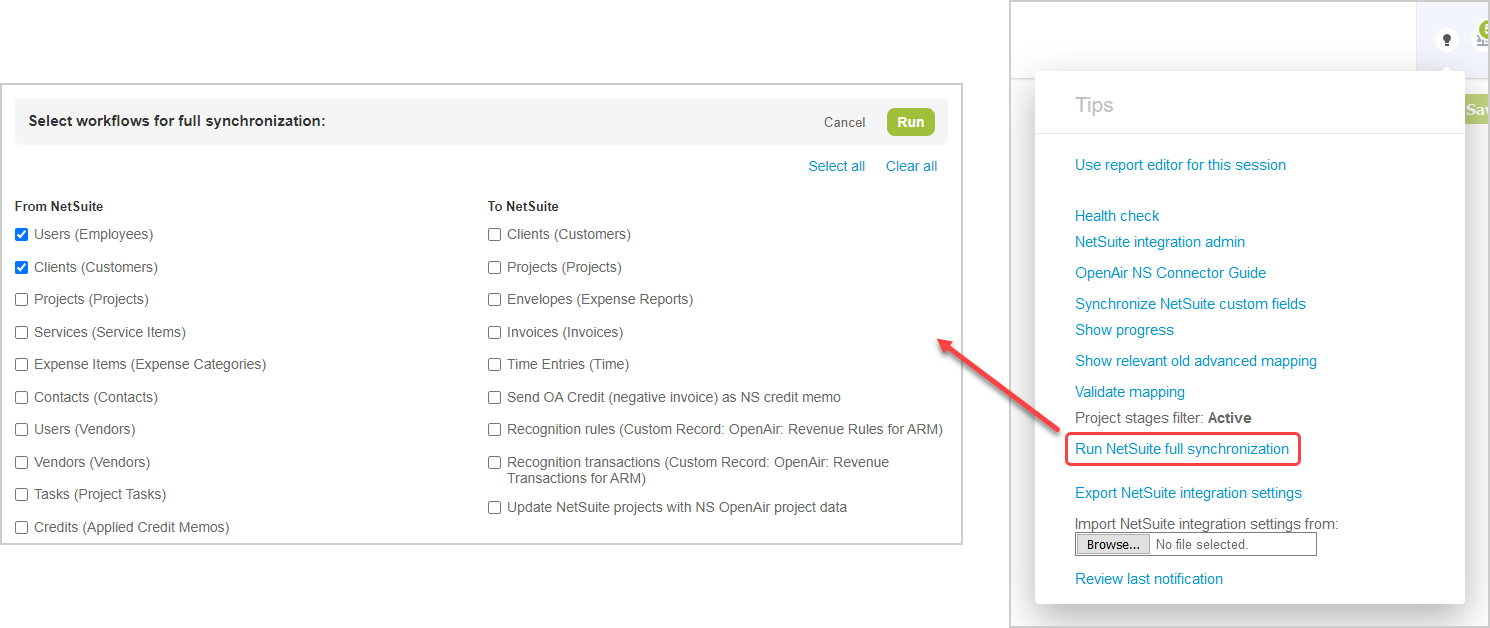
OpenAir NetSuite Connector lets you select the workflows you want to run a full synchronization for. When you click Run NetSuite full synchronization in the Tips menu, a dialog appears. Check the boxes for the workflows you want to include and click Run to launch a full synchronization for the selected workflows.
OpenAir NetSuite Connector validates any workflow dependencies before running the synchronization. A validation error message appears if a workflow is required but not included in the run. For example, if you configure a full synchronization run for projects imported from NetSuite, you must also include imported clients in the synchronization run.
A workflow cannot be modified if it is included in an active scheduled integration run or set for an active real-time integration. It is protected against any changes that may impact your integration — you cannot modify the field mappings or the settings for the workflow, and you cannot disable the workflow. To modify any protected workflow, you must first deactivate all scheduled integration runs and real-time integrations that protect this workflow.
Important: If you set a Workflow group to the meta value [All] for one of your scheduled integration runs, all enabled workflows are protected. As soon as you enable a workflow and save the NetSuite Connector configuration, this workflow becomes protected and cannot be edited
Double the speed of your integration with an optimized link between OpenAir and NetSuite.
Direct token-based authentication (TBA) utilizes a more robust communication channel between OpenAir and NetSuite to deliver faster integration runs. It also simplifies the login credentials administration.
To enable the feature for your account, configure NetSuite for direct TBA, and enable the feature in the NetSuite integration administration form in OpenAir.
In NetSuite, go to Customization > SuiteBundler > Search & Install bundles > List.
Update NetSuite bundle 2851– NetSuite OpenAir SRP Integration to version 2.07 or later. The bundle adds a new integration record for Internal NS Application OPENAIR that will be used for direct TBA.
Note: Update to version 2.08 to take advantage of all features introduced in the October 10, 2020 OpenAir release.
Create a new access token for the integration using the following steps.
Do one of the following:
Go to Setup > Users/Roles > Access Tokens > New — if you want to create an access token for another user.
In the Settings portlet, click Manage Access Tokens then New My Access Token — if you are an administrator or if you have the User Access Token permission and you want to create an access token for yourself.
Application Name — Select Internal NS Application OPENAIR.
User — Select the employee. This field is not available if you are creating an access token for yourself.
Role — Select NSOA Connector. This field is not available if you are creating an access token for yourself and you are an administrator.
Token Name — NetSuite generate the token name automatically. You can change the token name or keep the default value.
Click Save.
NetSuite generates the User Token ID and User Token Secret and displays the information on the Access Token page. The employee will need to enter this information on the NetSuite connector Credentials in OpenAir. NetSuite users with the User Access Token permission can view their existing access tokens at any time. To view your access tokens, click Manage Access Tokens in the Settings portlet,
In OpenAir:
Go to Administration > NetSuite Connector — if Redesigned OpenAir User Experience Phase 3 is enabled for your account.
Go to Administration > Global Settings > Integration: NetSuite — otherwise.
Click the Tips button, then click NetSuite integration admin. The NetSUite integration administration form appears.
Check the Enable Direct TBA box under the Other features section
Click Save.
On the NetSuite Connector Login Credentials screen, enter the TBA User Token ID and TBA User Token secret that you obtained when configuring NetSuite for direct TBA. Note that the Application ID, TBA Consumer Key, and TBA Consumer Secret fields no longer show on the Login credentials form.
Important: Direct TBA is available only if the “New NetSuite Connector UI” optional feature introduced in the October 17, 2015 OpenAir release is enabled for your account. To enable the New NetSuite Connector UI, contact OpenAir Support.
Use the NetSuite 2020.1 communication endpoint for the NetSuite <> OpenAir integration and take advantage of its features.
OpenAir supports NetSuite 2016.2 and 2020.1 communication endpoints. The NetSuite 2013.1 communication endpoint is no longer supported. NetSuite Connector uses the NetSuite 2016.2 endpoint by default unless the option to use the 2020.1 endpoint is enabled. Both NetSuite 2016.2 and 2020.1 endpoints require Token-Based Authentication.
This release makes the following changes to OpenAir NetSuite Connector configuration settings:
NetSuite Connector Credentials form — Removed the Email, Password, Confirm Password and Web Service Role fields, changed the position of the Application ID field, now located to the right of Account ID.
NetSuite integration administration form — Removed the Use 2016.2 communication endpoint checkbox (default endpoint) and added the Use 2020.1 communication endpoint checkbox.
The optional feature to use Token-Based Authentication exclusively is no longer available. Token-Based Authentication is the only supported authentication method for the NetSuite integration.
Tip: Update NetSuite bundle 2851 – OpenAir Integration to version 2.06 or later to add NSOA Connector custom role support for token-based authentication. See Token Based Authentication Ready NSOA Connector NetSuite Custom Role.
In OpenAir:
Go to Administration > NetSuite Connector — if Redesigned OpenAir User Experience Phase 3 is enabled for your account.
Go to Administration > Global Settings > Integration: NetSuite — otherwise.
Check the Use 2020.1 communication endpoint box.
Click Save.
Click the Tips menu icon and click Synchronize NetSuite custom fields.
To revert back to using the NetSuite 2016.2 endpoint, follow the above procedure and clear the Use 2020.1 communication endpoint box.
For more information, see the OpenAir NetSuite Connector Guide.
Important: Support for NetSuite 2020.1 communication endpoint is available only if the “New NetSuite Connector UI” optional feature introduced in the October 17, 2015 OpenAir release is enabled for your account. To enable the New NetSuite Connector UI, contact OpenAir Support.
Update the OpenAir Integration bundle and use the TBA-ready “NSOA Connector” NetSuite Custom role for the integration.
NetSuite bundle 2851 – OpenAir Integration Version 2.06 changes the NSOA Connector custom role in NetSuite to support token-based authentication. As of the October 10, 2020 OpenAir release, token-based authentication is the only supported authentication method for the integration. After the bundle update, you can use the integration straight out of the box without modifying the NetSuite role permissions to work with token-based authentication.
In NetSuite, go to Customization > SuiteBundler > Search & Install bundles > List.
Update bundle 2851 – NetSuite OpenAir SRP Integration to version 2.06 or later.
Note: Update to version 2.08 to take advantage of all features introduced in the October 10, 2020 OpenAir release.
For more information about configuring the integration to work with token-based authentication, see OpenAir NetSuite Connector Guide under Configuring the Integration > Configuring OpenAir for the Integration > Token-Based Authentication.
Review whether there are any recommended actions to improve the NetSuite Connector configuration and to take full advantage of recommended features.
To display the health check recommendations, go to the NetSuite Connector screen and click Health check in the Tips menu.
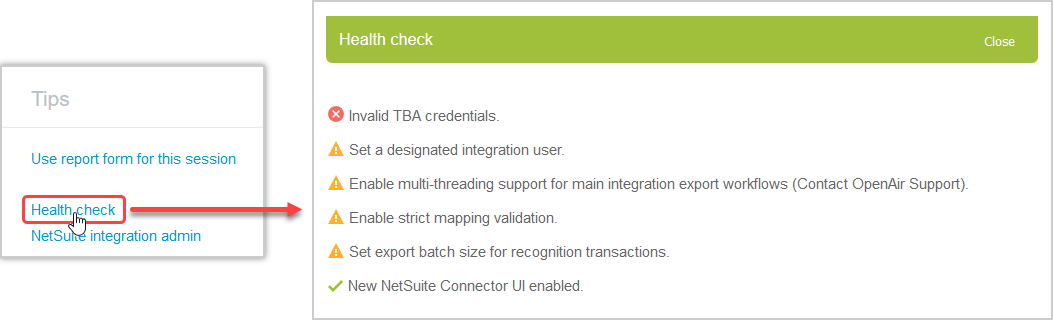
The health check verifies the following configuration options:
Token-based authentication — Ensure your TBA login credentials are valid. TBA credentials must be set to establish a connection with NetSuite.
Designated integration user — Select an active administrator as the designated OpenAir integration user and owner of integration runs.
NetSuite Connector user interface — Unlock the latest NetSuite Connector features by adopting the NetSuite Connector user interface introduced in the October 17, 2015 OpenAir release.
Multi-threading support for main integration export workflows — If the multi-threading is enabled for your account, make sure more than one thread is allocated for main integration runs to speed up exports to NetSuite in the main integration.
Strict mapping validation — Make sure your field mappings are free from error with strict mapping validation.
Batch export of Revenue recognition transactions — If the Recognition Transactions (Revenue Recognition Transactions) workflow is enabled, make sure you export revenue recognition in batches to run your revenue recognition exports up to two times faster.
Speed up your Customers workflow by ensuring only that records are only included in the integration run if one or more integrated field values have changed.
With this feature enabled, the fields designated for integration are monitored for change. Customer records will be included in the integration run only if one of the monitored field values have changed.
Update NetSuite bundle 2851 — NetSuite OpenAir SRP Integration to version 2.08 or later. The bundle will create a new hidden custom field for Customer records, which is used to store a timestamp whenever any of the monitored field values are changed.
If the real-time integration is installed and enabled on your account, Update NetSuite Bundle 12610 — NetSuite OpenAir SRP Real-time Add-on to version 2.0 or later.
Run the main integration and include the Customers workflow to update the monitored fields used for the real-time integration.
Important: Make sure you run the main integration and include the Customers workflow every time you modify the Customers field mapping to update the monitored fields used for the real-time integration.
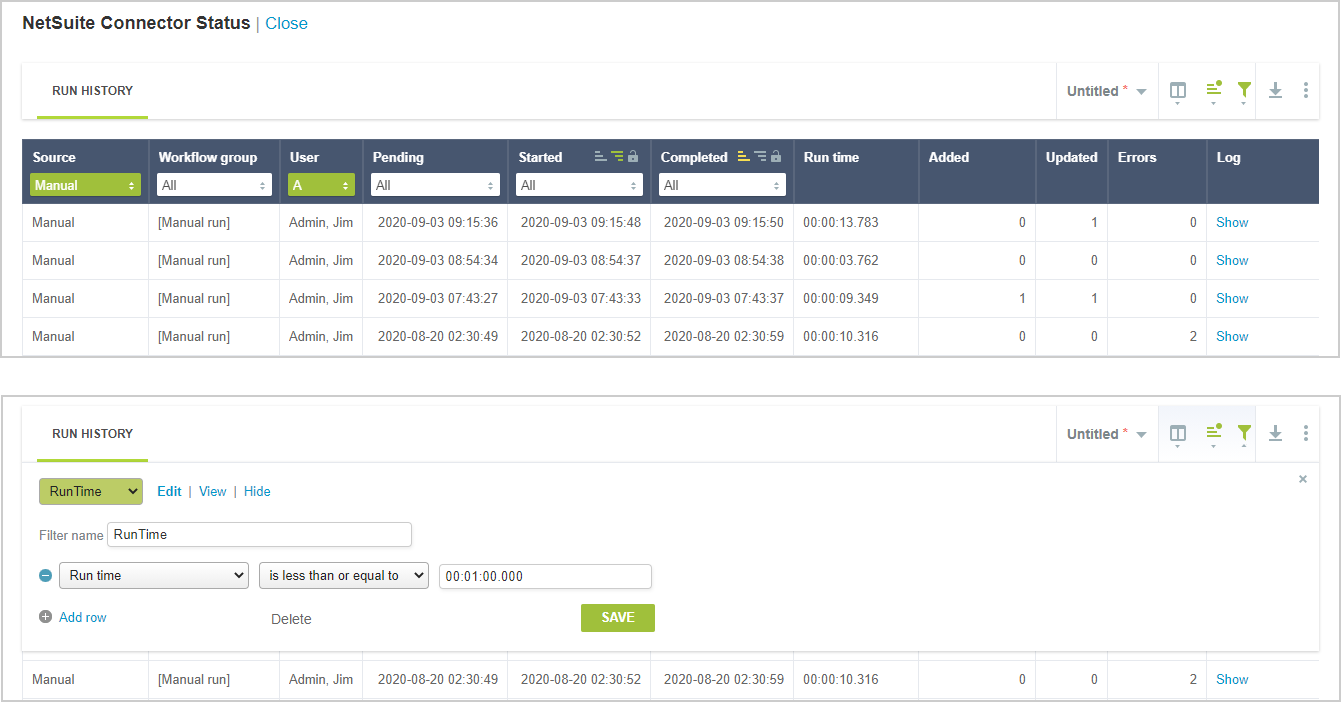
View the status screen in a new browser tab and use column and advanced filters to refine the list of integration runs.
The status screen now supports advanced filters as well as column filters for Workflow group, Pending, Started and Completed.
up
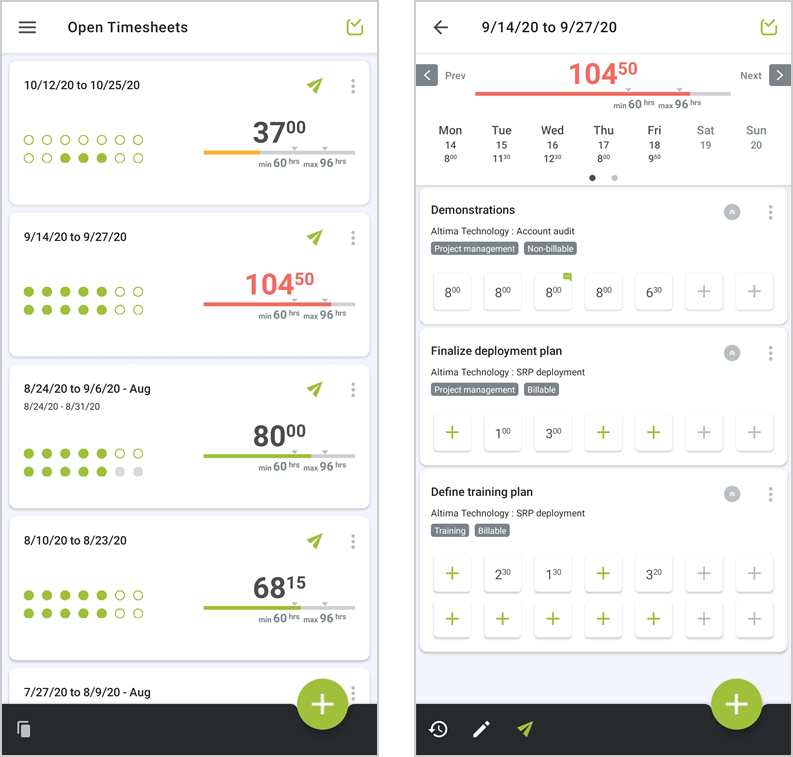
OpenAir Mobile 3 rolls out an intuitive new design for Timesheets, optimizes the layout for higher screen resolutions and improves data synchronization with your OpenAir account.
OpenAir Mobile 3 re-imagines time tracking:
Get a quick overview of recorded time in the timesheets list view.
View your time entries at a glance in a weekly calendar view for each timesheet.
Organize your time entries under time cards associated to specific projects or tasks.
Add or modify multiple time entries at the same time with just a few taps.
View timesheet errors in the new History view instead of popups.
OpenAir Mobile 3 for iPhone requires iOS13 or later version.
New Guide — A new guide was published to coincide with the release of OpenAir Mobile 3 for iPhone.
OpenAir Mobile 3 User Guide (iPhone)
See also help topics in the OpenAir Mobile 3 (iPhone) User Guide.
Note: OpenAir Mobile 3 for Android will be released in coming months.
Get the same redesigned OpenAir Mobile user experience on iPhone and Android devices.
With the latest versions of the Android (3.0) and iPhone (3.2) apps, to be released in November 2020, you will be able to get a snapshot of your time entry with an improved timesheet progress bar, and save your OpenAir storage space with compressed image attachments.
The forthcoming version of OpenAir Mobile for iPhone includes the following enhancements. The enhancements will also be available in the first version of OpenAir Mobile 3 for Android.
Image compression — OpenAir Mobile compresses all image attachments to a 40% quality JPG with a maximum width/height of 2000 pixels to reduce the size of the file stored in OpenAir.
Timesheet summary progress bar — View how much time you have entered compared to the minimum required or maximum allowed timesheet rules (if these rules are enabled for the account).
Merge time cards warning — Avoid merging time cards accidentally if you create or edit a time card with the same properties as another on the timesheet.
Timesheet approvals — See the name of the employee who submitted the timesheet in the timesheet header.
Timesheet week view — Jump automatically to the first week with editable time entries when you go to an open or rejected timesheet.
In-app rating and feedback prompts and settings option (iPhone only).
Two apps, one user guide — OpenAir Mobile 3 User Guide will describe both versions of the app for Android and iPhone and will be published to coincide with the release of OpenAir Mobile 3 for Android.
OpenAir Exchange Manager 5.1 adds support for OAuth 2.0 authentication and authorization to access Microsoft Azure Active Directory or Microsoft Exchange Online.
Microsoft will stop supporting and fully decommission the Basic Authentication for Exchange Web Services (EWS) to access Exchange Online in the second half of 2021. Over time, Microsoft have introduced OAuth 2.0 for authentication and authorization, which is a more secure and reliable way than Basic Authentication to access data.
To continue working with OpenAir Exchange Manager, you must:
Integrate OpenAir Exchange Manager with the Microsoft identity platform by registering it with an Azure Active Directory tenant and configuring it to access the relevant web APIs.
Update OpenAir Exchange Manager to version 5.1.0 or later.
In OpenAir Exchange Setup, go to Options > Integration Settings, and enter the Azure application credentials on the Azure app tab.
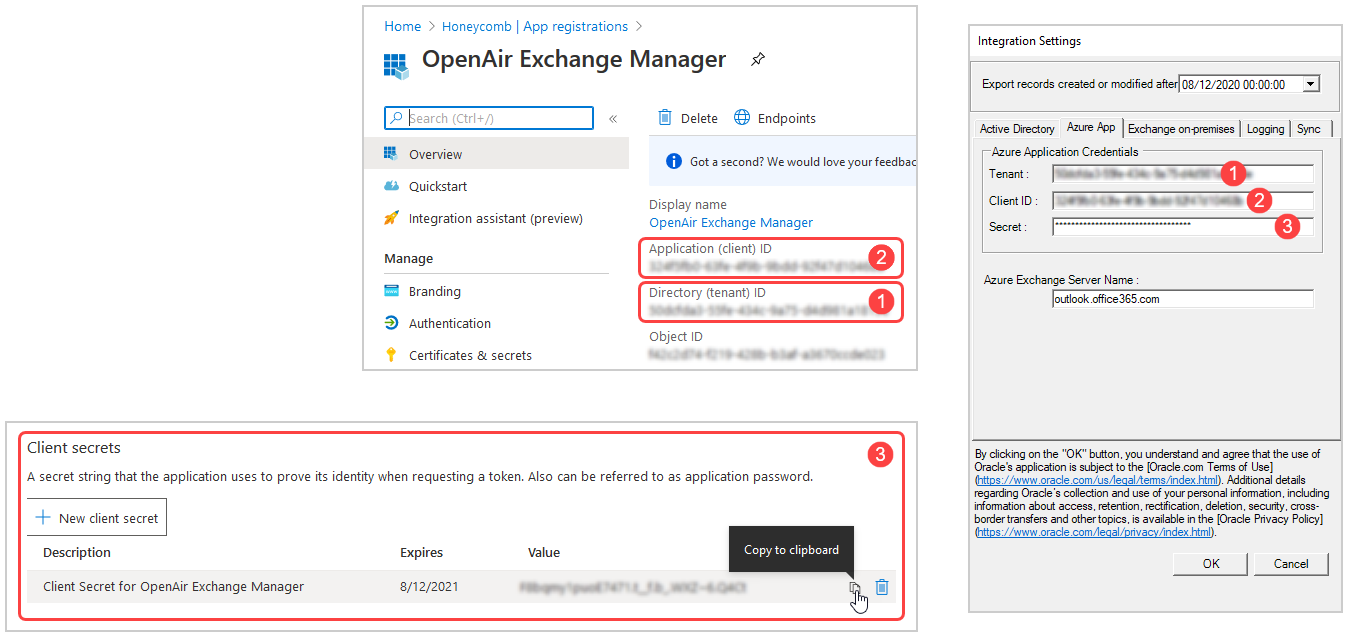
For more information, see OpenAir Exchange Manager Guide.
upStronger minimum password policy requirements are now enforced for all Sandbox and Production OpenAir account.
The following requirements will be enforced for all new passwords set after September 19, 2020 on Sandbox accounts, or after October 10,2020 on Production accounts. Passwords created by account administrators for new users or users who have never logged in must respect the password policies configured for your OpenAir account. Existing passwords remain valid until expired, reset or changed.
Your password cannot be the same as your user ID.
You must confirm your current password before you change your password.
Your password must include at least 8 characters.
Your password must contain at least 3 of the following types of characters: uppercase letters, lowercase letters, numbers, and special characters.
You cannot reuse the last 2 previous passwords when you change password.
Note: OpenAir accounts with stricter password policies are not impacted by this change. Users accessing OpenAir using SAML Single Sign-on or NetSuite Single Sign-on are not impacted by this change.
Important: Passwords created or updated using OpenAir API, NetSuite integration and other integrations must respect the password policies for your OpenAir account. Review any integration points which set user passwords and ensure that these passwords comply with the new minimum standards.
upOpenAir completed the migration to Oracle Cloud Infrastructure on July 18, 2020.
For more information about the migration, please refer to changes announced in the October 2019 OpenAir Release Notes and April 2020 OpenAir Release Notes.
For more information about Oracle Cloud Infrastructure, see Oracle website.
Support for custom remote ports in the Automatic Backup Service will stop on January 20, 2021. Custom remote ports will not work after this date.
If you have entered a custom port before April 1, 2020, it will be supported until January 20, 2021. However, custom ports entered after March 31, 2020 are not supported.
The FTPS protocol in the Automatic Backup Service will no longer be supported after January 20, 2021, and it will stop working on that date.
If you are using FTPS for Automatic Backup Service, you should switch to one of the supported protocols — SFTP or SCP — before January 20, 2021 to avoid disruption to this service.
Effective with the April 2021 OpenAir release, the legacy SAML endpoint will be removed from OpenAir.
|
Production account |
Sandbox account |
|
|---|---|---|
|
Legacy SAML endpoint |
https: |
https: |
|
New SAML endpoint |
https://auth.openair.com/sso |
https://auth.sandbox.openair.com/sso |
If you are using SAML for authentication in to your OpenAir account, make sure you update the configuration of your Identity Provider to use the new SAML metadata and endpoint before the April 2021 OpenAir release. For more information, see OpenAir SAML 2.0 Quick Start Guide. Please contact OpenAir Support if you have any questions.
up