Enhancements
![]()
Enhancements
Redesigned list views benefit from optimum column widths, smart rendering, column filter value search, wrap text or single line display options, full support for contextual tips, redesigned download functionality, and other usability and performance enhancements.
View both the Application settings and the Optional features enabled for your account in the Enabled features view.
Exclude the number of open or incomplete tasks from the My Status and Company Status portlets in the Home screen.
The Guinea Francs (GNF) have been added to the list of currencies.
The Belize Dollars (BZD) have been added to the list of currencies.
The usability of the attachments list view popup has been improved.
Include only the approved time entries, approved expenses and fulfilled purchase items for the specified date range when generating revenue recognition transactions using 'incurred vs. forecast' recognition rules.
The inline-editing keyboard navigation in the Project Tasks list view and Project Center Outline view was modified to improve usability.
See the status of your projects straight from the list view with project status tags displayed in the new Newsfeed — Status column.
The Advanced Booking Worksheet rows uses both visible and hidden columns to group bookings under worksheet rows.
The following filters are now available in the Dynamic and Advanced Booking Worksheets: Cost center filter, Project stage filter, Client filter and Utilization Filter.
When saving an existing report as a new report, the configuration options for the original report and the new report are now independent from one another.
Authorize access to your OpenAir data using the industry standard OAuth 2.0 framework and eliminate the need for integration applications to store user login details outside of OpenAir.
Read information about which tables use job codes using the XML API and SOAP API.
Read and modify the booking type when reading, adding or modifying Resource Request Queue records using the XML API and SOAP API.
Download and read about real world use case script examples from the new Platform Solutions page in the OpenAir Help Center.
Click the Data Dictionary tab in the Help Center navigation bar to open the OpenAir Data Dictionary in a new browser tab or window.
Use published list views like custom queries and read the latest list view data in your OpenAir form and scheduled scripts.
Publish all your essential list views and access the most up to date OpenAir data from your preferred Business Intelligence (BI) tools.
View your OData limits in the Administration module.
Enable users to identify and resolve common issues preventing the export of Expense reports, Invoices or Timesheets to NetSuite.
Select an active administrator as the designated OpenAir integration user and owner of integration runs.
Check for invalid quotation marks from the validate mapping tip and prevent configurations with invalid quotation marks from being saved with strict mapping validation.
Enable your main integrations to run up to four times faster with multi-threading (A valid NetSuite SuiteCloud Plus license is required to enable this feature).
Enable your revenue recognition exports to run up to two times faster by exporting recognition transaction records in batches to NetSuite.
Speed up any integration workflow importing hierarchies from NetSuite.
A new integration setting lets you export purchase charges as Service items instead of Product items when rebilling NetSuite vendor bills using OpenAir and integrating OpenAir invoices to NetSuite.
The NetSuite Connector administration screen is accessible from the main navigation menu when Redesigned OpenAir User Experience Phase 3 is enabled.
Add, update and approve time entries swiftly on your iPhone or Android mobile device.
OpenAir Mobile for Android Version 2.3.2 and OpenAir Mobile for iPhone Version 2.6.7 add support for account-specific domains in preparation for the upcoming migration to Oracle Cloud Infrastructure (OCI).
OpenAir Integration Manager 6.3.1 adds support for Intuit QuickBooks 2020 (20.0 ENT).
OpenAir Outlook Connector 2.3 includes a security update.
OpenAir OffLine 3.4 includes a security update.
OpenAir sends a lockout notification email to the locked employee when the number of failed login attempts exceeds the maximum permitted.
At a future date, OpenAir will validate new passwords against a list of known compromised passwords when an employee attempts to change password.
Usage of custom remote ports in the Automatic Backup Service will be deprecated at a future date to be determined and announced in advance.
All OpenAir accounts in all environments now use account-specific domains.
The new identity authentication service is available for all OpenAir accounts in all environments.
The use of OpenAir IP addresses to access or manage access to any OpenAir services is no longer supported.
OpenAir completed the full migration of the Sandbox environment to Oracle Cloud Infrastructure (OCI) on January 25, 2020.
upRedesigned list views benefit from optimum column widths, smart rendering, column filter value search, wrap text or single line display options, full support for contextual tips, redesigned download functionality, and other usability and performance enhancements.
List view column widths are calculated to provide an optimum fit between the column content and the available canvas space. The calculation will respect any custom column widths you have set manually, whenever possible.
Note: Full use of the available canvas space takes precedence over custom column width. If you change the width of a column, the width of other columns may also change to ensure the list view occupies the full canvas width. You may not be able to reduce a column width below a certain limit.
If the number of rows per page is set to 100 or higher, OpenAir renders your list view data progressively. When the list view loads, enough rows are rendered to fit the available canvas space vertically and over half that space up and down the list. Additional rows will be rendered progressively as you scroll up or down. This reduces the demands on your browser and lets your list views load faster. However, you will not be able to search through all the 100 or 1000 rows in the page using the browser “Find in page” feature (Ctrl +F). You will only be able to search the rendered rows using Ctrl + F.
Inline-editable list views do not currently support smart rendering.
Note: To enable the List view smart rendering (Redesigned User Experience) feature, contact OpenAir Support.
Column filters with a high number of distinct values have an impact on list view performance and usability. A solution is to stop distinct values being loaded when users open the column filter, to enforce a search for matching column filter options and to limit the number of matching values returned to 1000. This solution can be applied to selected column filters on request. It can be particularly useful for project, task or resource name columns, for example.
Identify and list the column filters with high number of distinct value dropdown options.
Contact OpenAir Support and ask for the Enforce column filter value search feature to be enabled for the column filters identified in step 1.
Note: This setting will apply to the specified column filters across all list views on your account.
This performance optimization feature modifies the user interaction for the specified column filters:
When clicking the column filter dropdown, the following message appears instead of the usual dropdown options: “Too many items to display. Use the search box to limit the number of matching items”.
Type a search string of minimum three characters in the dropdown search box and press Enter. OpenAir returns a list of up to 1000 values containing your search string.
If there are more than 1000 matching values in the database, only the first 1000 values are returned as search results and a message appears above the search results. Refine your search until there are less than 1000 matching values.
To filter the list of values returned by your last search, type any number of characters in the search box BUT do not press Enter. The list of values is filtered as you type with matching strings highlighted in bold.
Note: Filtering as you type only takes into account the values returned by your last search. If your initial search matched more than 1000 values in the database, only the first 1000 values were returned and are available for filtering. Other matching values may exist in the database but are excluded as there were not returned in the last search. We recommend to refine your search until there are less than 1000 matching values (step 3) before filtering the search results.
Select the desired options to set the column filter.
List views with a high number of rows are slower to load. Some list view features, such as Sorting, are disabled to improve performance if the list view exceeds a threshold number of rows.
A new on-screen tip appears at the top of the list view column headers if the list view contains more than 500 rows:
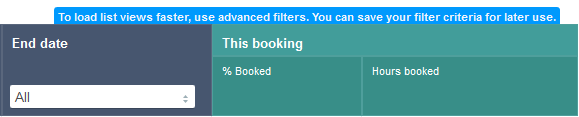
A message appears at the top of the list view column headers if the Sorting functionality is disabled:

Note: The threshold number of rows is set to 20000 by default for new accounts. To change the threshold, contact OpenAir Support.
Options for downloading your list view data are now available as a flyout panel similar to the other toolbar items. The downloaded list view data uses all redesigned list view configuration options, including multiple sorting levels. You can select the download file format directly from the list view and only the selected file format is generated for download.

New options are available in the More options panel in addition to the Clear column filters option.
Clear advanced filters — to reset any advanced filters applied to your list view.
Clear all list filters — to reset any column filters and advanced filters applied to your list view.
![]()
Contextual tips are now available at the list view, column and cell level:
List view contextual tips — The tips button panel displays tips and information specific to the list view.
Column contextual tips — Access tips specific to a field or column from list view column headers. The column options include an information icon if contextual tips are available for the column. Click the information icon ![]() to view contextual tips relevant to the column.
to view contextual tips relevant to the column.
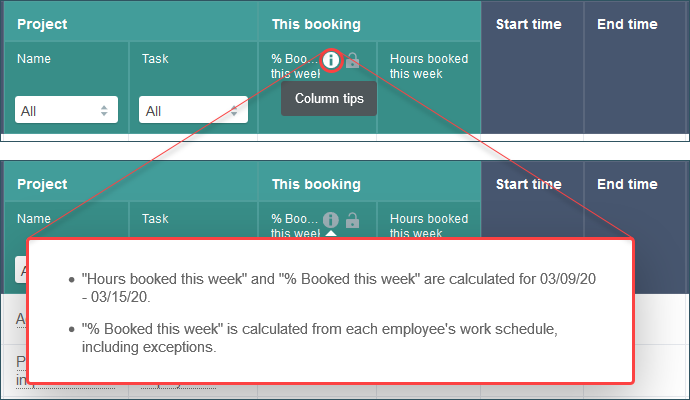
Cell contextual tips — Access tips specific to a record from list view cells. List view cells include an information icon if contextual tips are available. Click the information icon ![]() in the top right corner of the cell to view contextual tips relevant to that field or record.
in the top right corner of the cell to view contextual tips relevant to that field or record.

Select to wrap long text and text area field values on multiple lines in list view cells or display it in truncated form on a single line.
Single line (Default) — By default, redesigned list views display text and text area field values on a single line by default. If the entire text does not fit the cell, only part of the text is displayed with ellipses to indicate the text is truncated. To view the full text, point to the cell or click the Read more link inside the cell (for longer text content).
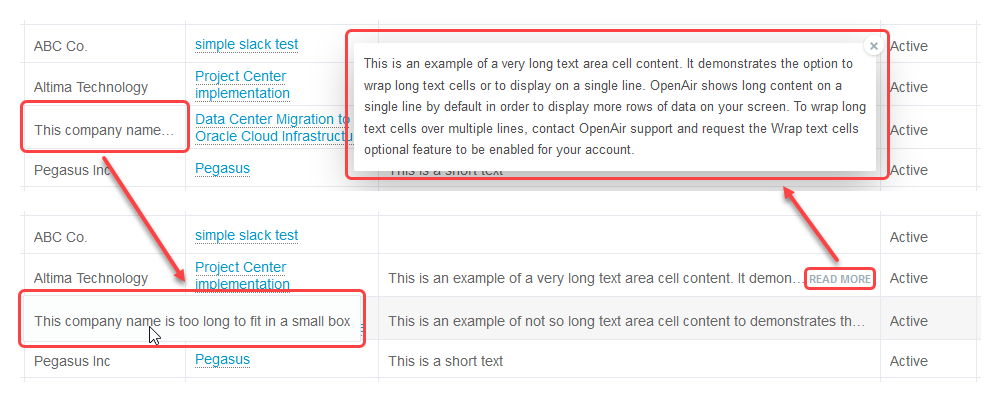
Wrap text — If the Wrap text in list view cells feature is enabled for your account, OpenAir wraps long text and text area field values on multiple lines in list view cells. For longer text content, only part of the text is displayed with ellipses to indicate the text is truncated. To view the full text, click the Read more link inside the cell.
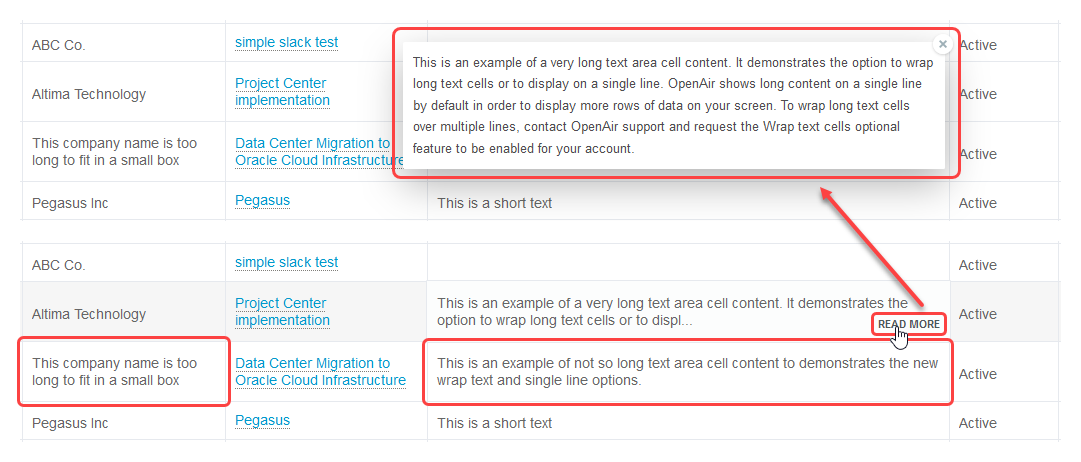
Longer text area cell content is truncated whether the wrap text option is enabled or disabled. To view the full text, click the Read more link. The full text appears in a popup box. Click the close icon ![]() , press the Esc key or click outside the box to close the popup box and return to the list view.
, press the Esc key or click outside the box to close the popup box and return to the list view.
Note: To enable the Wrap text in list view cells (Redesigned User Experience) feature, contact OpenAir Support.
List view position maintained when changing number of rows per page — If you change the number of rows per page in the list views options, OpenAir reloads the list view at the relevant page. After you change the option, the new page contains the first row which was displayed in the old page before you changed the number of rows per page option.
Unique column filter dropdown options — Column filter dropdown options are unique even if values are duplicated. For example, if the same names may be used for Projects Tasks and Phases, this name will only be listed once in the column filter dropdown options..
HTML cell content for permitted field — Redesigned list views now support HTML content for fields that are permitted to contain html.
Note: HTML content support may be discontinued in a future release and replaced with new custom field types such as a Tag custom field, which can be used to emphasize important information — a risk status, for example.
Note: The features described in this section are available when Redesigned OpenAir User Experience Phase 2 and/or 3 is enabled for your account. To enable these features, contact OpenAir Support.
View both the Application settings and the Optional features enabled for your account in the Enabled features view.
To access the Enabled features view go to Administration > Global settings > Enabled Features.
A new column indicates, and lets you order and filter listed features by the Type:
Internal — Internal settings control the Optional features which can only be enabled for your account by OpenAir Support. These features are described in the OpenAir Optional Features Book.
Application — Application settings are controlled by account administrators in the OpenAir Administration module (Administration > Application Settings > [Select an Application] > Other Settings). These features are described in the OpenAir Admin Guide.
The list indicates whether the setting is enabled in account or disabled in account and includes links to the help topics describing the features.
To read more about the feature in the relevant help topic, click the feature name.
To read about requesting an optional feature to be enabled for your account, click Disabled in account. For Application settings, this link points to the help topic describing the feature.
Note: You must be an administrator or have the View Enabled Features role permission to access the enabled features list.
The OpenAir Help Center feature must be enabled for your account and you must be an administrator or have the View Help Center role permission to click the links and access help topics describing the features. To enable the OpenAir Help Center feature for your account, contact OpenAir Support.
Exclude the number of open or incomplete tasks from the My Status and Company Status portlets in the Home screen.
Depending on your configuration and use of OpenAir, you may not need the My Status and Company Status portlets to show the number of incomplete tasks. To remove the number of incomplete tasks, contact OpenAir Support and ask for the following switch to be disabled: “Display incomplete tasks on dashboard”.
Note: If you are using tasks mainly to manage access to timesheets and expenses, you may accumulate a very high number of open or incomplete tasks over time. Showing a high number of incomplete tasks in the My Status and Company Status portlets impacts the performance of the Home screen. Excluding this information should improve Home screen loading time.
The Guinea Francs (GNF) has been added to the list of currencies.
To view available currencies in OpenAir, go to Administration > Global Settings > Currencies.
The Belize Dollars (BZD) have been added to the list of currencies.
To view available currencies in OpenAir, go to Administration > Global Settings > Currencies.
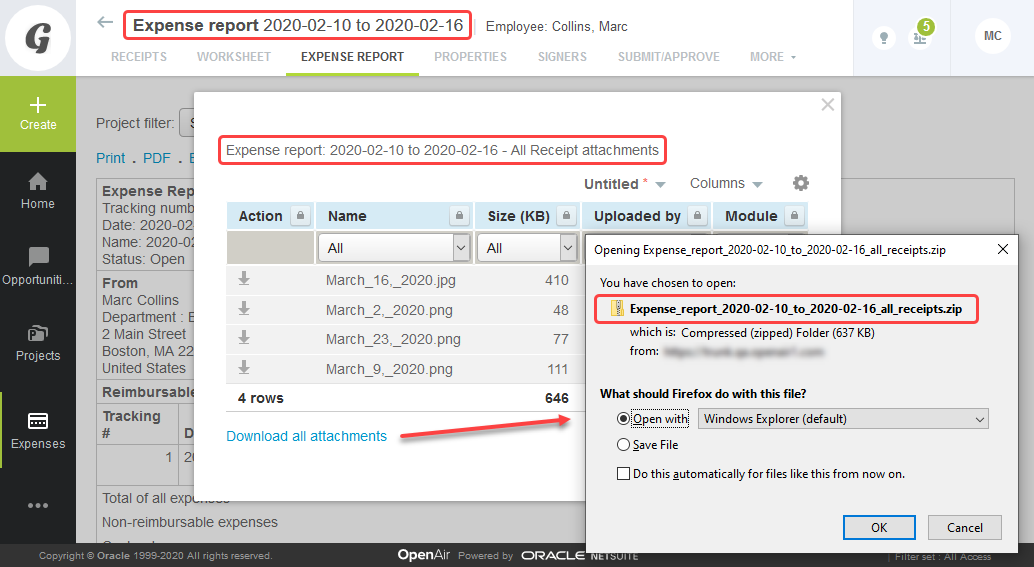
upThe usability of the attachments list view popup has been improved.
All instances of the attachments list view popup panel or window include a link to Download all attachments if the feature Enable single archive download of all files in expense report attachment views is enabled for your account.
If you go to Expenses > Expense Reports > [Select an Expense report] > Expense Report, click Expense report attachments or Receipt attachments to open the attachments list view popup panel or window.
The attachments list view popup opens as a panel if the personal setting Open popups as panels instead of windows is enabled.
Note: Elsewhere, the attachments popup opens as a window and not as a panel.
The title of the attachments list view popup is context-specific:
Expense report attachments — Expense report: <Expense report name> — Attachments
Receipt attachments — Expense report: <Expense report name> — All Receipt attachments
Note: The popup window title is “Expense report: <Expense report name>” if opened from the Expense report Properties form and “Receipt attachments” if opened from the Receipt form.
The filename for the Download all attachments Zip archive will be:
Expense report attachments — Expense_report_<Expense_report_ name>_attachments.zip
Receipt attachments — Expense_report_<Expense_report_ name>_all_receipts.zip
Note: Elsewhere, the filename for the attachments Zip archive is Attachments.zip
The Close button was removed. To close the window, click the close icon ![]() in the top right corner or press the ESC key (modal windows)
in the top right corner or press the ESC key (modal windows)
up
Include only the approved time entries, approved expenses and fulfilled purchase items for the specified date range when generating revenue recognition transactions using 'incurred vs. forecast' recognition rules.
You can use this feature, for example, if you run revenue recognitions for the previous month (e.g. November) a few days into the current month (e.g. December 6) and you only want to include approved time entries, approved expenses and fulfilled purchase items for the previous month (e.g. November 1–30) in revenue recognition transactions.
With this feature enabled, only the approved time entries, approved expenses and fulfilled purchase items entries up to and including the specified end date (e.g. November 30) will be included in revenue recognition transactions.
If the feature is not enabled, revenue recognition transactions include all approved time entries, approved expenses and fulfilled purchase items up to and including the date you run the revenue recognition (e.g. December 6). This may include not only approved time entries, approved expenses and fulfilled purchase items for the previous month (e.g. November) but also for the current month up to the date you run the revenue recognition (e.g. December 6).
Note: To enable this feature, contact OpenAir Support and ask for the following switch to be enabled: Respect the dates filtered on 'incurred vs. forecast' rule when generating revenue recognition transactions.
The inline-editing keyboard navigation in the Project Tasks list view and Project Center Outline view was modified to improve usability.
Double click any editable cell to edit the field value straight from the list view.
Press the Tab key or Shift+Tab to navigate to the editable cell immediately to the right or immediately to the left, respectively. If you are editing the last editable cell to the right, press the Tab key to navigate to the first editable cell in the same row. If you are editing the first editable cell to the left, press Shift + Tab to navigate to the last editable cell in the same row.
Press the Enter key to save the change, close the edit mode, and move to the cell immediately below. You can also click a different row or use the up and down arrow keys to save the changes made and move to a different row.
Note: Previously, pressing the Enter key saved the changes made and opened the cell immediately below for editing. Pressing the Tab key when editing the last editable cell in the row opened the first editable cell in the row immediately below for editing. Pressing Shift + Tab when editing the first editable cell in the row opened the first editable cell in the row immediately above for editing.
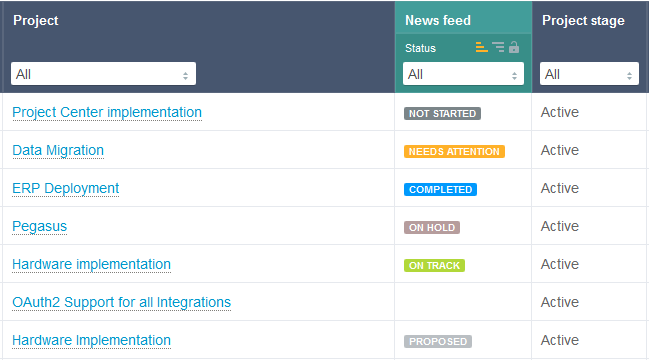
See the status of your projects straight from the list view with project status tags displayed in the new News feed — Status column.
The News feed — Status column shows the project status tag as a color coded text badge, if there are any status update for the project and if a project status tag is set in the latest status update.
Click on the tag to open the project status news feed from the projects list view and view the latest status update details. You can sort and filter your data by Status using the list view sort and filtering options.
Note: This feature is currently only available on redesigned list views if the Project status news feed and Redesigned OpenAir user experience Phase 2 and/or 3 features are enabled for your account.
The project status tag is not currently supported in:
Project status summary
Reports
Dashboard portlets
List views other than those redesigned as part of the Redesigned OpenAir user experience Phase 3 feature.
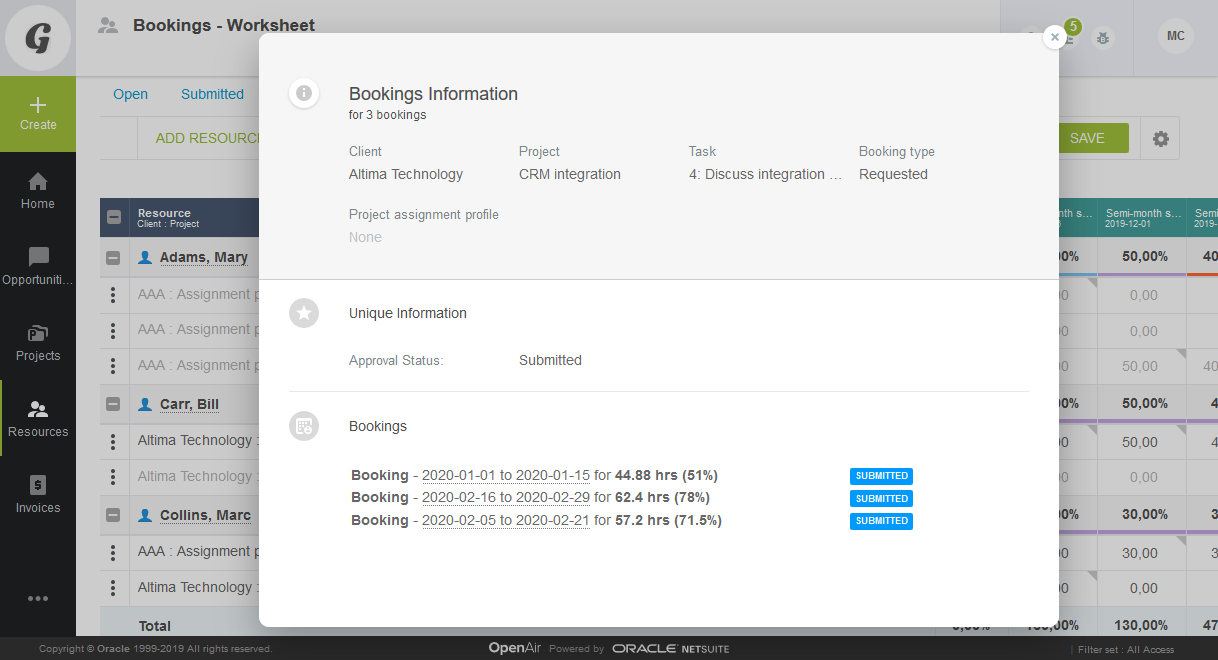
The Advanced Booking Worksheet rows uses both visible and hidden columns to group bookings under worksheet rows.
This optional feature includes the following functionality:
All the bookings grouped under a single worksheet row have the same values for all fields except the note, start date and end date fields. Bookings grouped under the same worksheet row not only have the same values in the columns that are visible in the Advanced Booking Worksheet but also have the same value in the columns which are not shown.
Note: When the feature is not enabled, bookings grouped under the same worksheet row have the same values in the visible worksheet columns but may have different values in the hidden columns.
The Bookings column shows an information icon ![]() next to the number of bookings when both the following conditions apply:
next to the number of bookings when both the following conditions apply:
Two or more worksheet rows show the same information in the visible columns.
Some of the booking information is unique to each worksheet row.

To show the details for the bookings grouped under a single row, click the link showing the number of bookings in the Bookings column. A popup window shows detailed information for the bookings and the list of bookings sharing this information.
If two or more worksheet rows share some information:
The shared information is displayed under the Bookings information heading.
The information that is unique to the bookings grouped under the worksheet row is displayed under the Unique information heading.
The improved copy functionality copies all fields from the existing booking except the start date, end date, requester and note fields.
To enable this feature, contact OpenAir Support and ask for the following switch to be enabled: Enable detailed groupings of bookings in the advanced booking worksheet.
The following filters are now available in the Dynamic and Advanced Booking Worksheets: Cost center filter, Project stage filter, Client filter and Utilization filter.
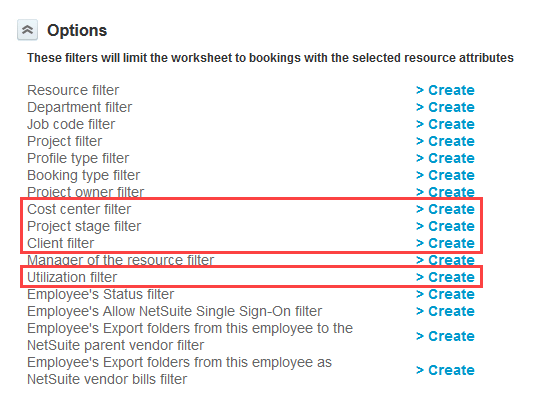
Go to Resources > Bookings > Worksheet and click the Settings icon ![]() .
.
Click the > Create link next to the filters you want to set.
Select the filter settings and click OK.
The utilization filter lets you filter for resources with more or less than a certain utilization percentage in any of the visible booking periods. For example, select More than 80% and Less than 30% to list only those resources with more than 80% utilization or less than 30% utilization in any of the booking periods in the selected date range.

Note: The Utilization filter is only supported in the Advanced Booking Worksheet, not in the Dynamic Booking Worksheet.
upWhen saving an existing report as a new report, the configuration options for the original report and the new report are now independent from one another.
This release corrects the behavior of the Save report as ... functionality.
Until now, when creating a Tabular or CrossTab report based on an existing report, both the original and the new reports used the same configuration options. Changing one of the following configuration options for one report also changed it for the other:
Show all/Hide all and individual node collapsing
Locking
Sorting
Number of rows
Position on page
Column resizing
Starting from the April 18, 2020 release, these report configuration options can be changed independently in the new report and the original report without impacting the other.
Note: The previous behavior is available as an optional feature — it is disabled by default. Contact OpenAir Support to enable the shared report settings feature if the previous behavior is required.
upAuthorize access to your OpenAir data using the industry standard OAuth 2.0 framework and eliminate the need for integration applications to store user login details outside of OpenAir.
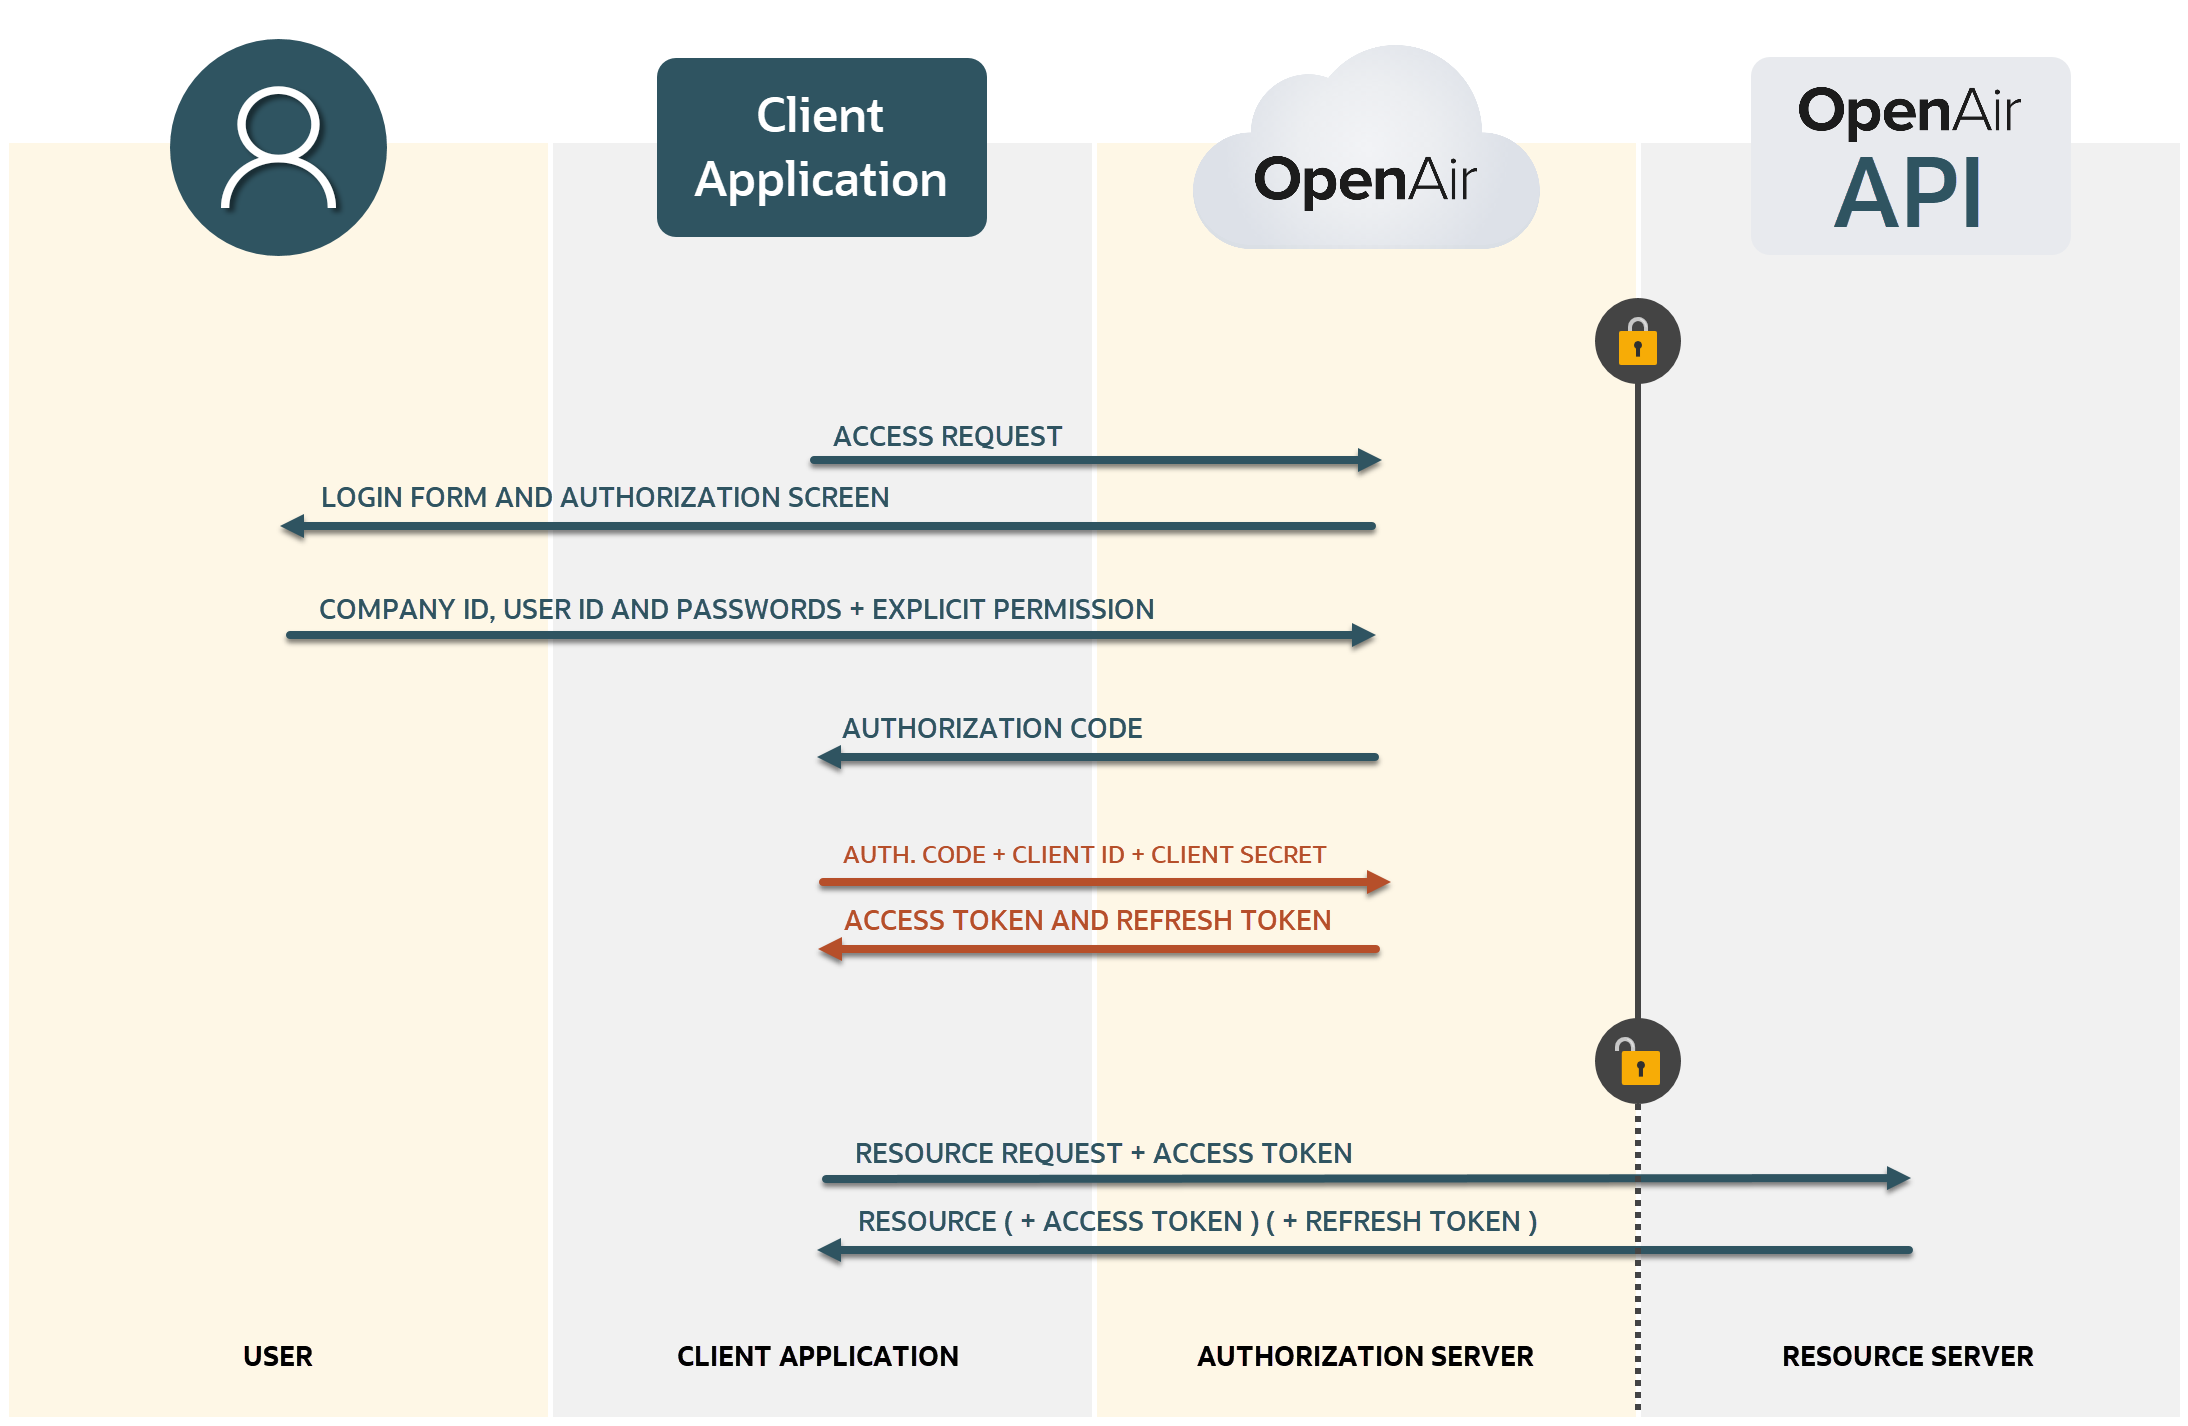
OpenAir supports OAuth 2.0, a robust authorization framework. This authorization framework enables client applications to use a token to access OpenAir through the OpenAir XML or SOAP API. The application accesses the protected resources on behalf of a user who gave an explicit permission for the access. This method eliminates the need for XML or SOAP API integrations to store user credentials.
This feature is available automatically if you have access to OpenAir API. It includes the following elements:
Administrators can register up to 20 integration applications with OpenAir and enable or disable these applications in the Administration module.
Application Developers can use the OAuth 2.0 authorization code flow to get an access token then use the access token to access your OpenAir data using the OpenAir XML or SOAP API.
Note: OpenAir only supports the OAuth 2.0 authorization code grant type.
End-users can give applications explicit permission to access OpenAir on their behalf and they can revoke this permission at any time.
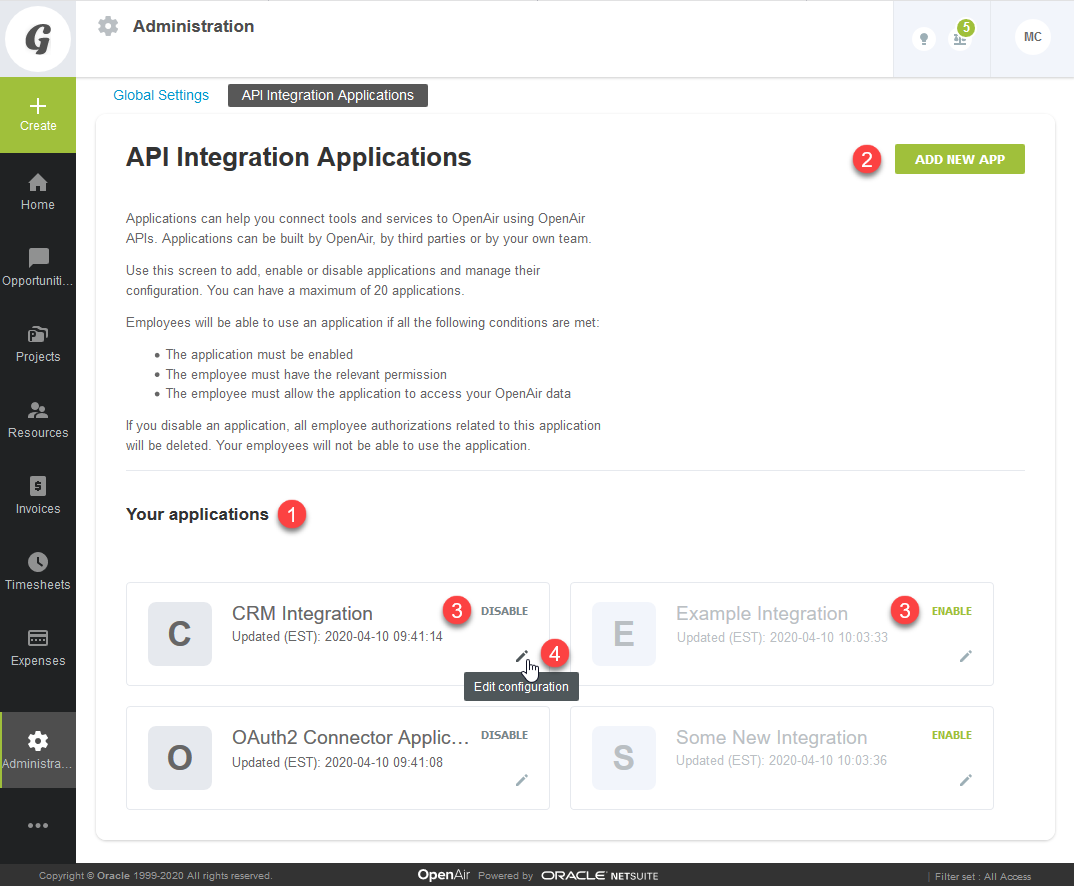
Integration applications using OAuth 2.0 to obtain access to your OpenAir data must be registered and enabled by an account administrator. To register and manage your integration applications, go to Administration > Global settings > API Integration Applications.
All your registered applications are listed in a grid. Details include the name of the application and the date and time when it was last updated.
To register a new application, click ADD NEW APP. This button is disabled if you reach the limit of 20 registered applications.
To enable or disable an application, click the ENABLE or DISABLE link in the top right corner of the corresponding box.
To edit an application’s configuration, click the edit icon ![]() in the bottom right corner of the corresponding box.
in the bottom right corner of the corresponding box.
Note: All times are given as Eastern Standard Time (EST).
You can register up to 20 applications. Each application needs a Client ID and Client Secret to obtain access to OpenAir using OAuth 2.0. The Client ID and Client Secret are generated by OpenAir as part of the registration process and are unique to each application.
Important: The Client Secret is a private key the application uses to request an authorization code from OpenAir. It should not be shared or stored in public code repositories.
The Client Secret is displayed only once. You will not be able to retrieve it after you close the Application Credentials dialog.
If you misplace the Client Secret, you can edit the application configuration and generate a new Client Secret for the application.
Go to Administration > Global settings > API Integration Applications.
Click ADD NEW APP. The Add New Application dialog box appears.
Enter the following information:
Application name (Required) — Enter a display name for your application in OpenAir. The name must be unique to the application. You will not be able to use a name already used by another registered application.
Description — Enter a few sentences to tell your employees what the application and how it will help them. Your employees will use this information to decide whether they allow this application to access OpenAir on their behalf.
Redirect URI (Required) — Enter a link users should be redirected to after granting or denying the application permission to access OpenAir on their behalf.
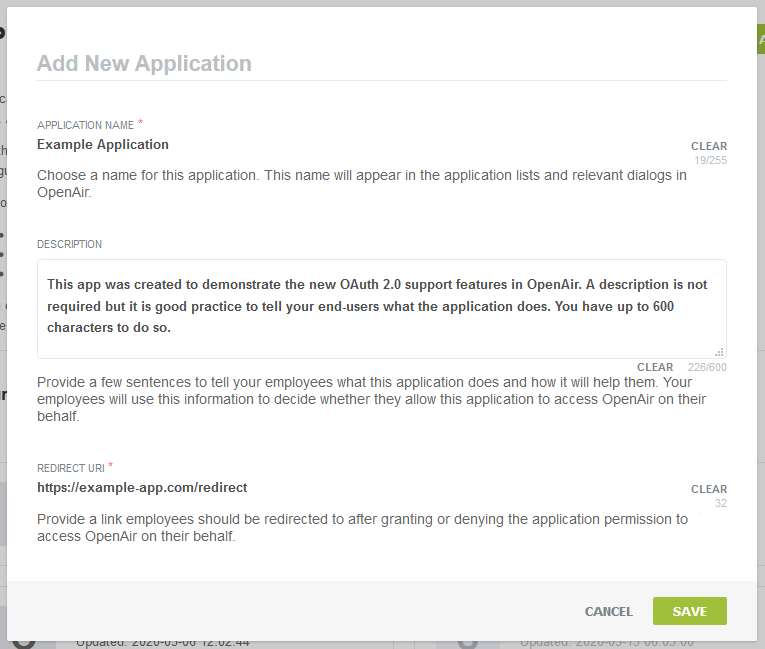
Click Save. The Application Credentials dialog box appears.
Copy the Client Secret and store it in a safe place. The Client Secret is displayed only once. You will not be able to retrieve it after you close this window.
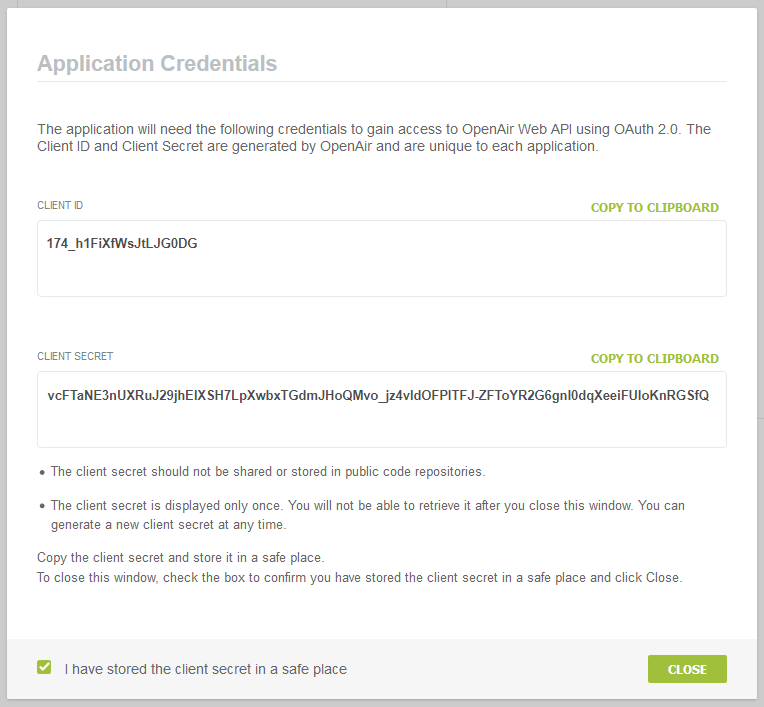
Check the box to confirm you have copied and stored the Client Secret in a safe place then Click Close.
You must enable an application to allow this application to obtain access to OpenAir using OAuth 2.0.
You can disable an application to prevent this application from obtaining access to OpenAir using OAuth 2.0. If you disable an application OpenAir automatically revokes all permissions given by users for the application to access OpenAir on their behalf. Employees will not be able to use the disabled application
Go to Administration > Global settings > API Integration Applications.
Click the ENABLE or DISABLE link in the top right corner of the corresponding box. A confirmation dialog box appears.
Click ENABLE or DISABLE to enable or disable the application. Click Cancel to cancel the operation and return to the API Integration Applications screen.
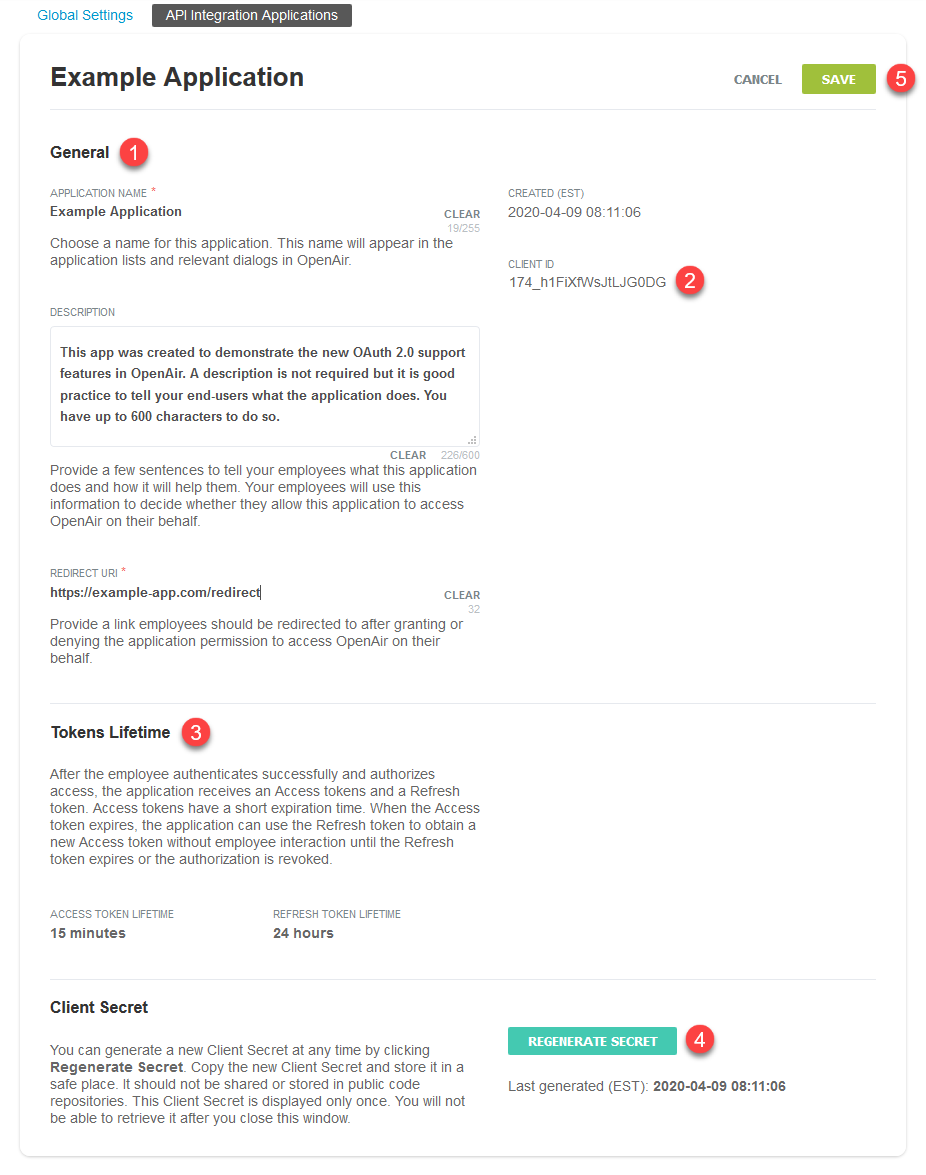
You can view the configuration details of your registered applications, including their unique Client ID from the Application Configuration form. You can change the application name, description or Redirect URI or generate a new Client Secret for the application.
To open the Application Configuration screen for a registered application, go to Administration > Global settings > API Integration Applications and click the edit icon ![]() in the bottom right corner of the corresponding box.
in the bottom right corner of the corresponding box.
The General section of the form lists the main application detail:
You can change the Application name, Description and Redirect URI.
You can view when the application was registered under Created.
Note: All times are given as Eastern Standard Time (EST).
You can view the Client ID — the unique identifier a client application needs to send to OpenAir along with a client secret as part of the OAuth 2.0 authorization code flow.
The Tokens Lifetime section of the form indicates the validity period of the access and refresh tokens — Access token lifetime and Refresh token lifetime.
As part of the Auth 2.0 authorization code flow, authorized applications need to exchange an authorization code for an access token and refresh token to obtain access to OpenAir. The access token has a short expiration time. When the access token expires, the client application can use the refresh token to obtain a new access token without user interaction until the refresh token expires or the authorization is revoked. A new refresh token is returned with the access token if the current refresh token is due to expire before the new access token expires.
To generate a new Client Secret, click Regenerate Secret — You may need to generate a new client secret if you misplace or delete the client secret accidentally or if your client secret becomes compromised.
The new client secret will be valid immediately. The old client secret will continue to be valid for 24 hours after you generate a new one. This allows time to update any enabled application with the new client secret.
If you made any changes to the configuration details in the General section, the Save button is enabled. Click Save to save changes and return to the API Integration Applications screen or click Cancel to close the configuration form without saving.
OpenAir supports two methods to access OpenAir data using OpenAir XML or SOAP API requests:
Using user credentials (Company ID, User ID, password) and, in the case of OpenAir SOAP web services, a session ID.
Using OAuth 2.0 access tokens.
In the OAuth 2.0 scenario, client applications use one of the OAuth 2.0 grant types to get an access token after the user authorizes the application. The user’s identity is verified by an authentication service, which issues the access token. The access token can then be used to gain authenticated access to OpenAir through the XMl or SOAP API.
This section describes how to get an access token using the OAuth 2.0 authorization code grant type in your applications, and how to use the access token in your API calls.
Note: OpenAir only supports the OAuth 2.0 authorization code grant type, which defines a particular workflow client applications can use to obtain the access token.
Application developers can use the OAuth 2.0 redirection-based authorization code grant type to obtain an access token. This method eliminates the need for client applications to collect and store user credentials.
The authorization code flow includes the following steps:
Getting the user’s explicit permission to access OpenAir on their behalf.
The client application opens a browser and directs the user to the OpenAir identity authentication service with the necessary URL query string parameters.
The user enters user credentials in the OpenAir login form or in a third-party identity provider Single Sign-on login form . The authenticated user is then prompted to authorize the application’s access request.
Receiving the authorization code — OpenAir issues an authorization code. The user is redirected back to the client application with the authorization code in the query string.
Exchanging the authorization code for an access token — The client application must exchange the authorization code for an access token and a refresh token.
An additional step — Refreshing an access token — is required to get a new access token after the previously issued access token has expired.
To begin the OAuth 2.0 authorization code flow, the client application must direct the user to the authorization server — OpenAir — using a GET request.
Send a GET request to the authorization endpoint using a URL like the following:
https://company-id.app.openair.com/login/oauth2/v1/authorize?response_type=code&redirect_uri=https://example-app.com/redirect&client_id=174_h1FiXfWsJtLJG0DG&scope=soap&state=ryjp37y2qa28hdseck1gat
The GET request URL includes the authorization endpoint for the OpenAir account followed by a query string: https://<company-id>.app.openair.com/login/oauth2/v1/authorize?<query-string>.
The request parameters are described in the following table.
|
Request parameter |
Description |
|---|---|
|
response_type |
The value of the response_type parameter is always code. It tells the authorization server that the client application is initiating the OAuth 2.0 authorization code flow. |
|
redirect_uri |
The valid redirect URI where the application will process the authorization code. The user should be redirected to this URI after allowing or denying the access request. The redirect URI must match the redirect URI specified on the application configuration form in OpenAir. |
|
client_id |
The public identifier for the client application. The Client ID is generated by OpenAir when an administrator registers the client application. |
|
scope |
The scope for which the application is requesting access. The scope determines which OpenAir API the application will be able to access.
|
|
state |
A random string generated by the client application, which is used to prevent cross-site request forgery (CSRF) attacks. For more information see the OAuth 2.0 specification RFC6749 Section 10.12. |
After the application sends the GET request, OpenAir redirects the user to the OpenAir login form. OpenAir may redirect the user to a third-party Identity provider Single Sign-on form, if SAML SSO is enabled for the account and the user. After successful authentication, OpenAir displays an authorization screen prompting the user to approve the application’s access request.
After obtaining the user’s explicit permission, OpenAir initiates a redirect to the redirect URI specified in the GET request with the authorization code and the state as query parameters.
The redirect query parameters are described in the following table.
|
Redirect parameter |
Description |
|---|---|
|
state |
The client application should check that the state in the redirect matches the state set in the GET request initiating the OAuth 2.0 authorization code flow. Validating the state sent to and returned from the authorization server can be used to prevent cross-site request forgery (CSRF) attacks. |
|
code |
The authorization code issued by OpenAir.
|
The following sample redirects illustrate successful and unsuccessful authorization.
Application successfully authorized.
https://example-app.com/redirect?state=ryjp37y2qa28hdseck1gat&code=JTlQ43UvYDKbhI_SpEWsIE_bTpbou2-kYeeLtKiMuR1iqZ3W3roqM4rmRC8fFCOJtBI6a85AnJPefx2szW9g4jCY
Application not authorized.
https://example-app.com/redirect?error_description=The+resource+owner+or+authorization+server+denied+the+request&error=access_denied&state=ryjp37y2qa28hdseck1gat
The application can use the authorization code to obtain an access token and a refresh token using a POST request.
Send a POST request to the token endpoint.
The POST request URL is https://<company-id>.app.openair.com/login/oauth2/v1/token
The request must include the client ID and the client secret in the HTTP authorization request header.
The client authentication method used in a header of the request follows the HTTP Basic authentication scheme. For more information, see RFC 7617.
The format is client_id:clientsecret.
The string value is Base64 encoded.
The request must include the parameters grant_type, code and redirect_uri in the request body.
Request parameters must be encoded based on the HTML specification for application/x-www-form-urlencoded media type. For more information, see URL Specification 5.1.
The request parameters are described in the following table.
|
Request parameter |
Description |
|---|---|
|
grant_type |
The value of the grant_type parameter is authorization_code. It tells the token endpoint that the client application is using the OAuth 2.0 authorization code grant type. |
|
code |
The authorization code issued by OpenAir and received by the client application in the redirect. |
|
redirect_uri |
The valid redirect URI. The redirect URI must match the redirect URI specified on the application configuration form in OpenAir and when requesting the authorization code. |
|
client_id |
The public identifier for the client application. The Client ID is generated by OpenAir when an administrator registers the client application. |
|
client_secret |
The client secret for the application. This ensures that the request to get the access token is made only from the application, and not from a potential attacker that may have intercepted the authorization code. |
Example POST request:
POST /login/oauth2/v1/token HTTP/1.1
Host: company-id.app.openair.com
Authorization: Basic MTc0X2gxRmlYZldzSnRMSkcwREc6dmNGVGFORTNuVVhSdUoyOWpoRWxYU0g3THBYd2J4VEdkbUpIb1FNdm9fano0dmxkT0ZQSVRGSi1aRlRvWVIyRzZnbmwwZHFYZWVpRlVJb0tuUkdTZlEK
Content-Type: application/x-www-form-urlencoded
code=JTlQ43UvYDKbhI_SpEWsIE_bTpbou2-kYeeLtKiMuR1iqZ3W3roqM4rmRC8fFCOJtBI6a85AnJPefx2szW9g4jCY&redirect_uri=https%3A%2F%2Fexample-app.com%2Fredirect&grant_type=authorization_code
The token endpoint will verify all the parameters in the request to ensure that the authorization code is valid and that the client ID and client secret match. If all the request headers and parameters are valid, the token endpoint generates an access token and refresh token and includes them in the response.
The token endpoint returns the response as a JSON object with the properties described in the following table.
|
JSON object properties |
Description |
|---|---|
|
access_token |
The access token in JSON Web Token (JWT) format. The access token is valid for 15 minutes. |
|
refresh_token |
The refresh token in JSON JWT format. The refresh token is valid for 24 hours. |
|
expires_in |
The access token expiration time in seconds. The access token is valid for 900 seconds after it is issued. |
|
type |
The value of the type property is always bearer. For more information, see the OAuth 2.0 specification — RFC 6750. |
Example response (successful token request):
HTTP/1.1 200 OK
Content-Type: application/json
Cache-Control: no-store
Pragma: no-cache
{
      "refresh_token":"WGxpeGNVTm1mNGhaS2E1djFQQ2twV1pKcWpOU0pXUkhZUU5oMTR1MFU5OUtLY3N1NkZKOG9SMHp4UnNuMjYyRTJGcm9NVUo5OWxENDFzcW5WSDFsUEhoSF8xNzQ",
      "expires_in":900,
      "access_token":"eNNJ1GXD25-6IUylF6RZT33HqhoqSAAK53F0kxT62fBoKreDoc8Y_-Gnk2lUIqNbhwguHnxDtxUsJMY6NrDoiBnd",
      "token_type":"bearer"
}
The client application can now use the access token to make API requests. This completes the authorization flow.
The access token is only valid for a short period of time and within the scope it was issued for. The client application will need to refresh the access token to continue making API requests after it expires.
The access token has a short expiration time (15 minutes). When the access token expires, the client application can use the refresh token to obtain a new access token using a POST request.
You can use the expiration time value (expires_in) to refresh access tokens before it is due to expire.
You can refresh access token if an API request returns an authentication failed error.
Send a POST request to the OpenAir token endpoint. The POST request is similar to that used to exchange an authorization code for an access token except it now uses the parameters set in the following table.
|
Request parameter |
Description |
|---|---|
|
grant_type |
The value of the grant_type parameter is refresh_token. It tells the token endpoint that the client application is requesting to refresh an access token. |
|
refresh_token |
A valid refresh_token. Refresh tokens are valid for 24 hours. |
|
redirect_uri |
The valid redirect URI. |
|
client_id |
The public identifier for the client application. |
|
client_secret |
The client secret for the application. |
Example POST request:
POST /login/oauth2/v1/token HTTP/1.1
Host: company-id.app.openair.com
Authorization: Basic MTc0X2gxRmlYZldzSnRMSkcwREc6dmNGVGFORTNuVVhSdUoyOWpoRWxYU0g3THBYd2J4VEdkbUpIb1FNdm9fano0dmxkT0ZQSVRGSi1aRlRvWVIyRzZnbmwwZHFYZWVpRlVJb0tuUkdTZlEK
Content-Type: application/x-www-form-urlencoded
refresh_token=WGxpeGNVTm1mNGhaS2E1djFQQ2twV1pKcWpOU0pXUkhZUU5oMTR1MFU5OUtLY3N1NkZKOG9SMHp4UnNuMjYyRTJGcm9NVUo5OWxENDFzcW5WSDFsUEhoSF8xNzQ&redirect_uri=https%3A%2F%2Fexample-app.com%2Fredirect&grant_type=refresh_token
The token endpoint will verify all the parameters in the request to ensure that the refresh token is valid and that the client ID and client secret match. If all the request headers and parameters are valid, the token endpoint generates an access token and refresh token and includes them in the response.
The token endpoint returns the response as a JSON object with the properties described in the following table. The response includes both a new access token and a new refresh token.
|
JSON object properties |
Description |
|---|---|
|
access_token |
The access token in JSON Web Token (JWT) format. The access token is valid for 15 minutes. |
|
refresh_token |
The refresh token in JSON JWT format. The refresh token is valid for 24 hours. |
|
expires_in |
The access token expiration time in seconds. The access token is valid for 900 seconds after it is issued. |
|
type |
The value of the type property is always bearer. For more information, see the OAuth 2.0 specification — RFC 6750. |
Example response (successful token request):
HTTP/1.1 200 OK
Content-Type: application/json
Cache-Control: no-store
Pragma: no-cache
{
      "refresh_token":"N25RdE82N0FIMnBDRTQ1d3hITHN6dXRwQ3dNdzVHWHMydWd3WWFqUXMwMWgrcTB3UHBFQ3VLaUZQTlRuR0J3U09LaWcvWWJ2UHpPS2hWUUtxQlJCMzBHVF8xNzQ",
      "expires_in":900,
      "access_token":"pWprqUHkgaOWai7fSjaNaN5ywpDr7a7W6hLiq-b1vBBAT48zxAPTyy-wpTNxyfwJieQzZ5E1HEOsG1hNtwJpILR5",
      "token_type":"bearer"
}
Your client application needs to handle the following cases when the request to exchange an authorization code for an access token or to refresh a token fails. The token endpoint may return one of the errors listed in the following table if the token request fails.
Errors are listed in descending priority order. Only the first error is returned if there are more than one.
Some of the errors are specific to one of the two possible types of request ( grant_type).
|
error |
error_description |
grant_type |
Reason |
|---|---|---|---|
|
unsupported_grant_type |
The authorization grant type is not supported by the authorization server |
The grant_type must be either authorization_code or refresh_token. |
|
|
invalid_request |
Authorization header not sent |
Request headers must include a Basic Authorization header. |
|
|
invalid_request |
No credentials provided |
The Client Id and Client Secret must be sent in the request Authorization header. |
|
|
access_denied |
Authorization code is not valid |
authorization_code |
The authorization code must be valid. Possible reasons include:
|
|
invalid_request |
redirect_uri or client_id is not valid |
authorization_code |
The redirect URI and Client ID must match the information specified on the application configuration form in OpenAir. |
|
access_denied |
Refresh token is not valid |
refresh_token |
The refresh token sent in the request is not valid. Possible reasons include:
|
|
invalid_scope |
Changing scopes is not supported |
refresh_token |
Tokens are issued for a specific scope. The scope of the token requested must be the same as the scope of the token sent in the request. |
|
access_denied |
Authorization failed |
The Client Id and Client Secret pair sent in the request is not valid. Note that account administrators may generate a new Client Secret for the application in OpenAir. |
Note: If applicable, the client application can initiate the OAuth 2.0 authorization code flow again to obtain a new authorization code and exchange it for an access token. The end user will be directed to the login form and required to enter valid user credentials. If the user revoked the application the authorization screen will appear. If the application is still authorized, the authorization endpoint will return a new authorization code immediately after the successful user authentication.
You can use OAuth 2.0 access token authorization instead of password authentication or Session ID in your API requests. Both OpenAir XML API and OpenAir SOAP API support authorization using access tokens.
Note: Both OpenAir XML API and OpenAir SOAP API continue to support password authentication. OpenAir SOAP API continues to support SessionID.
API requests must use a valid access token. OpenAir API return an error code 420 and message Authentication failed otherwise.
The access token must exist.
The access token must not be expired.
The user who gave the application permission to access OpenAir must be active. The same access token can be used if the user is set to active again.
The application must be enabled for the OpenAir account. The same access token can be used if the application is disabled and then enabled again.
API requests must use an access token with a valid scope. OpenAir API return an error code 413 and message Account not privileged to access API otherwise.
The access token must be used within the scope (the specific OpenAir API) it was issued for. For example, an invalid scope error will be returned if the authorization code was obtained for the scope xml and the client application attempts to use the access token in a SOAP API request.
An invalid OAuth2 access token authorization has priority over a valid password authentication. You cannot use password authentication (Company ID, User ID, password) — or a valid Session ID in the SOAP session header — as a fallback for an invalid access token.
The access token (access_token) is passed instead of Company ID, User ID and Password used for password authentication in the Auth XML command.
Use the syntax given in the following example:
<Auth>
      <Login>
            <access_token>eNNJ1GXD25-6IUylF6RZT33HqhoqSAAK53F0kxT62fBoKreDoc8Y_-Gnk2lUIqNbhwguHnxDtxUsJMY6NrDoiBnd</access_token>
      </Login>
</Auth>
The access token (accessToken) is held in the SessionHeader web services method complex type instead of the logged in user Session ID (sessionId). Use the syntax given in the following examples:
XML Example
<SessionHeader xsi:type="perl:SessionHeader"mlns:perl="http://namespaces.soaplite.com/perl">
      <accessToken xsi:type="xsd:string">eNNJ1GXD25-6IUylF6RZT33HqhoqSAAK53F0kxT62fBoKreDoc8Y_-Gnk2lUIqNbhwguHnxDtxUsJMY6NrDoiBnd</accessToken>
</SessionHeader>
C# Example
// Create service stub
OAirServiceHandlerService _svc = new OAirServiceHandlerService();

// POST Request to get access_token

// Create a new session header object and add the access token
_svc.SessionHeaderValue = new SessionHeader();
_svc.SessionHeaderValue.accessToken = response.access_token;
Java Example
// Set the service URL
OAirServiceHandlerServiceLocator locator = new OAirServiceHandlerServiceLocator();
locator.setOAirServiceAddress("https://company-id.app.openair.com/soap");

// POST Request to get access_token

// Create a new session header object and add the access token
SOAPHeaderElement header = new SOAPHeaderElement("https://company-id.app.openair.com/OAirService", "SessionHeader");
SOAPElement node = header.addChildElement("accessToken");
node.addTextNode(access_token);
binding.setHeader(header);
Integration applications let you connect OpenAir with other applications and they extend what you can do with OpenAir. Integration applications may use the OAuth 2.0 authorization protocol to gain access to your OpenAir account.
The first time an application using the OAuth 2.0 protocol attempts to access OpenAir on your behalf, you will need to give this application your explicit permission.
The application will open a browser and direct you to the same trusted login form you normally use to log into OpenAir. The OpenAir login form or your company Single Sign-on form will appear.
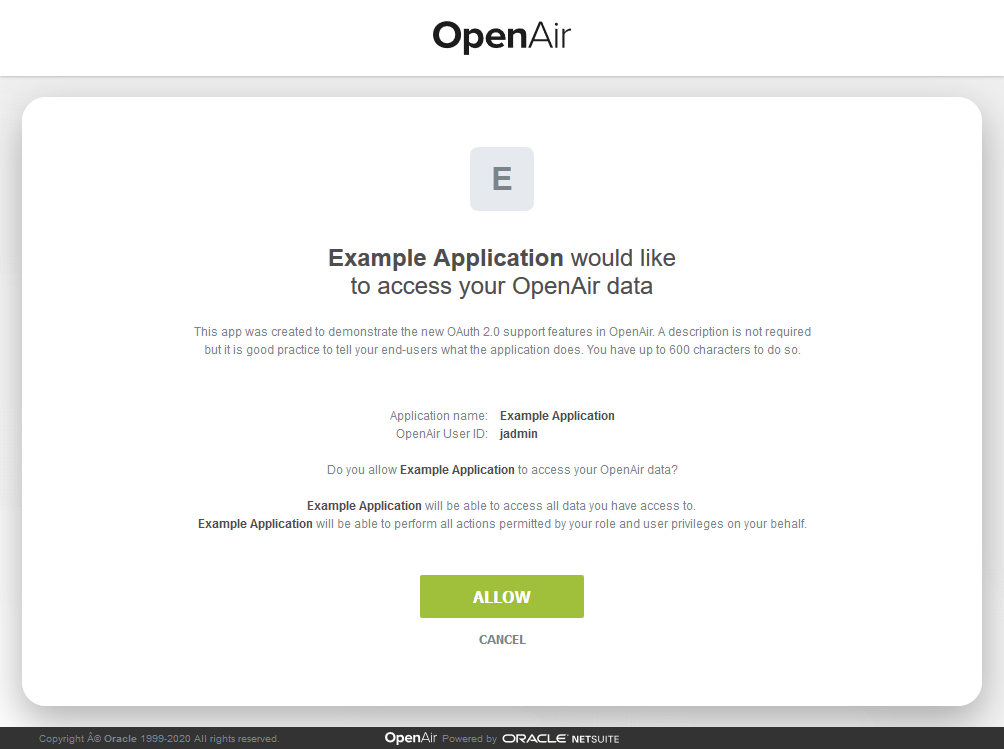
Enter your login details and click Log in. An authorization screen will appear indicating that the application <application name> would like to access your OpenAir data.
Read the content of the authorization screen attentively. It should describe what the application does and how it will help you. It should also say what the application can do:
The application will be able to access all data you have access to.
The application will be able to perform all actions permitted by your role and user privileges.
Click ALLOW to authorize the application or click CANCEL if you do not want the application to access OpenAir on your behalf.
Integration applications are registered and managed by your account administrator. They need to be enabled on your account before they can attempt to connect to OpenAir and request your permission.
Note: Integration applications are registered and managed by your account administrator. They need to be enabled on your OpenAir account before they can attempt to connect to OpenAir and request your permission.
Account administrators can disable an application at any time.
If you have authorized an application and this application is disabled by an administrator, the application will no longer be able to interact with OpenAir.
If an administrator enables this application again, you will need to give this application your explicit permission again before you can continue to work with it in connection with OpenAir.
After you authorize an application, it will be able to interact with OpenAir on your behalf until you revoke the authorization.
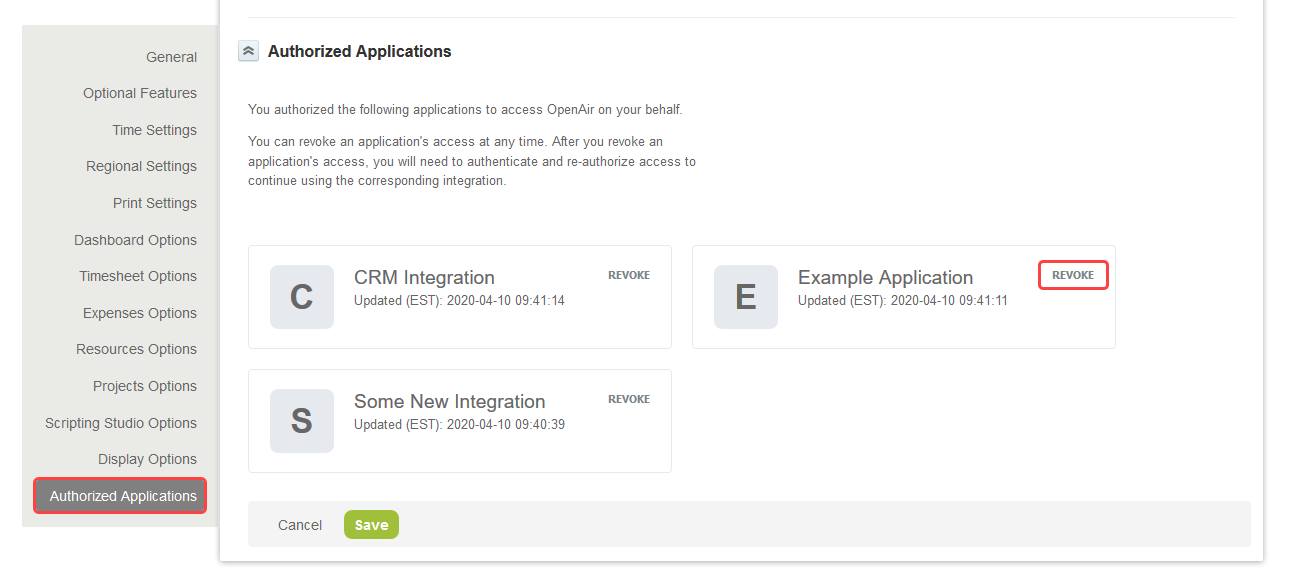
To view the application you have authorized, go to User Center > Personal Settings > Authorized Applications. All your authorized applications are listed in a grid. Details include the name of the application and the date and time when it was last updated.
Note: All times are given as Eastern Standard Time (EST).
To revoke an application, click REVOKE in the top right corner of the corresponding box, then click REVOKE in the confirmation message. The application no longer shows in the authorized applications list. If a revoked application attempts to access OpenAir on your behalf, you will be prompted to give this application your explicit permission again.
Read information about which tables use job codes using the XML API and SOAP API.
Read the JobCodeUsed type using the XML API or SOAP API. The JobCodeUsed type includes the following fields: id, table_name, used_by , position , created, updated.
Read and modify the booking type when reading, adding or modifying Resource Request Queue records using the XML API and SOAP API.
The booking_type_id field is available when using the XML API or SOAP API to read, add, modify records in the ResourceRequestQueue table.
Download and read about real world use case script examples from the new Platform Solutions page in the OpenAir Help Center.
To view the platform solutions catalog, go to User Center > Help Center > Platform Solutions. The page lists all the real world user scripting examples described in the OpenAir User Scripting Guide. Solutions are color coded by category — Validation, Automation, Workflow — with a visual representation and a short summary to indicate the purpose of each solution.
To save the solution XML file, click the DOWNLOAD link. You can then import the solution file from the Scripting Center in OpenAir.
To read the help topic describing the solution, click the LEARN MORE link.
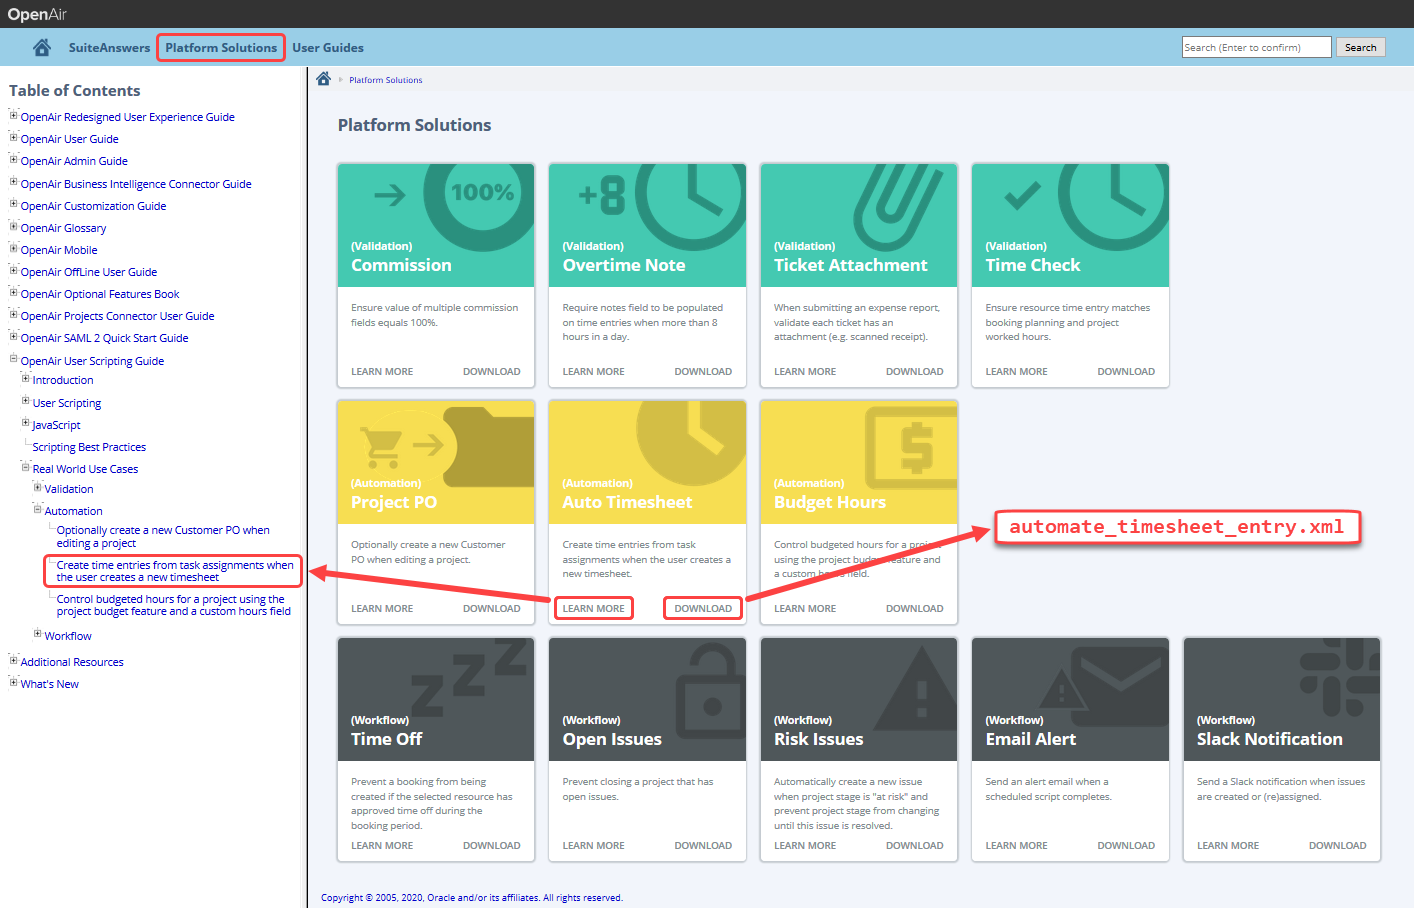
Note: The OpenAir Help Center feature must be enabled for your account and you must be an administrator or have the "View Help Center" role permission to access the Platform Solutions page. The OpenAir Scripting Center feature must be enabled for your account and you must be an administrator or have the "View Scripting Center" role permission to access the import solution files and try out the solutions.
Click the Data Dictionary tab in the Help Center navigation bar to open the OpenAir Data Dictionary in a new browser tab or window.
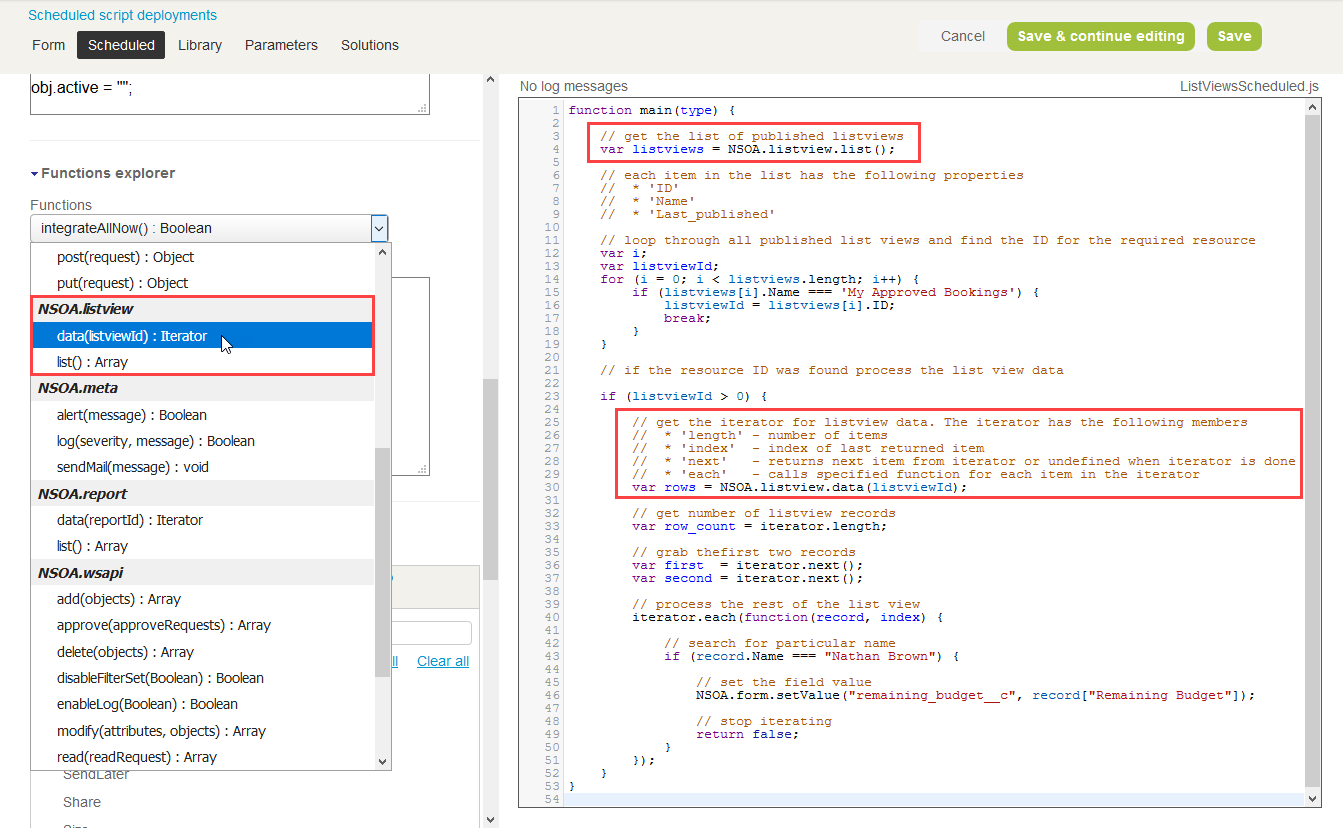
Use published list views like custom queries and read the latest list view data in your OpenAir form and scheduled scripts.
Read your published list view data in your OpenAir form scripts and scheduled scripts with two new functions:
NSOA.listview.data(listviewId) — Read the published list view data available to the user running the script. The function returns a specialized list view data iterator (length, index, next, each):
length — number of items
index — index of last returned item
next — returns the next item from the data iterator or undefined when the iterator is done
each — calls specified function for each item in the iterator
The function consumes 10 units for each 1000-item page loaded into the iterator on-demand. It consumes 10 units for the first fetch even if empty.
NSOA.listview.list() — Read the list of published list views available from the OpenAir OData service. Returns the list of published list views. Each item in the list has the following properties:
ID— The published list view OData resource ID
Name — The name of the list view
Last published — The date and time the list view was last published
Important: The Last published property will be Last_published with an underscore instead of the space if the optional feature Replace Non-Alphanumeric Characters with Underscores in Column Titles and Metadata is enabled for your account. Accommodate both possibilities in your scripts to ensure your scripts continue work whether the feature is enabled or not.
The function consumes 1 unit.
The data read by your scripts is exactly the same as the data you can see in your list view at any given time.
Accessing published list views using the NSOA.listview.data(listviewId) and NSOA.listview.list() user scripting functions does not use any of your allocated OData requests.
Both form and scheduled scripts support the NSOA.listview.data(listviewId) function. However, the number of items you can process in form scripts is restricted by the scripting governance time limits. The function is best suited for reading published list view data in scheduled scripts, which allow up to 1 hour of JS runtime and 1 hour of web services API call time.
Note: The OpenAir Business Intelligence Connector must be enabled for your account to use NSOA.listview and NSOA.report functions. OpenAir Business Intelligence Connector is a licensed add-on. To enable this feature, contact your OpenAir Sales Representative.
For more information about publishing list views, see the OpenAir Business Intelligence Connector Guide.
upPublish all your essential list views and access the most up to date OpenAir data from your preferred Business Intelligence (BI) tools.
You can read data from all essential OpenAir list views in real-time by publishing these list views to the OpenAir OData service.
The extended coverage includes the main list views from the Expenses, Invoices, Projects, Purchases, Resources, Timesheets and Workspaces applications. The following list views are currently supported:
Expenses — Expense reports, Authorizations, Alerts
Invoices — Invoices, Charges
Projects — Bookings, Projects, Tasks, Issues, Alerts
Purchases — Purchase requests, Purchase Orders, Fulfillment, Fulfillments
Resources — Resources, Bookings, Alerts
Timesheets — Timesheets, Time entries, Time off requests, Leave accrual, Alerts
Workspaces — Workspaces, Alerts
Tip: Use published list views like custom queries and read the latest list view data in your OpenAir form and scheduled scripts. See Platform.
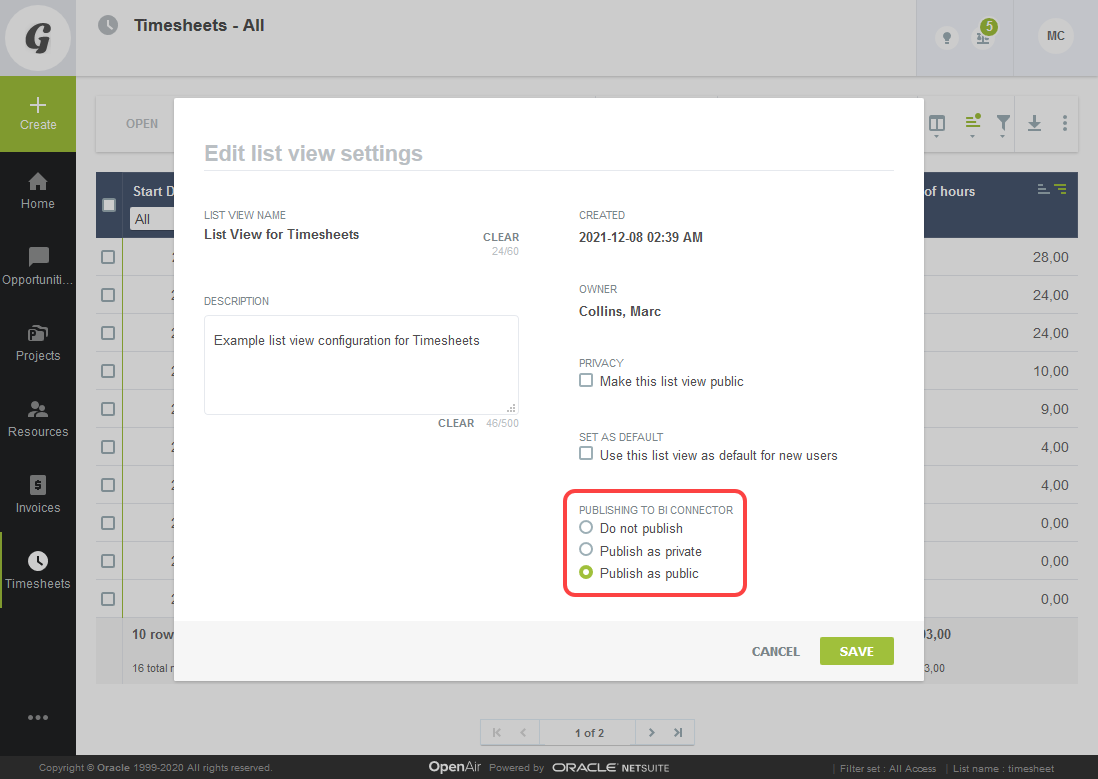
With the relevant features and role permissions enabled, list view publication settings become available when saving a new list view configuration or editing the properties for an existing list view configuration.
Go to the list view you want to publish.
Select one of your saved list view configurations or create a new one based on the active configuration.
Click Edit properties in the List View Configurations panel, or click Save as ... if you are creating a new list view configuration.
In the Edit list view settings (or New list view settings) form, select one of the available options under PUBLISHING TO BI CONNECTOR:
Do not publish — the list view will not be published (this is the default setting).
Publish as private — the list view will be published, but only the user publishing it can access the data.
Publish as public — the list view will be published and available for any user to access. This option respects role permissions and rules for data access, so users can only see data which their role allows them to see.
Click Save.
You can connect your BI tools to the OpenAir OData feed and work with your OpenAir list view data in real time from your BI tools.
Note: The OpenAir Business Intelligence Connector and Save list view configurations features must be enabled for your account and you must be an administrator or have the Publish List Views via OData role permission to publish list views to, and access published list views data from the OpenAir OData Service. OpenAir Business Intelligence Connector is a licensed add-on. To enable this feature, contact your OpenAir Sales Representative.
For more information about publishing list views, see the OpenAir Business Intelligence Connector Guide.
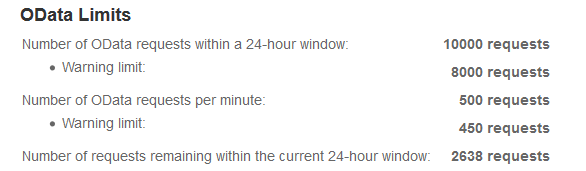
View your OData limits in the Administration module.
If the OpenAir Business Intelligence Connector is enabled for your account, go to Administration > Global settings > OData limits.
The new screen shows the maximum number of requests allowed for your account as well as the remaining number of requests in a given 24-hour window.
up
Enable users to identify and resolve common issues preventing the export of Expense reports, Invoices or Timesheets to NetSuite.
When this feature is enabled for the Expense Reports (Expense Reports) , Invoices (Invoices) or Time Entries (Time) workflow:
If an error occurs when OpenAir attempts to export a record to NetSuite, administrators and employees with the relevant role permission can see the last integration error for that record and take any corrective actions within their control. The Last NetSuite integration error field is displayed:
As a read only field on the properties form for Expense reports, Invoices or Timesheets records.
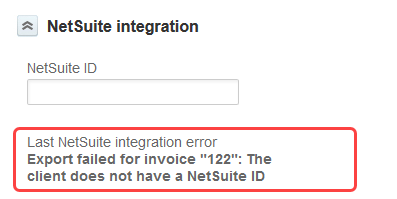
As a column on Timesheets, Expense reports or Invoices list views.
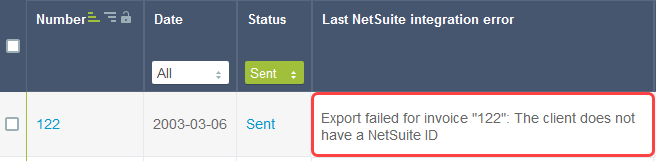
The Last NetSuite integration error field clears automatically as soon as the record exports successfully to NetSuite.
The error message displayed on the properties form or list view is the same as:
The message displayed on screen when running the integration manually.
The message recorded on the integration run log accessible from the Status screen.

You can enable this feature separately for Expense reports, Invoices or Timesheets by enabling the corresponding workflow setting.
Go to Administration > Global settings > Integration: NetSuite > Mapping.
Click the Expense Reports (Expense Reports) , Invoices (Invoices) or Time Entries (Time) workflow.
Click Settings. The workflow settings dialog box appears.
Check the Show last NetSuite integration error on <entity> box.
Click Save.
Note: If you enable Show last NetSuite integration error on <entity> for the first time, OpenAir creates a custom field associated with the relevant entity to store the last NetSuite integration error message.
If you disable Show last NetSuite integration error on <entity>, the record properties form and list view column continue to show the last integration error recorded before you disabled the workflow setting.
You can control who can see integration errors on record properties forms and list views using role permissions.
Go to Administration > Global settings > Role > [Select a role].
Enable any of the following permissions for the role:
Allow employee to view last NetSuite error on expense reports
Allow employee to view last NetSuite error on invoices
Allow employee to view last NetSuite error on timesheets
Click Save.
Note: Allow employee to view last NetSuite error on <entity> role permissions are only available if Show last NetSuite integration error on <entity> is enabled.
If you disable Show last NetSuite integration error on <entity>, employees with the Allow employee to view last NetSuite error on <entity> role permission will continue to see the last integration error recorded before you disabled the workflow setting. To hide the last integration error recorded, you must disable the role permission before disabling the workflow setting.
Select an active administrator as the designated OpenAir integration user and owner of integration runs.
The integration user must be an administrator and an active user.
OpenAir NetSuite Connector will use the selected integration user’s permissions for all scheduled, manual or real-time integration runs.
When the integration creates or updates a record in OpenAir, the audit trail for that record shows the selected integration user as the author of the changes. The audit trail also shows the record was created or updated using the NetSuite integration.
The selected integration user’s permissions are protected — the user cannot be set as inactive and the user’s role cannot be changed.
To set the Integration user, go to Administration > Global settings > Integration: NetSuite > Credentials, select an Integration User from the dropdown options and click Save. Only administrators are listed in the dropdown options.
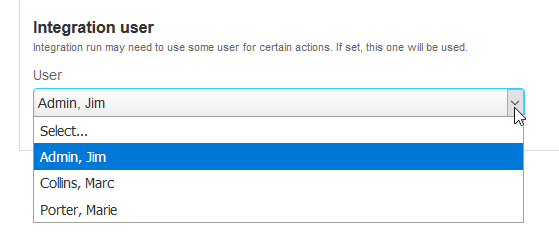
To clear the designated integration user, choose the Select... option from the Integration user dropdown options. When there are no Integration user selected, OpenAir NetSuite Connector reverts back to the default behavior:
The owner of manual integration runs is the user who triggers the integration.
The owner of scheduled or real-time integration runs is the user who set the schedule or real-time integration, if that user record exists, or another administrator otherwise.
The owner of the integration run shows as the author of the changes in OpenAir record audit trails.
Enable your main integrations to run up to four times faster with multi-threading (SuiteCloud Plus is required to enable this feature)
Using curly quotation marks instead of straight quotation marks in advanced mapping and filter definitions can cause the integration workflow to fail.
If there are any invalid quotation marks:
With the Enable Strict mapping validation integration setting enabled, OpenAir will return an error when you attempt to save the mappings.
Using the Tip menu option to Validate mapping will return an error.
Note: Invalid quotation marks can be included accidentally in advanced mapping or filter definitions if you copy them from a word processor, for example, and paste them in OpenAir.
To enforce front-end mapping validation and prevent saving workflow mappings with errors, contact OpenAir Support and ask for the Enable strict mapping validation integration admin setting to be enabled.
Enable your main integrations to run up to four times faster with multi-threading (a valid NetSuite SuiteCloud Plus license is required to enable this feature).
OpenAir NetSuite Connector can now use multiple threads to export records from OpenAir to NetSuite as part of main integration runs.
Until now, if you had the multi-threading support feature enabled for your account, the main integration was limited to a single thread and the real-time export could use any available threads concurrently.
To enable multi-threading support for the main integration, contact OpenAir Support.
OpenAir NetSuite Connector currently allows up to 4 threads to be allocated for main integration runs.
Multi-threading is supported only for export from OpenAir to NetSuite and not for import from NetSuite to OpenAir.
The maximum number of threads which can be allocated overall for the OpenAir <> NetSuite integration is set in the NetSuite integration administration form.
Important: To enable multi-threading support, you must have an active NetSuite SuiteCloud Plus license. NetSuite SuiteCloud Plus allows up to 10 threads to be allocated concurrently for communication with NetSuite web services.
If you do not have an active NetSuite SuiteCloud Plus, the OpenAir NetSuite integration is limited to a single thread communication with NetSuite web services at all time.

Enable your revenue recognition exports to run up to two times faster by exporting recognition transaction records in batches to NetSuite.
The feature lets you integrate OpenAir revenue recognition transactions to NetSuite recognition transaction in batches instead of one by one. The maximum batch size is 100 records. The feature will significantly reduce the run time of the Recognition Transactions (Revenue Recognition Transactions) workflow if you export large numbers of journal entries to NetSuite.
In OpenAir, go to Administration > Global Settings > Integration : NetSuite > Mapping
Click the Recognition Transactions (Revenue Recognition Transactions) workflow.
Click Settings.
Enter the required value for the NetSuite recognition transaction batch size (maximum of 100).
Click Save.
![]()
Important: If you have scripts running when records are created in your NetSuite account, reduce the batch size to avoid your scripts timing out. Test this feature in your sandbox account to determine the best batch size for your NetSuite customizations.
Speed up any integration workflow importing hierarchies from NetSuite.
If this feature is enabled, NetSuite Connector imports only the hierarchies created or updated since the last integration run instead of importing all hierarchies with each integration run. The feature will significantly reduce the run time of any integration workflow importing large numbers of hierarchies from NetSuite.
In NetSuite, upgrade the OpenAir Integration bundle (Bundle 2851) to Version 2.05.
In OpenAir, go to Administration > Global Settings > Integration : NetSuite and click the Synchronize NetSuite custom fields from the Tips menu.
Run the integration. The first integration run will import all hierarchies from NetSuite. Subsequent integration runs will use the custom timestamp to import only new and updated hierarchies.
A new integration setting lets you export purchase charges to NetSuite as Service items instead of Product items when rebilling NetSuite vendor bills using OpenAir.
If the Disable vendor bill linkage on invoices in NetSuite integration integration setting is enabled, purchase charges are integrated to the Items subtab on the NetSuite invoice when rebilling NetSuite vendor bills using OpenAir and exporting the OpenAir invoice to NetSuite. By default, the item on the NetSuite invoice shows as the purchase item in OpenAir.
The new integration setting — Use Service item instead of Product item during invoices export for purchase charges — tells the NetSuite <> OpenAir integration to show the item on the NetSuite invoice as the Service instead of the purchase item, if a Service is specified for the charge in OpenAir.
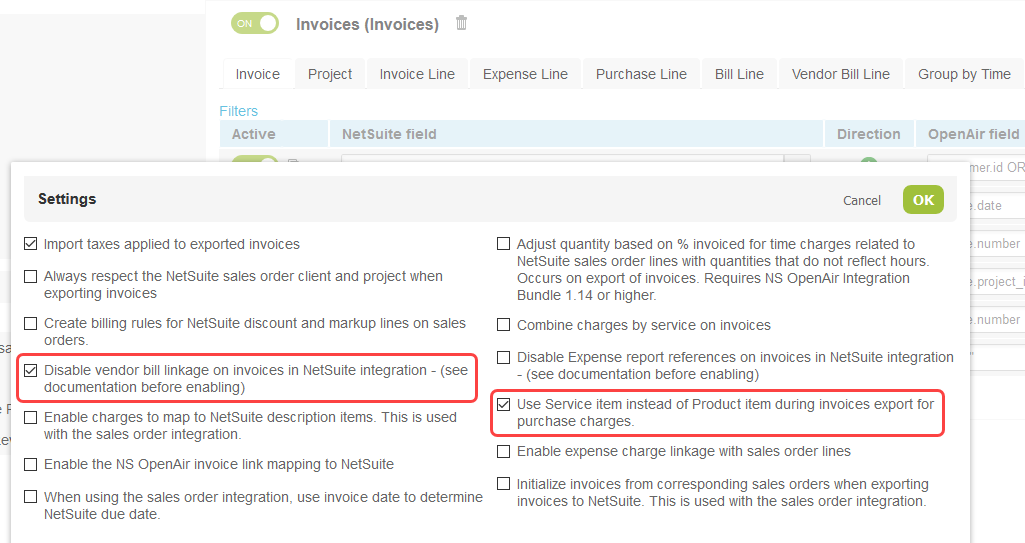
Go to Administration > Global Settings > Integration : NetSuite
In the NetSuite Connector user interface, click Mapping then Invoices (Invoices) to view the mapping for the Invoices (Invoices) workflow.
Click the Settings link and check the following boxes:
Disable vendor bill linkage on invoices in NetSuite integration - (see documentation before enabling)
Use Service item instead of Product item during invoices export for purchase charges
Click Save
The NetSuite Connector administration screen is accessible from the main navigation menu when Redesigned OpenAir User Experience Phase 3 is enabled.
The direct link replaces the Integration: NetSuite link in Administration > Global settings.
To access the NetSuite Connector administration screen:
If Redesigned OpenAir User Experience Phase 3 is not enabled — Go to Administration > Global Settings > Integration : NetSuite
If Redesigned OpenAir User Experience Phase 3 is enabled — Go to Administration > NetSuite Connector — You can access the NetSuite Connector from the Administration in-Module screen navigation menu.
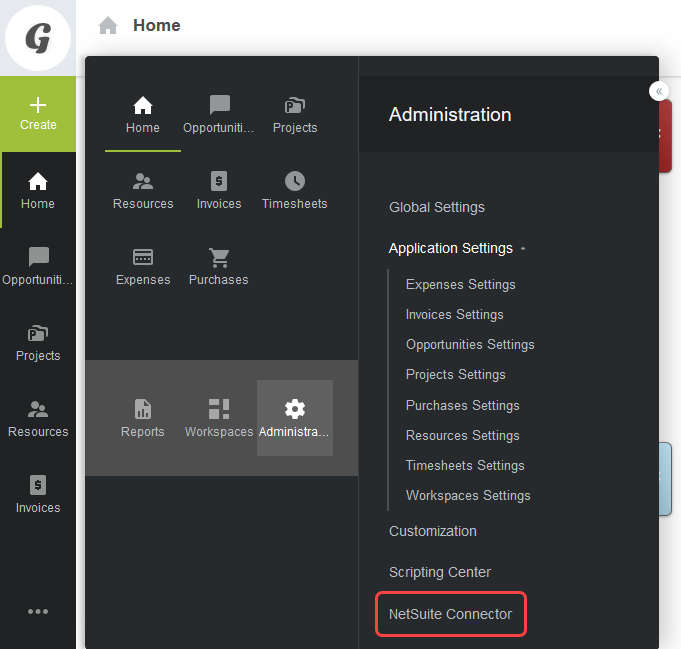
Note: To enable Redesigned OpenAir User Experience Phase 3 for your account, contact OpenAir Support.
upAdd, update and approve time entries swiftly on your iPhone or Android mobile device.
Note: OpenAir Mobile 3.0 is coming soon. It will be released for iPhone first, followed by the Android version later on. OpenAir Mobile users will be informed of the new release through the App store (iPhone) and Google Play store (Android).
To keep informed about changes introduced in between releases, visit OpenAir Help Center > What’s New > Release Notes > OpenAir Interim Enhancements from time to time.
To watch a video preview of the new OpenAir Mobile features, visit OA: 2020.1 New Feature Preview - Mobile Applications Short Videos in OpenAir SuiteAnswers (Answer ID: 91656).
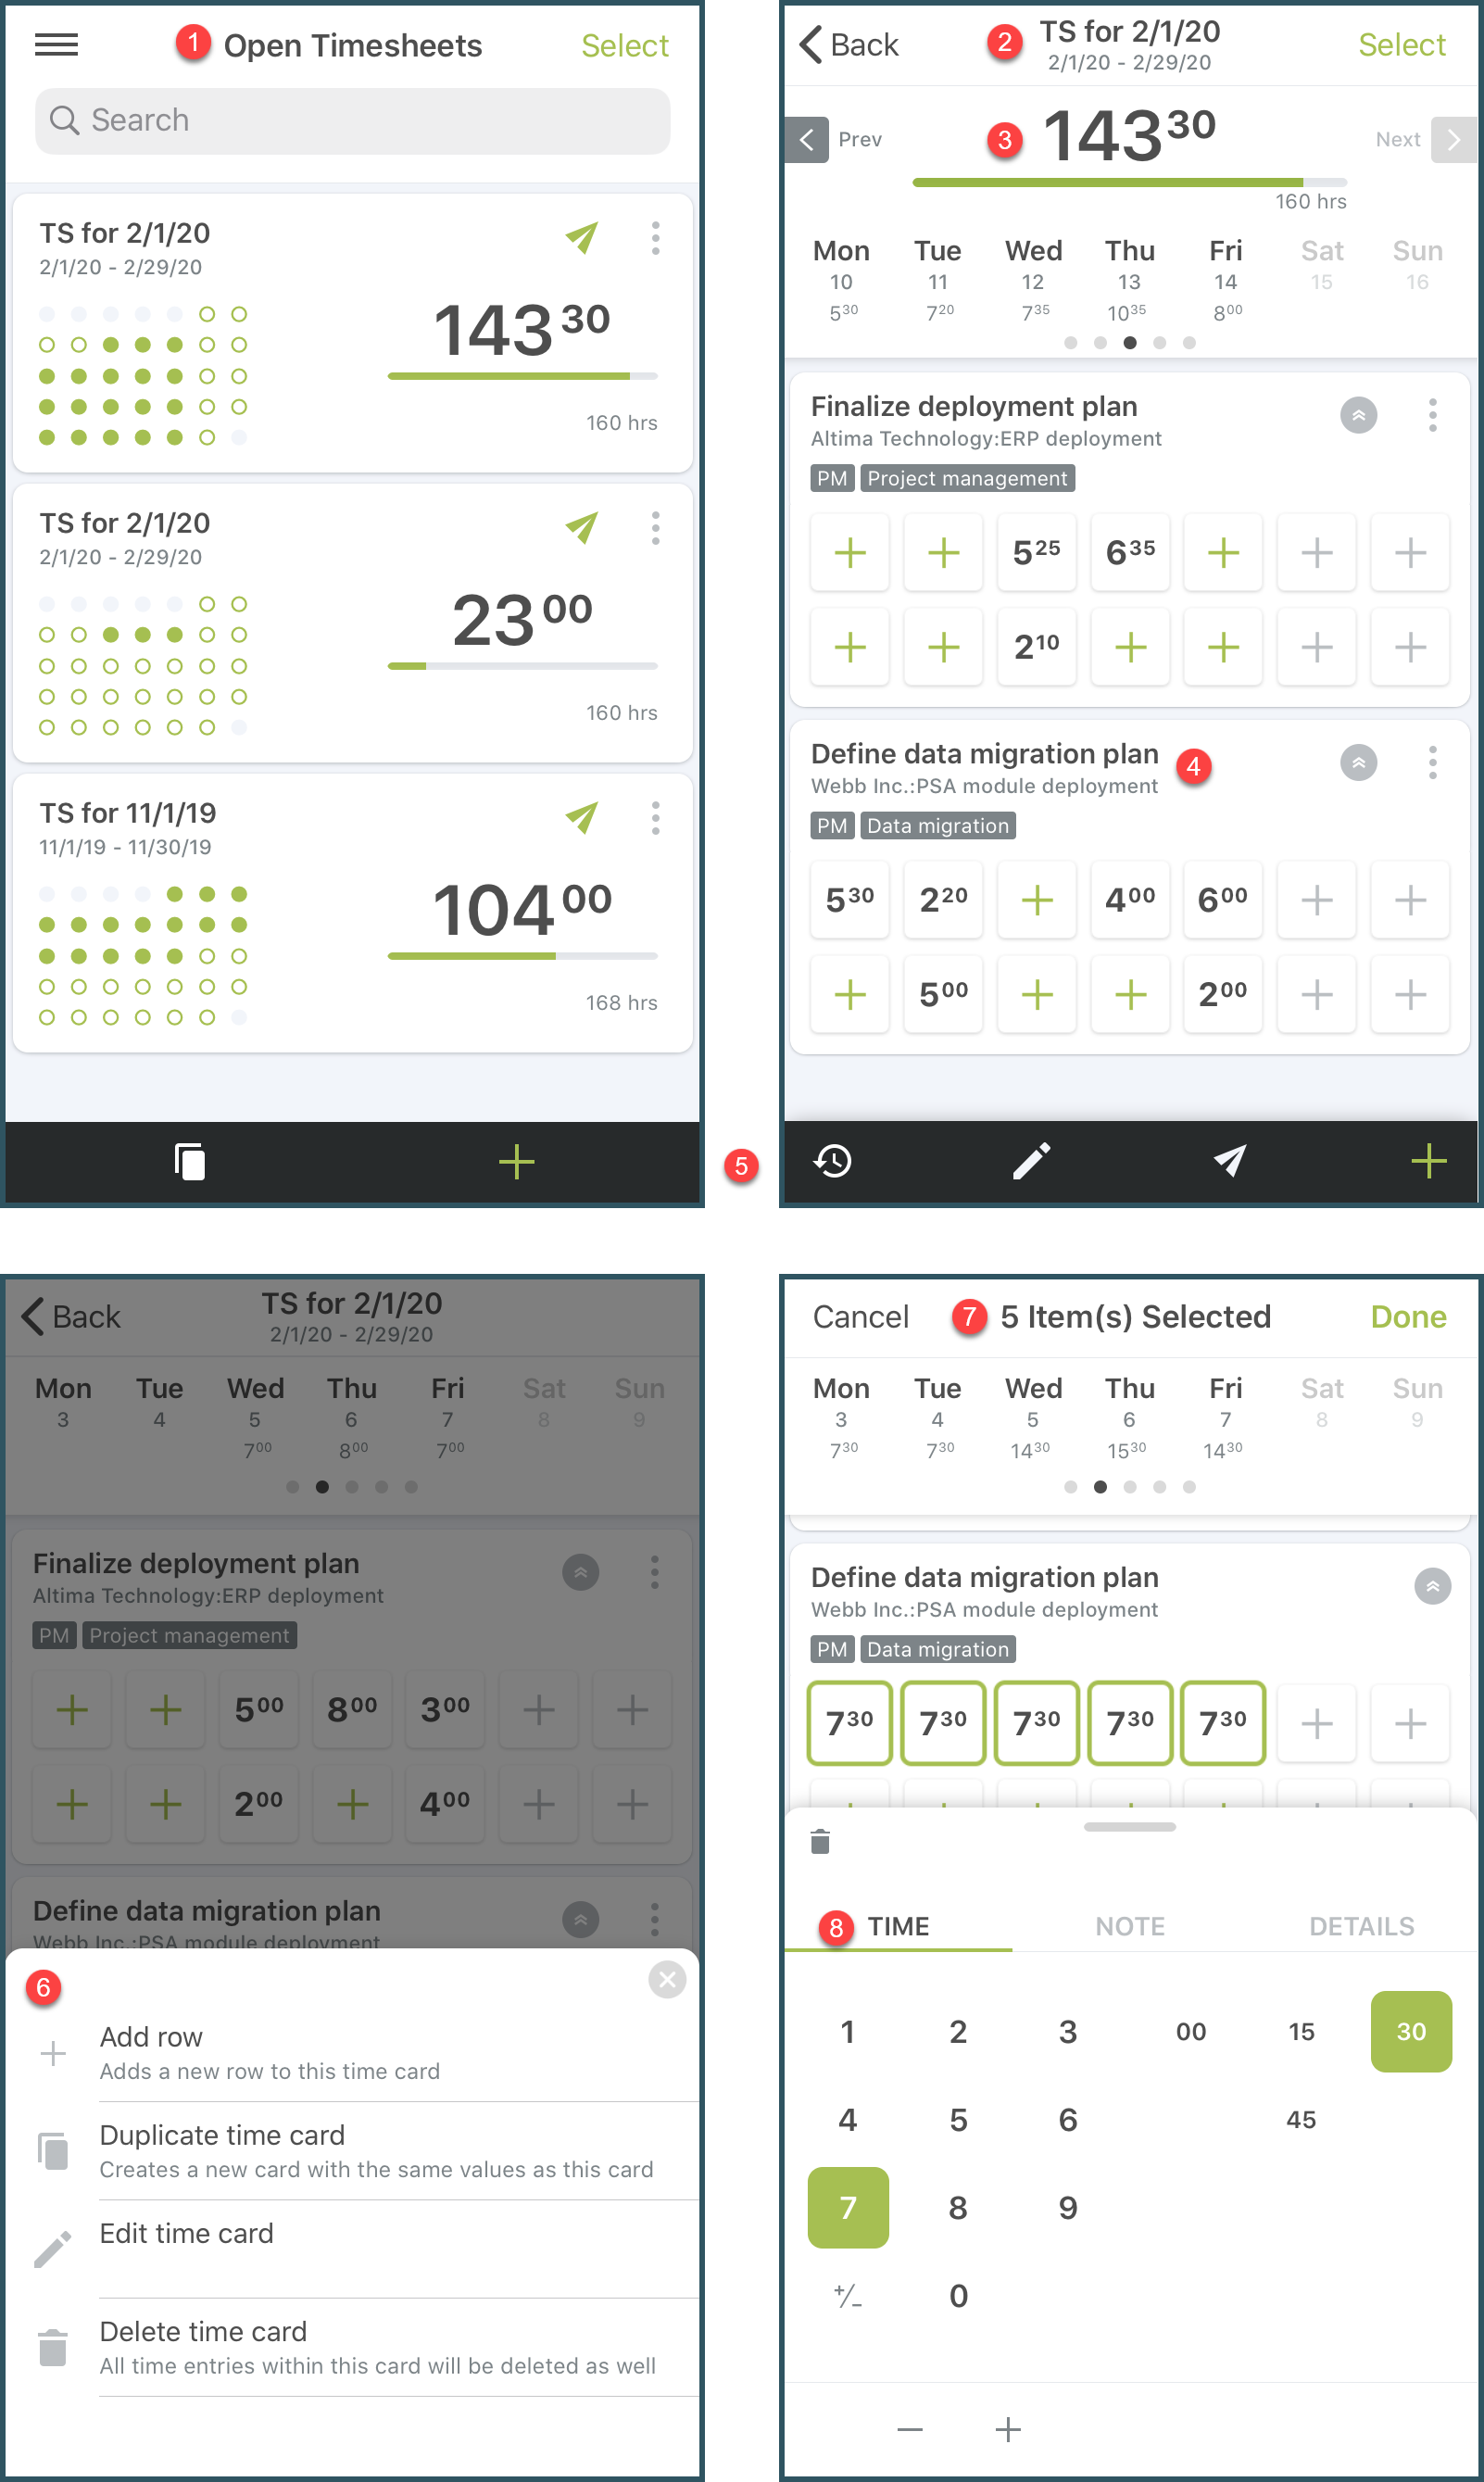
OpenAir Mobile version 3.0 redefines the way you work with Timesheets with an intuitive new design.
View time entries at a glance in list views  and timesheets
  .
.
Scroll easily through your time entries with timesheets and week navigation  .
.
All time entries associated to a specific project or task are grouped under the same time card. Badges under the task name indicate additional information such as Service or Job code  .
.
All actions are at your fingertip, using the toolbar at the bottom of the screen  or contextual menus
  .
.
Tap a cell in the time card to add or edit a single time entry.
Add or edit multiple time entries in one go using the bulk edit functionality  and a simple time picker.
Check your timesheet errors in the new History view. Most error notifications show in the History view instead of popups.
OpenAir Mobile 3.0 optimizes the layout for higher screen resolutions and improves data synchronization with your OpenAir account.
OpenAir Mobile for Android Version 2.3.2 and OpenAir Mobile for iPhone Version 2.6.7 add support for account-specific domains in preparation for the upcoming migration to Oracle Cloud Infrastructure (OCI).
The October 2019 release of OpenAir introduced the Account-Specific Domains feature to support our Upcoming move to OCI — see October 2019 OpenAir Release Notes. OpenAir Mobile users must update the application to the latest version to ensure a seamless experience. OpenAir Mobile for Android Version 2.3.2 and higher and OpenAir Mobile for iPhone Version 2.6.7 and higher will use the correct domain automatically. Users do not need to change their connection settings to continue using OpenAir Mobile after the Account-Specific Domains is enabled and the account migration to OCI.
OpenAir Integration Manager 6.3.1 adds support for Intuit QuickBooks 2020 (20.0 ENT).
OpenAir Outlook Connector 2.3 includes a security update.
OpenAir OffLine 3.4 includes a security update.
upOpenAir sends a lockout notification email to the locked employee when the number of failed login attempts exceeds the maximum permitted.
Locked employees no longer see the “locked user” on-screen error message on the OpenAir login screen. The error message is the same whether the employee credentials are invalid or the employee is locked out of OpenAir.
By default, OpenAir sends a lockout notification email to the employee being locked.
Note: Lockout notification email can be disabled for your account. To stop OpenAir sending lockout notification email to employees being locked, contact OpenAir Support.
At a future date, OpenAir will validate new passwords against a list of known compromised passwords when an employee attempts to change password.
OpenAir will not allow any known compromised password. This is not applicable for temporary passwords set by administrators.
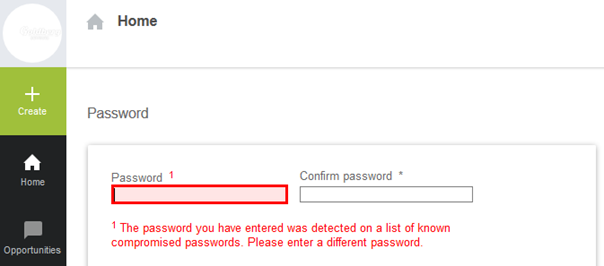
Note: This feature will be released at a future date. To keep informed about changes introduced in between releases, visit OpenAir Help Center > What’s New > Release Notes > OpenAir Interim Enhancements from time to time.
upUsage of custom remote ports in the Automatic Backup Service will be deprecated at a future date to be determined and announced in advance.
If you have entered a custom port before April 1, 2020, it will be supported until the deprecation date (to be determined). However, custom ports entered after March 31, 2020 will not be supported.
All OpenAir accounts in all environments now use account-specific domains.
Important: You must update all connections to your Production OpenAir account to use the account-specific domain before the migration of your account to OCI. Until then, OpenAir continues to support both the generic domain www.openair.com and account-specific domains for integrations and add-on services on Production.
The URL for OpenAir services includes the domain for your OpenAir account <account-domain>. It may also include the specific path for the OpenAir service you are accessing <service-path>.
https://<account-domain>/<service-path>
Account-specific domains contain a unique account identifier <company-id> as part of the domain name. The account identifier is typically based on your OpenAir Company ID.
Account-specific domains depend on the account type:
Production account-specific domain: <company-id>.app.openair.com
Sandbox account-specific domain: <company-id>.app.sandbox.openair.com
Demo account-specific domain: <company-id>.app.demo.openair.com
The following table lists URLs used for account integrations and add-on services:
|
Integration / Service |
URL |
|---|---|
|
OpenAir OData feed — reports OpenAir OData feed — list views |
https://<account-domain>/odata/v4/reports/ https://<account-domain>/odata/v4/listviews/ |
|
OpenAir SOAP API requests |
https://<account-domain>/soap |
|
OpenAir XML API requests |
https://<account-domain>/api.pl |
|
NetSuite Single Sign-on (SuiteSignOn) NetSuite<>OpenAir real-time integration SuiteSignOn record |
https://<account-domain>/netsuite.pl |
|
SAML Single Sign-on |
See Identity Authentication Service Enabled in All OpenAir Environments |
|
OpenAir Exchange Manager OpenAir Integration Manager OpenAir Integration Manager shortcuts OpenAir OffLine OpenAir Outlook Connector OpenAir Project Connector |
https://<account-domain> |
Note: OpenAir Mobile users do not need to update their connection settings on the app if OpenAir Mobile 2.3.2 (Android), 2.6.7 (iPhone) or a later version is installed on their device.
The new identity authentication service is available for all OpenAir accounts in all environments.
Important: If SAML Single Sign-on is enabled on your Production account, you will need to update the configuration of your Identity Provider to use the SAML metadata and endpoint for the new identity authentication service before the migration to OCI.
After the new identity authentication service is enabled:
Users navigating to https://www.openair.com/index.pl for authentication will be redirected automatically to https://auth.openair.com/login
Users will enter their usual credentials on this new login page
Users will be redirected into the OpenAir application upon successful authentication
Users who utilize password managers may need to update the password manager for the new login URL https://auth.openair.com/login
Note: After your Identity Provider is updated to use the new endpoint, users accessing OpenAir with Single Sign-on should navigate to https://auth.openair.com/logon_sso or click the SSO users can login here link on the OpenAir login page.
Until your Identity Provider is updated to use the new endpoint, users accessing OpenAir with Single Sign-on should navigate to https://www.openair.com/index.pl?_sso=1 or click the Legacy SSO users can login here link on the OpenAir login page.
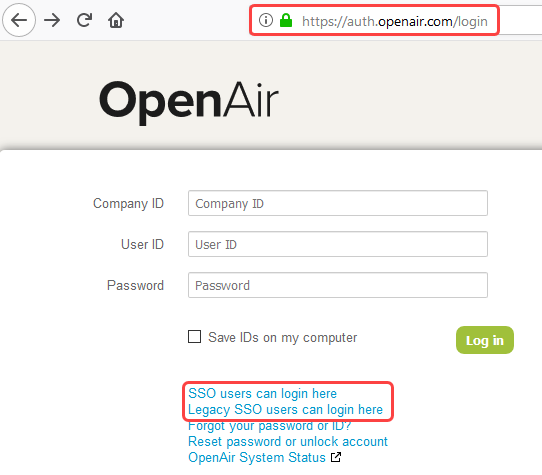
The SAML metadata and callback endpoint URLs for the new OpenAir identity authentication service depend on the account type:
Production account:
Download or import the SAML metadata from https://auth.openair.com/sso/metadata.
SAML endpoint — https://auth.openair.com/sso
Sandbox account:
Download or import the SAML metadata from https://auth.sandbox.openair.com/sso/metadata.
SAML endpoint — https://auth.sandbox.openair.com/sso
Demo account:
Download or import the SAML metadata from https://auth.demo.openair.com/sso/metadata.
SAML endpoint — https://auth.demo.openair.com/sso
Note: After the new identity authentication service is enabled, a new section in the SAML integration settings form lets you compare the Active settings for the identity authentication service with the SAML configuration for your account. If these settings do not match, an error message appears when you go to Administration > Global settings > Integration: SAML Single Sign-On, and setting mismatches are highlighted on the form. To synchronize the settings and update the identity authentication service data, click Save on the SAML integration form.
For more information on updating your SAML Identity Provider configuration, see OpenAir SAML 2 Quick Start Guide. Contact your SAML provider for specific instructions.
The use of OpenAir IP addresses to access or manage access to any OpenAir services is no longer supported. The IP addresses of OpenAir services may change at any time without notice.
The following domains must be whitelisted for emails and Automatic Backup Service (if you leverage this feature):
openair.com
outbound1.openair.com
outbound2.openair.com
relay.openair.com
system.openair.com
The account-specific domain for your account (see Account-Specific Domains Enabled for All OpenAir Accounts)
You can also add a Sender Policy Framework (SPF) record to your mail server to authorize OpenAir to send emails that use your domain name. For more information, see the OpenAir SuiteAnswers article “OpenAir's Sender Policy Framework (SPF) Record” (Answer ID: 18737).
OpenAir completed the full migration of the Sandbox environment to Oracle Cloud Infrastructure (OCI) on January 25, 2020.
The changes announced in the October 2019 OpenAir Release Notes apply to all Sandbox accounts.
You must update all connections to your Sandbox OpenAir account to use the account-specific domain. See Account-Specific Domains Enabled for All OpenAir Accounts.
Use domain names instead of IP addresses for whitelisting and SPF records. See Whitelisting by Domain.
If your Sandbox account is integrated with SAML, you must import the metadata from https://auth.sandbox.openair.com/sso/metadata. See Identity Authentication Service Enabled in All OpenAir Environments.
Note: Please perform some testing on your Sandbox account prior to the migration of your Production account. Primary testing should involve accessing your account using any mechanisms and features you use today in your sandbox or production account. Other business critical functions can also be tested. If you encounter any issues, please contact OpenAir Support.
up